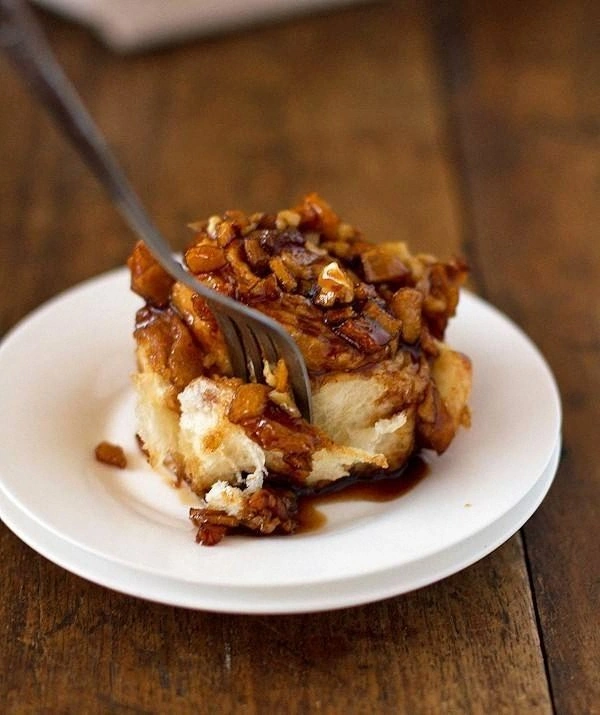
I was standing in my kitchen, mid‑Monday, when a frantic text from my roommate demanded “something sweet, now!” I stared at the half‑finished batch of cinnamon rolls on the counter, feeling the panic rise like dough in a warm oven. The air was already thick with butter and sugar, but something was missing – a deep, buttery caramel that could turn a simple breakfast into a dessert‑level indulgence. I grabbed an apple, a handful of walnuts, and a jar of caramel, and the next hour became a whirlwind of whisked eggs, melted butter, and the kind of aroma that makes strangers peek through the door. Most recipes I’ve tried either drown the apples in syrup or forget the crunch that walnuts bring, leaving a soggy disappointment that clings to the plate. This version, however, layers caramel, crisp apple slices, and toasted walnuts between buttery, yeasted dough, creating a symphony of textures that dance on the tongue.
Picture this: the moment you pull the tray from the oven, the tops are a golden‑brown crown, the caramel glistening like a sunrise over a mountain of fruit, and the scent of warm apples and toasted nuts floods the kitchen, making you want to inhale forever. The first bite is a buttery crunch that gives way to a soft, pillowy interior, while the caramel drips down the sides, coating every crumb in silky sweetness. I dare you to taste this and not go back for seconds – it’s practically a love‑letter to your taste buds. The secret? A splash of vanilla in the dough and a quick caramel glaze that sets just enough to stay glossy but not hard, giving you that perfect “chewy‑on‑the‑outside, melt‑in‑your‑mouth” experience. If you’ve ever struggled with rolls that turn out flat or dry, you’re not alone – this recipe fixes that with a few clever tweaks.
Most recipes get this completely wrong. They either over‑sweeten the caramel, use too much fruit, or skip the crucial rest period that lets the gluten relax and the flavors meld. Here’s what actually works: a short, gentle rise for the dough, a caramel glaze applied while the rolls are still warm, and a final bake at a slightly lower temperature to keep the interior moist. I’ll be honest — I ate half the batch before anyone else got to try it, and the leftovers still tasted like they’d just been pulled from the oven. The result is a roll that’s both elegant enough for a brunch spread and comforting enough for a lazy Sunday morning.
Okay, ready for the game‑changer? I’m about to walk you through every single step — by the end, you’ll wonder how you ever made it any other way. From the moment you whisk the first egg to the final drizzle of caramel, I’ll be right there with you, sharing the exact temperatures, timings, and sensory cues you need to nail this masterpiece. Stay with me here — this is worth it, and the payoff is a batch of caramel‑kissed apple rolls that will have everyone asking for the recipe.
What Makes This Version Stand Out
- Taste: The caramel adds a buttery, deep sweetness that perfectly balances the tart apples and earthy walnuts, creating a harmonious flavor profile.
- Texture: A crisp, caramelized exterior gives way to a soft, airy crumb, while the apple slices stay tender yet distinct.
- Simplicity: Only a handful of pantry staples plus fresh fruit and nuts, yet the technique feels restaurant‑grade.
- Uniqueness: The caramel glaze is applied hot, allowing it to seep into the roll’s crevices, a step most recipes skip.
- Crowd Reaction: Guests instantly gravitate to the glossy tops, and the aroma alone sparks a chorus of “Mmm!” before the first bite.
- Ingredient Quality: Using firm, tart apples and toasted walnuts elevates the dish from ordinary to unforgettable.
- Make‑Ahead Potential: The dough can be pre‑shaped and refrigerated overnight, and the caramel glaze reheats beautifully.
Inside the Ingredient List
The Flavor Base
Flour is the structural backbone; I use all‑purpose flour for its balanced protein content, which gives the rolls that perfect rise without becoming too chewy. If you swap in bread flour, expect a denser crumb, while cake flour will make them overly tender and likely collapse. The sugar not only sweetens but also feeds the yeast, accelerating the rise and adding a subtle caramel note.
Instant yeast is my go‑to because it dissolves quickly and works at room temperature, cutting down proofing time. If you only have active dry yeast, dissolve it in the warm milk for 5 minutes – the extra step is worth the lift. Salt is the unsung hero; it tones down the sweetness and strengthens the gluten network, ensuring the rolls hold their shape.
The Texture Crew
Warm milk hydrates the flour and activates the yeast, creating a tender crumb. For a richer flavor, you can substitute half the milk with heavy cream, but keep the temperature around 110°F to avoid killing the yeast. Melted butter adds richness and a silky mouthfeel; if you’re dairy‑free, coconut oil works but will impart a faint coconut flavor.
The egg acts as a binder and adds color to the crust. Be sure it’s at room temperature; a cold egg can shock the dough and stall the rise. A pinch of vanilla extract deepens the flavor profile, making the caramel taste even more luxurious.
The Unexpected Star
Apples bring natural sweetness and a gentle acidity that cuts through the caramel’s richness. I recommend a firm variety like Honeycrisp or Granny Smith for texture; softer apples turn mushy during baking. Slice them thinly – about 1/8 inch – so they soften quickly yet retain a slight bite.
Walnuts add a crunchy contrast and a buttery, earthy note that pairs beautifully with caramel. Toast them lightly in a dry skillet for 3‑4 minutes to unlock their full flavor; this step is non‑negotiable for the best taste.
The Final Flourish
Caramel sauce is the star glaze; a good quality store‑bought caramel works, but homemade caramel (sugar, butter, cream, a pinch of sea salt) elevates the dish to gourmet status. The cinnamon adds warmth and ties the apple flavor together – don’t skimp on it.
A dash of extra sugar on top before baking creates a glossy, slightly crunchy crust that crackles when you bite into it. If you’re watching sugar, reduce the sprinkle by half – the rolls will still be sweet enough thanks to the caramel.
Everything's prepped? Good. Let's get into the real action…
The Method — Step by Step
In a large mixing bowl, whisk together 2 cups flour, 1/4 cup sugar, 1 tsp instant yeast, and 1/2 tsp salt. The dry mixture should look uniform, with the yeast evenly distributed – this is the foundation that ensures a consistent rise.
Watch out: If any clumps remain, sift the flour once more; clumps can create pockets of dense dough later.
In a separate bowl, combine 1/2 cup warm milk (110°F), 1/4 cup melted butter, 1 large egg, and 1 tsp vanilla extract. Beat until the mixture is smooth and slightly frothy; the warmth will gently activate the yeast without killing it.
Pour the wet ingredients into the dry bowl and stir with a wooden spoon until a shaggy dough forms. It will look sticky at first – that’s a good sign. Turn the dough onto a lightly floured surface and knead for about 8‑10 minutes until it becomes smooth, elastic, and no longer sticks to your hands.
Kitchen Hack: Use a stand mixer with the dough hook for 5 minutes; it saves your back and gives a consistent knead.Form the dough into a ball, place it in a lightly oiled bowl, cover with plastic wrap, and let it rise in a warm spot for 1 hour, or until doubled in size. You’ll know it’s ready when the dough feels puffy and the surface looks slightly domed.
While the dough is rising, prepare the filling: toss the thin apple slices with 1 tsp cinnamon and a drizzle of the caramel sauce. This coating prevents the apples from drying out and infuses them with spice.
Quick tip: If the apple slices release too much juice, pat them dry with a paper towel before adding to the dough.
Once risen, punch down the dough gently, then roll it out on a floured surface into a 12×8‑inch rectangle, about 1/2‑inch thick. The surface should be smooth, not tearing.
Spread the remaining caramel sauce evenly across the dough, then layer the apple slices and sprinkle the toasted walnuts over the top.
Starting from the long edge, roll the dough tightly into a log, sealing the seam with a pinch. Cut the log into 12 equal pieces using a sharp serrated knife; each piece should be about 1‑inch thick.
Arrange the rolls in a greased 9×13‑inch baking dish, leaving a little space between each. Cover loosely with a clean kitchen towel and let them proof for another 30 minutes – they should puff up noticeably.
Watch Out: Over‑proofing will cause the rolls to collapse during baking; set a timer and don’t let them sit longer than 35 minutes.Preheat the oven to 350°F (175°C). Bake the rolls for 20‑25 minutes, or until the tops are a deep golden‑brown and the caramel is bubbling at the edges. The scent will fill the kitchen, and you’ll see the caramel turning glossy – that’s the moment of truth.
When they’re done, remove from the oven and let them sit for 5 minutes before drizzling the remaining caramel sauce over the warm rolls for an extra glossy finish.
That's it — you did it. But hold on, I've got a few more tricks that'll take this to another level…
Insider Tricks for Flawless Results
The Temperature Rule Nobody Follows
Never bake with a cold oven; always preheat fully to 350°F and let the oven stabilize for at least 10 minutes. This ensures the rolls rise evenly and the caramel sets without burning. I once tried a “quick bake” at 375°F and the tops browned too fast, leaving the interior undercooked. Trust the thermostat – consistency is king.
Why Your Nose Knows Best
When the caramel starts to bubble and you catch that buttery, nutty aroma, you’re within two minutes of perfection. The scent is a reliable cue that the sugars have caramelized just right. If you rely solely on timers, you might miss that subtle shift from sweet to slightly nutty.
The 5‑Minute Rest That Changes Everything
After baking, let the rolls rest uncovered for five minutes before glazing. This brief pause lets the steam settle, preventing the caramel from seeping into the pan and making the tops soggy. A friend once skipped this step and ended up with a gummy glaze; don’t be that person.
The Walnut Toast Trick
Toast walnuts in a dry skillet over medium heat until they turn fragrant and lightly golden. This not only adds crunch but also releases natural oils that mingle with the caramel, creating a richer flavor. If you’re in a hurry, a quick 2‑minute toast in the oven at 350°F works too.
The Caramel Consistency Secret
If your caramel is too thick, whisk in a tablespoon of warm milk until it flows like liquid amber. Too thin? Add a splash of heavy cream and a pinch of sea salt. The right consistency ensures the glaze spreads evenly without pooling.
Creative Twists and Variations
This recipe is a playground. Here are some of my favorite ways to switch things up:
Maple‑Brown Sugar Delight
Swap half the granulated sugar for brown sugar and replace the caramel glaze with pure maple syrup. The result is a deeper, earthy sweetness that pairs wonderfully with the apples.
Cranberry‑Pecan Burst
Add a handful of dried cranberries to the apple layer and substitute walnuts with toasted pecans. The tart cranberries cut through the caramel, offering a bright contrast.
Chocolate‑Swirl Surprise
Drizzle a thin ribbon of melted dark chocolate over the caramel glaze before serving. The bitterness of chocolate balances the sweet caramel, turning the rolls into a dessert‑grade treat.
Spiced Pumpkin Autumn
Incorporate 1/4 cup pumpkin puree into the dough and sprinkle pumpkin pie spice with the cinnamon. This version shines in fall, especially when paired with a dollop of whipped cream.
Savory Cheese & Herb
Omit the caramel and apples, and instead fold in shredded sharp cheddar, fresh rosemary, and a pinch of cracked black pepper. The rolls become a perfect accompaniment to soups or salads.
Storing and Bringing It Back to Life
Fridge Storage
Place cooled rolls in an airtight container and store in the refrigerator for up to 4 days. The caramel may thicken; simply reheat each roll in a microwave for 15‑20 seconds, and the softness returns.
Freezer Friendly
Wrap each roll individually in plastic wrap, then place them in a freezer‑safe bag. They’ll keep for up to 2 months. To serve, thaw overnight in the fridge, then warm in a 325°F oven for 10 minutes, adding a splash of water to the pan to revive the caramel glaze.
Best Reheating Method
For the ultimate texture, reheat in a preheated 300°F oven for 8‑10 minutes, covering the tray loosely with foil for the first 5 minutes to prevent over‑browning. Adding a tiny splash of water to the bottom of the pan creates steam that restores the roll’s interior fluffiness while keeping the caramel glossy.