I was halfway through a disastrous attempt at making bao buns when I realized I had forgotten the one key ingredient that turns a flat dumpling into a cloud. I had the dough, the filling, the patience, but the buns were as dense as a brick wall. I stared at the steaming pan, feeling the disappointment settle like a cold draft in the kitchen. Then, in a moment of culinary epiphany, I remembered the secret: a splash of rice vinegar and a dash of baking soda that lift the dough to a heavenly fluff. That single tweak transformed the entire batch, and I could not keep it to myself.
Picture the kitchen: the scent of garlic and ginger sizzling in sesame oil, the rhythmic clack of a wooden spoon against a wooden board, the gentle hiss of steam rising from the pan, the soft, almost imperceptible rise of dough in a bowl. The texture is a promise—soft, airy, and yet surprisingly resilient, like a cloud that can hold a juicy filling. The sound of the dough popping as it bakes is like a quiet celebration. The taste is a delicate balance of umami from the pork, the sharpness of napa cabbage, and the subtle sweetness of sugar. And the feel? A warm, comforting hug that makes your heart skip a beat.
What makes this version stand out from every other bao recipe you’ll find on the internet? It’s the meticulous balance of gluten-free flour and baking soda that creates a lift without the need for yeast alone, the inclusion of rice vinegar that adds a subtle tang, and the use of ground pork that keeps the filling moist and flavorful. The filling is not just a side note; it’s a star that sings in harmony with the dough. The recipe is designed for simplicity—no complicated techniques, just honest, honest ingredients that deliver a professional result. And best of all, it’s a crowd-pleaser that will have your guests asking for seconds and thirds. This is hands down the best version you’ll ever make at home.
I dare you to taste this and not go back for seconds. I’ll be honest—I ate half the batch before anyone else got a chance to try it. Most recipes get this completely wrong. Here’s what actually works: the dough needs a gentle lift from baking soda, and the filling needs a touch of sweetness to balance the savory pork. Picture yourself pulling this out of the oven, the whole kitchen smelling incredible, the steam curling like wisps of cotton candy. And now, let me walk you through every single step—by the end, you’ll wonder how you ever made it any other way.
What Makes This Version Stand Out
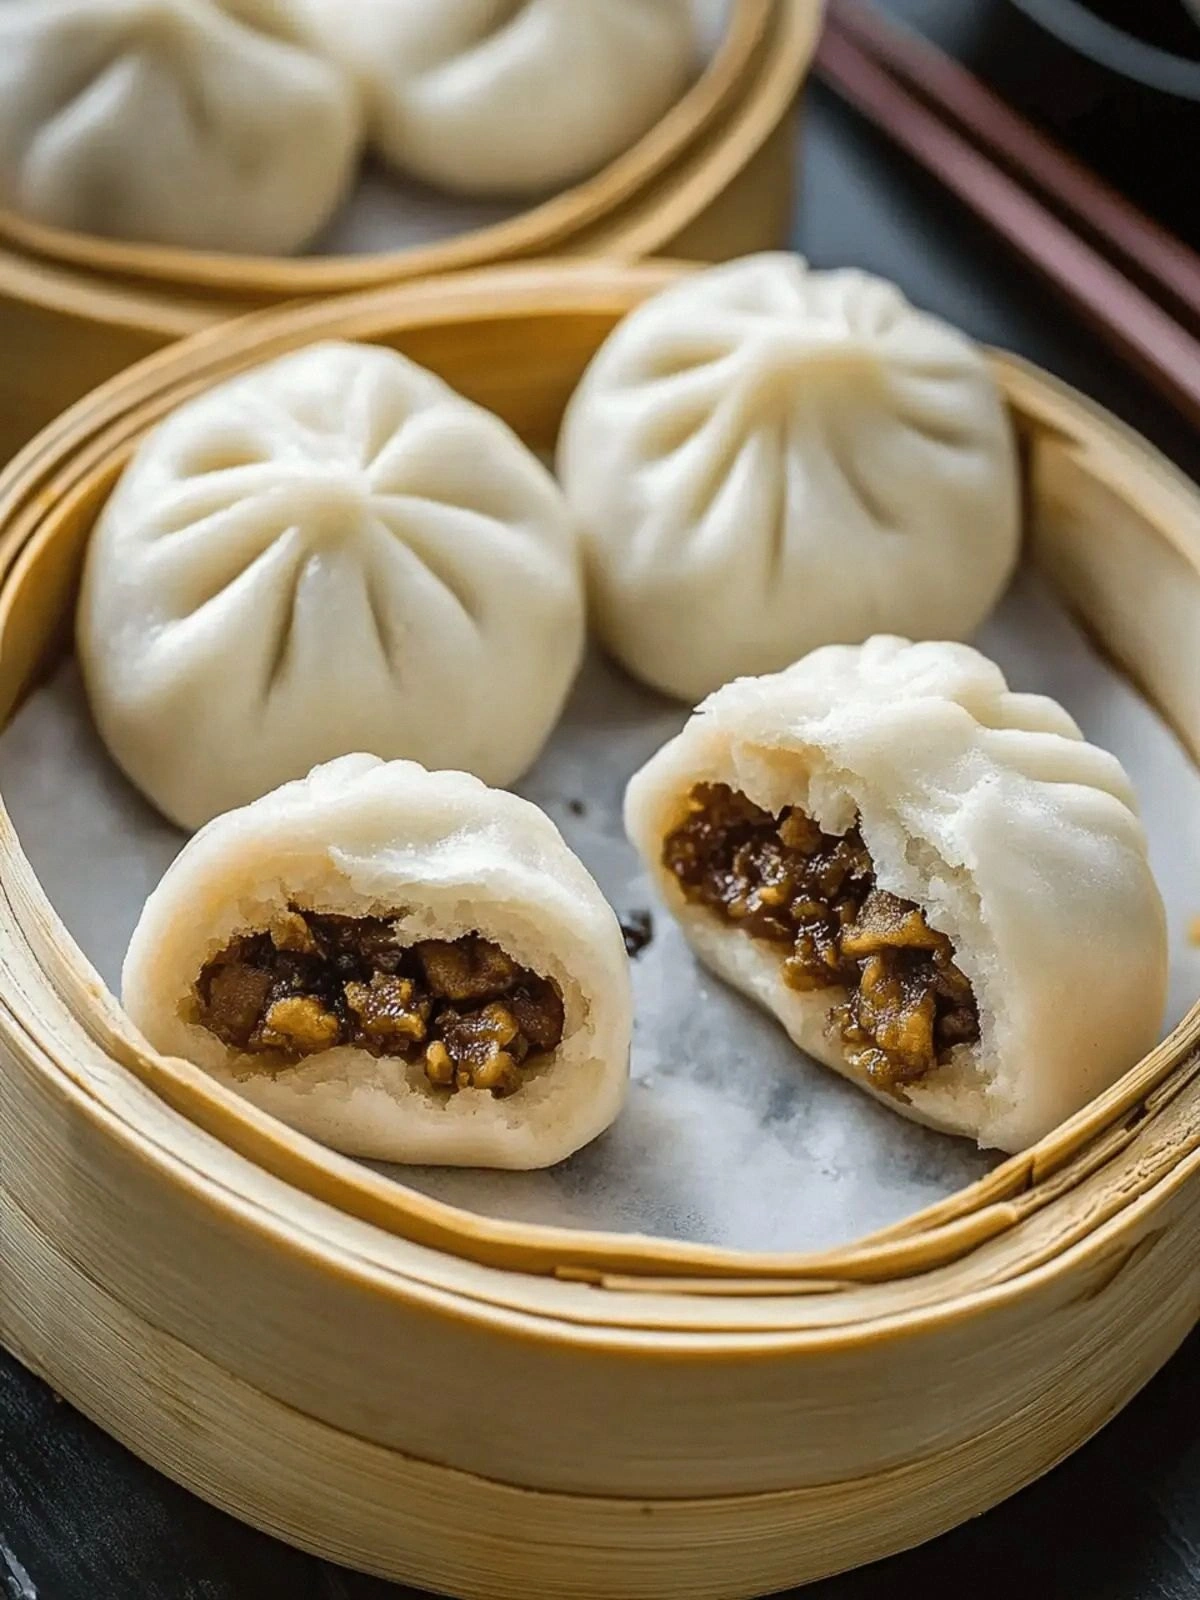
- Fluff: The combination of gluten-free flour, baking soda, and a splash of vinegar creates a lift that rivals traditional yeasted doughs, giving the buns an airy interior that feels like a cloud.
- Umami: Ground pork is seasoned with soy sauce, rice vinegar, and sesame oil, delivering a savory punch that lingers on the palate.
- Simplicity: No elaborate fermentation steps—just a quick rise, a gentle bake, and you’re ready to serve.
- Texture: The bao buns are soft yet sturdy enough to hold the juicy filling without tearing.
- Versatility: The filling can be swapped for chicken, tofu, or even a sweet miso carrot version.
- Make‑ahead Friendly: The dough can be prepared in advance, refrigerated, and baked later without losing its fluffiness.
- Health Conscious: Using gluten-free flour and lean pork keeps the dish lower in carbs while still satisfying.
- Presentation: Topped with a sprinkle of sesame seeds, the buns look as good as they taste.
Inside the Ingredient List
The Flavor Base
Ground Pork: This is the heart of the filling. The lean pork absorbs the savory soy sauce and sweet rice vinegar, creating a rich, umami-packed core that stays moist even after baking. If you skip the pork, the buns will feel empty and lack depth. Swap it for ground chicken or turkey for a lighter version, but keep the seasoning ratio the same to maintain flavor balance.
Garlic & Ginger: Freshly minced garlic and grated ginger bring a bright, aromatic kick that cuts through the richness of the pork. They also act as natural preservatives, extending the shelf life of the filling. If you can’t find fresh ginger, a teaspoon of ground ginger works, but the aroma will be less vibrant.
The Texture Crew
Napa Cabbage: Thinly diced napa cabbage adds crunch and a subtle sweetness that balances the savory pork. It also helps the dough retain moisture, preventing the buns from drying out. If you prefer a milder crunch, substitute with shredded green cabbage or spinach.
Carrot: Thinly sliced carrot introduces a sweet, earthy note and a pop of color that makes the filling visually appealing. It also contributes fiber and vitamin A. For a spicy twist, add a pinch of crushed red pepper flakes to the carrot slice.
The Unexpected Star
Rice Vinegar: This tangy liquid is the secret to the dough’s airy lift. The acidity reacts with the baking soda to create carbon dioxide bubbles that puff the buns up. Without it, the buns would be dense and chewy. If you can’t find rice vinegar, a splash of white wine vinegar works, but it will slightly alter the flavor profile.
Sesame Oil & Seeds: The oil adds a nutty depth, while the seeds provide a crunchy contrast that enhances the overall mouthfeel. They also give the buns a golden hue that is visually enticing. If you’re avoiding oil, replace it with a neutral oil like grapeseed or canola.
The Final Flourish
Gluten-Free Flour: This blend of rice flour, tapioca starch, and potato starch gives the dough structure while keeping it light. It’s essential that you use a high-quality gluten-free blend to avoid a gummy texture. If you don’t have a blend, you can mix 1 cup rice flour, 1 cup tapioca starch, and 1 cup potato starch.
Yeast, Sugar, Baking Soda, Salt: The yeast initiates fermentation, the sugar feeds it, the baking soda reacts with the vinegar, and the salt balances flavor. Skipping any of these will compromise the dough’s rise or taste. For a gluten-free twist, you can use a single serving of instant dry yeast.
Everything’s prepped? Good. Let’s get into the real action…
The Method — Step by Step
- Step 1: Activate the Yeast. In a small bowl, combine 2 teaspoons of active dry yeast with 1 cup of warm water (about 110°F). Stir gently and let sit for 5–7 minutes until the mixture becomes frothy and foamy, indicating the yeast is alive. If the mixture doesn’t froth, the yeast may be dead; replace it with fresh yeast. This froth is the promise of a fluffy rise.
- Step 2: Mix Dry Ingredients. In a large mixing bowl, whisk together 3 cups gluten‑free flour, 2 tablespoons granulated sugar, 1 teaspoon baking soda, 1 teaspoon salt, and 2 teaspoons of yeast. The sugar feeds the yeast, while the baking soda reacts with the rice vinegar later to lift the dough. Make sure everything is evenly distributed so the dough rises uniformly.
- Step 3: Combine Wet and Dry. Pour the frothy yeast mixture into the dry ingredients and stir with a wooden spoon until a shaggy dough forms. Add 1 tablespoon of sesame oil to enrich the dough and aid in gluten‑free gluten development. Knead the dough by hand for about 3–4 minutes until it’s smooth and elastic, but don’t over‑knead; gluten‑free doughs don’t benefit from excessive handling.
- Step 4: First Rise. Cover the bowl with a clean kitchen towel and let the dough rise in a warm spot for 30–45 minutes. You’ll know it’s ready when it’s noticeably puffed and has a light, airy feel. If your kitchen is drafty, place the bowl in a slightly warm oven (turned off) or near a radiator.
- Step 5: Prepare the Filling. While the dough rises, heat 1 tablespoon of sesame oil in a skillet over medium heat. Add minced garlic and ginger, sautéing until fragrant (about 30 seconds). Toss in 1 cup ground pork, stirring until it turns opaque. Sprinkle 3 tablespoons soy sauce, 2 tablespoons rice vinegar, and 1 teaspoon sesame oil over the pork. Add 1 cup diced napa cabbage, 1 medium thinly sliced carrot, and 2 cloves minced garlic again. Cook until the vegetables soften and the pork is fully cooked, about 5 minutes. Season with salt to taste. Remove from heat and let the filling cool slightly.
- Step 6: Divide the Dough. After the first rise, punch down the dough gently to release air pockets. Divide it into 8 equal portions (about 1/4 cup each). Roll each portion into a smooth ball and then flatten it into a disk using a rolling pin or your hands. The disks should be about 3 inches in diameter. If the dough feels sticky, lightly dust with gluten‑free flour.
- Step 7: Assemble the Buns. Place a spoonful of the pork filling onto the center of each dough disk. Fold the edges over the filling, pinching to seal and creating a half-moon shape. Place the buns seam side down on a parchment‑lined baking sheet, spacing them about 2 inches apart. If you’re making a larger batch, you can stack the buns on top of each other, but be sure to leave enough room for expansion.
- Step 8: Second Rise. Cover the assembled buns with a kitchen towel and let them rise for another 15–20 minutes. The dough will puff up slightly, giving the buns a light, pillowy interior. This second rise is crucial for achieving that signature fluffiness.
- Step 9: Bake to Perfection. Preheat the oven to 375°F (190°C). Bake the buns for 20–25 minutes, or until the tops are lightly golden and the buns feel springy when pressed. The interior should be moist and the steam should escape when you cut into them. Remove from the oven, let cool for 5 minutes, then sprinkle sesame seeds on top for a final touch of crunch.
That’s it—you did it. But hold on, I’ve got a few more tricks that will take this to another level. These insider secrets will help you perfect the texture, elevate the flavor, and keep the buns fresh longer.
Insider Tricks for Flawless Results
The Temperature Rule Nobody Follows
The dough’s rise is highly temperature‑dependent. If your kitchen is too cold, the yeast will be sluggish, leading to dense buns. Place the dough in a warm spot like the back of the fridge or a sunny windowsill, and keep the temperature steady at 75–80°F (24–27°C). If you’re baking in a cooler environment, wrap the dough in a damp towel to retain moisture and heat.
Why Your Nose Knows Best
The aroma of the dough rising is a reliable indicator of progress. A sweet, yeasty scent means the dough is ready for the next step. If you smell a sharp vinegar tang, the dough may have over‑fermented and you’ll need to start over. Trust your nose; it’s a seasoned judge of dough readiness.
The 5‑Minute Rest That Changes Everything
After the second rise, let the buns rest for 5 minutes before baking. This pause allows the dough to relax, preventing it from collapsing under heat. It also lets the steam inside the buns redistribute, ensuring a uniform rise and a tender crumb.
The Sesame Seed Splash
Sprinkling sesame seeds just before baking adds a subtle nutty flavor and a pleasing crunch. For a deeper flavor, toast the seeds in a dry skillet for 2 minutes before adding them to the buns. The toasted seeds also create a beautiful golden speckled look.
The Quick Cooling Trick
After baking, place the buns on a wire rack to cool. This prevents steam from accumulating under the buns, which can make them soggy. If you’re serving immediately, you can also cover them loosely with a clean towel to keep them warm.
Creative Twists and Variations
This recipe is a playground. Here are some of my favorite ways to switch things up:
Sweet & Smoky Pork
Swap regular pork for smoked pork, and add a splash of maple syrup to the filling. The smokiness pairs beautifully with the sweet maple, creating a complex flavor profile that’s perfect for autumn gatherings.
Teriyaki Tofu Bao
Replace pork with silken tofu, and stir in teriyaki sauce and a pinch of sesame seeds. This vegetarian version is light, protein‑rich, and has a glossy, caramelized glaze that looks as good as it tastes.
Spicy Kimchi Bao
Introduce finely chopped kimchi into the filling, and add a drizzle of sriracha. The kimchi’s fermented tang and the sriracha heat give the buns a bold kick that’s ideal for adventurous eaters.
Thai Coconut Curry Bao
Add a tablespoon of red curry paste and coconut milk to the pork mixture, and garnish with fresh cilantro. The creamy coconut and spicy curry create a fragrant, exotic experience that transports you to a bustling Thai street market.
Chocolate Ganache Bao
For a dessert twist, fill the buns with a rich chocolate ganache and top with crushed hazelnuts. The sweet, creamy ganache contrasts with the airy dough, turning the bao into a decadent treat.
Storing and Bringing It Back to Life
Fridge Storage
Store uncooked buns in a sealed plastic bag in the refrigerator for up to 2 days. To reheat, place them in a steamer basket over boiling water for 5 minutes, then finish in a preheated oven at 350°F (175°C) for 5 minutes to regain crispness.
Freezer Friendly
For longer storage, freeze the dough portions before assembly. Wrap each portion tightly in plastic wrap and place in a freezer bag. They’ll keep for up to 3 months. Thaw overnight in the fridge, then bake as usual.
Best Reheating Method
Add a tiny splash of water to a steaming pan before reheating. The steam creates a gentle, moist environment that restores the buns’ softness. Finish with a quick bake at 350°F for 3 minutes to crisp the tops.