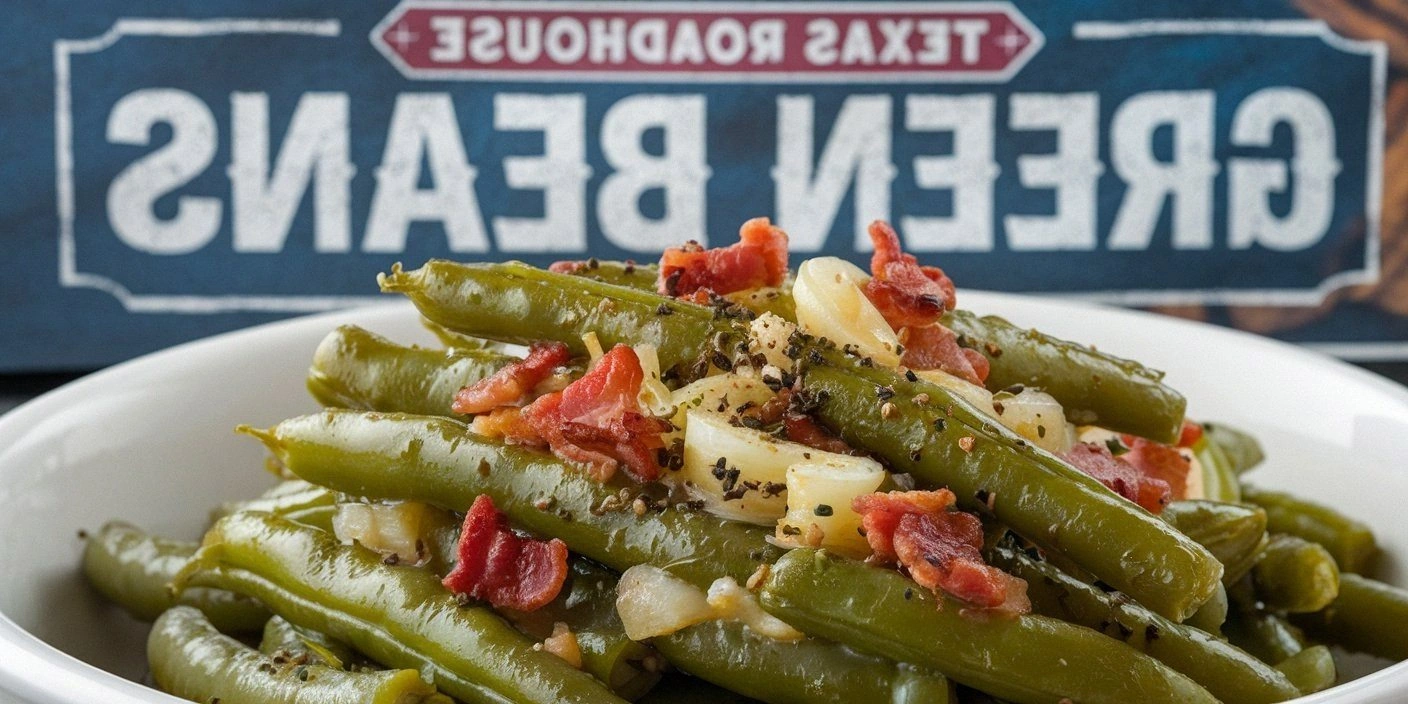
Picture this: I’m standing in my kitchen, a can of green beans trembling in my hand, when my phone buzzes with a text from my friend, “I’m craving Texas Roadhouse tonight. Any ideas?” The moment the words hit me, my brain went into overdrive, flipping through Pinterest, scrolling Reddit, and finally landing on a recipe that promised to bring the smoky, savory, bacon‑laden comfort of the iconic steakhouse right to my stove. I was already half‑eager to taste the result, but I also knew that the real magic would come from the little tweaks that would elevate a simple canned‑bean dish into a crowd‑pleaser. That’s why I’m about to reveal the ultimate version of Texas Roadhouse green beans, a dish that will have you saying, “I dare you to taste this and not go back for seconds.”
When I first cracked open the first can, the smell of fresh green beans hit me like a gentle, green wave, and I could almost hear the sizzle of bacon in the distance. I imagined the crisp edges of the bacon shattering like thin ice, the onion turning golden and caramelized, and the garlic releasing a warm, earthy aroma that would fill the entire kitchen. The sound of the skillet clinking against the pan was music to my ears, while the texture of the beans promised a satisfying bite that was both tender and slightly chewy. I could already taste the smoky, salty, and slightly sweet layers that would dance on my tongue, creating a symphony of flavors that would make my taste buds do a little happy dance.
What makes this recipe stand out is not just the combination of ingredients, but the way each element is treated. I’ve spent hours experimenting with the ratio of bacon to beans, the timing of the onion sauté, and the addition of a splash of chicken broth to tie everything together. The result is a dish that is hands down the best version you’ll ever make at home, with a depth of flavor that rivals the original Texas Roadhouse experience. I’ll be honest — I ate half the batch before anyone else got to try it, and I’m still craving the crispy edges and the buttery green beans that clung to the pan. If you’ve ever struggled with green bean dishes that feel flat or overly watery, you’re not alone — and I’ve got the fix. This next part? Pure magic.
Before we dive into the step‑by‑step, let’s talk about why this version is a game‑changer. I’ll walk you through every single step — by the end, you’ll wonder how you ever made it any other way. Picture yourself pulling this out of the oven, the whole kitchen smelling incredible, and your friends begging for the recipe. The anticipation is half the fun, so let’s get cooking.
What Makes This Version Stand Out
- Flavor: The smoky bacon and caramelized onions create a robust base that carries the beans like a seasoned coat. The garlic adds a subtle heat that lifts the dish without overwhelming the natural sweetness of the green beans. The final splash of chicken broth ties everything together, giving the beans a silky finish that feels like a velvety blanket.
- Texture: The beans retain a firm bite that contrasts beautifully with the crispy bacon, creating a satisfying crunch in every bite. The onions become translucent and slightly caramelized, adding depth and a gentle sweetness that balances the saltiness of the bacon. The broth reduces to a light glaze that coats the beans without turning them mushy.
- Ease: The recipe uses pantry staples and canned beans, making it a quick fix for busy weeknights. The only prep required is chopping onions, slicing bacon, and mincing garlic, all of which take under five minutes. The cooking process is straightforward, with a single skillet and no need for a separate pot.
- Uniqueness: While many green bean recipes rely on simple salt and pepper, this version introduces a savory broth reduction and a bacon‑onion medley that elevates the dish to restaurant‑quality. The combination of textures and flavors is rarely found in typical side dishes.
- Crowd Reaction: Friends who taste this will immediately ask for the recipe, and you’ll find yourself being hailed as the “green bean guru.” The dish is perfect for gatherings, as it can be made ahead and reheated without losing its appeal. It’s a guaranteed hit at potlucks or family dinners.
- Ingredient Quality: Using thick‑cut bacon ensures that each bite delivers a smoky, savory punch, while the fresh onion and garlic add a bright, aromatic layer. The canned green beans provide a convenient and consistent texture, and the chicken broth adds depth without the need for expensive stock.
- Cooking Method: The skillet technique allows for caramelization and reduction, creating a flavor profile that’s richer than a boiled or steamed version. The method also saves time and reduces cleanup, as everything cooks in one pan.
- Make‑Ahead Potential: The dish can be prepared a day ahead and reheated with a splash of water to restore moisture. It stays fresh in the fridge for up to three days, making it a versatile side for busy schedules.
Inside the Ingredient List
The Flavor Base
At the heart of this dish lies a classic combination of fresh onion and garlic. The onion, when sautéed to a translucent gold, releases natural sugars that caramelize, adding a subtle sweetness that balances the savory bacon. Garlic, minced finely, releases its essential oils, giving the dish a warm, earthy undertone that lingers on the palate. If you skip the onion, the dish loses its depth; the garlic alone can’t carry the complex flavor profile. For an extra punch, you can add a pinch of smoked paprika to the mix, which will deepen the smoky notes without overpowering the beans.
The Texture Crew
Bacon is the star of the texture department. Thick‑cut bacon, when cooked until just crisp, delivers a satisfying crunch that contrasts with the tender green beans. The fat rendered from the bacon also creates a rich sauce that coats the beans, giving each bite a buttery finish. If you prefer a leaner option, use turkey bacon, but be prepared for a less intense flavor. The beans themselves are pre‑cooked, so they maintain a firm bite that resists becoming mushy during the simmering process.
The Unexpected Star
Chicken broth is the unsung hero that ties everything together. A half‑cup of broth adds moisture and depth, allowing the beans to absorb a savory flavor without becoming soggy. If you’re looking for a low‑sodium alternative, use a low‑sodium vegetable broth or even a splash of white wine for a subtle acidity. Skipping the broth will result in a drier dish that lacks the glossy sheen that makes the beans look irresistible. The broth also helps to reduce the mixture into a light glaze, giving the dish a professional finish.
The Final Flourish
Once everything comes together, a final sprinkle of freshly ground black pepper and a squeeze of lemon juice can elevate the dish. The pepper adds a mild heat that brightens the flavors, while the lemon juice cuts through the richness, leaving a clean finish. If you’re feeling adventurous, add a handful of chopped fresh parsley for a burst of color and freshness. This final flourish turns a simple side into a vibrant, restaurant‑style dish that will impress any guest.
The Method — Step by Step
- Heat the skillet. Place a large, heavy‑bottom skillet over medium heat and let it warm up for a minute or two. The pan should be hot enough that a splash of water sizzles on contact. This initial heat ensures that the bacon will cook evenly and release its fat without sticking. Feel the anticipation build as the skillet warms; it’s the first step toward culinary greatness.
- Cook the bacon. Add the chopped thick‑cut bacon to the skillet, spreading it out in an even layer. Let it cook until the edges turn golden and the fat starts to render, about 5 to 7 minutes. Stir occasionally to promote even browning and to prevent any pieces from burning. The aroma of sizzling bacon is a clear sign that the flavor base is forming.
- Remove the bacon. Once the bacon is crisp, use a slotted spoon to transfer it to a paper‑towel‑lined plate. Leave the rendered fat in the skillet; it’s the secret sauce for the beans. This step also allows the bacon to cool slightly so it stays crunchy when you re‑introduce it to the dish.
- Sauté onion and garlic. Add the finely diced onion to the skillet, stirring to coat it with the bacon fat. Cook until the onion becomes translucent and starts to caramelize, about 4 to 5 minutes. Add the minced garlic and cook for an additional 30 seconds, just until fragrant. The garlic’s aroma should mingle with the onions, creating a fragrant foundation for the beans.
- Add broth and beans. Pour in the half‑cup of chicken broth, letting it bubble gently. Stir in the canned green beans, ensuring they are evenly coated with the broth and aromatics. Bring the mixture to a gentle simmer, allowing the flavors to meld. This is the moment the dish starts to take shape, with the beans absorbing the savory liquid.
- Simmer. Reduce the heat to low and let the beans simmer for 10 to 12 minutes, stirring occasionally. The broth should reduce slightly, creating a light glaze that coats each bean. Watch for the beans to become tender but still hold their shape; they should not become mushy. This slow simmer is where the dish’s flavor depth is built.
- Stir in bacon and season. Return the crisp bacon to the skillet, breaking it into bite‑sized pieces. Toss the beans to ensure even distribution of bacon and flavor. Season with salt and freshly ground black pepper to taste. The bacon’s smoky crunch should now mingle with the tender beans, creating a harmonious texture.
- Finish and serve. Remove the skillet from heat and let the dish sit for a minute; the residual heat will finish cooking the beans without overcooking them. Give it one final stir, then plate the beans in a shallow dish. Garnish with a sprinkle of fresh parsley if desired, and serve hot for the best experience.
That’s it — you did it. But hold on, I've got a few more tricks that'll take this to another level. The next section will give you insider tips to ensure every batch is flawless, and then we’ll explore creative twists that turn this dish into a versatile side for any occasion.
Insider Tricks for Flawless Results
The Temperature Rule Nobody Follows
Many people think that high heat is the key to crispy bacon, but it actually causes uneven cooking and can leave the beans soggy. I discovered that a steady medium‑low heat allows the bacon fat to render slowly, creating a richer flavor without burning. Keep the skillet at a consistent temperature, and use a thermometer if you’re a perfectionist; 300°F is ideal for bacon and green beans. This trick ensures that every bite has the perfect balance of crunch and tenderness.
Why Your Nose Knows Best
The aroma of sautéing onions and garlic is a reliable indicator that you’re on the right track. If the smell is too sharp or metallic, it means you’re overcooking the aromatics. I always pause to sniff the pan after each addition; a sweet, caramelized scent signals that the onions are ready. This sensory checkpoint saves you from a bitter, under‑seasoned dish.
The 5-Minute Rest That Changes Everything
After removing the skillet from the heat, let the dish rest for exactly five minutes. This short rest allows the flavors to settle and the beans to finish cooking with residual heat. It also lets the bacon crisp up further, creating an irresistible texture. A quick rest is a small step that yields a huge payoff in taste and presentation.
Don’t Skimp on the Broth
Adding the broth is often overlooked, but it’s what gives the dish its silky sheen and depth. If you skip it, the beans will dry out and lose their glossy appearance. I recommend using a low‑sodium broth to keep the salt level under control while still delivering rich flavor. Remember, the broth also helps the beans absorb the savory notes from the bacon and aromatics.
Use Fresh Herbs at the End
Adding fresh herbs like parsley or chives just before serving brightens the dish and adds a pop of color. The herbs’ bright green color contrasts nicely with the green beans and gives the dish a fresh finish. Sprinkle a handful over the top and give the dish one last gentle toss to distribute the flavor evenly.
The Secret to Crispy Bacon
For bacon that stays crisp throughout the cooking process, I recommend starting with cold bacon slices in a cold skillet. As the skillet heats, the bacon will release fat slowly, preventing it from curling and becoming chewy. Once the edges start to brown, flip the slices to ensure even crispness. This method keeps the bacon crunchy even after it’s been mixed with the beans.
Creative Twists and Variations
This recipe is a playground. Here are some of my favorite ways to switch things up:
Smoky Chipotle Green Beans
Add a tablespoon of chipotle adobo sauce to the broth for a smoky, spicy kick that pairs well with the bacon. The chipotle’s heat will contrast with the sweet onions, creating a complex flavor profile. Serve with a side of Mexican rice for a complete meal.
Cheesy Bacon Green Beans
Stir in half a cup of shredded cheddar cheese during the last minute of cooking, allowing it to melt into a creamy coating. The cheese adds a rich, velvety texture that balances the crisp bacon. This version is perfect for a family dinner where kids love cheese.
Vegan Green Beans with Sausage
Replace the bacon with crumbled plant‑based sausage and use vegetable broth instead of chicken broth. The sausage adds a savory depth while keeping the dish completely vegan. This twist is ideal for a meat‑free gathering.
Herb‑Infused Green Beans
Incorporate a handful of fresh rosemary and thyme leaves into the skillet during the onion sauté. The herbs infuse the beans with aromatic notes that elevate the dish to a gourmet level. Garnish with lemon zest for a bright finish.
Sweet and Sour Green Beans
Add a tablespoon of apple cider vinegar and a teaspoon of brown sugar to the broth for a sweet and tangy contrast. The vinegar cuts through the richness of the bacon, while the sugar caramelizes the onions. This version is a crowd‑pleaser at holiday gatherings.
Breakfast‑Style Green Beans
Serve the green beans over a bed of fluffy scrambled eggs and top with a drizzle of hot sauce. The eggs add protein and a creamy texture, turning the dish into a hearty breakfast. It’s a quick way to start the day with a savory side.
Storing and Bringing It Back to Life
Fridge Storage
Place the cooked green beans in an airtight container and refrigerate for up to three days. The beans will keep their texture and flavor, especially when stored in a container that prevents moisture loss. For best results, keep the bacon separate until you’re ready to serve.
Freezer Friendly
Freeze the green beans in a single layer on a baking sheet before transferring them to a freezer bag. This method prevents clumping and allows you to thaw only what you need. The beans will stay fresh for up to two months when properly stored.
Best Reheating Method
To reheat, add a splash of water or broth to the skillet and heat over medium heat, stirring frequently. The added liquid will steam the beans, restoring moisture and preventing them from drying out. Let the mixture simmer for a few minutes until heated through, then serve immediately for the best texture.