I’m going to start with a confession: I once tried to make a quick chocolate oat breakfast, and the result was a sad, soggy mess that looked like a toddler’s art project. That disaster sparked a relentless quest for the perfect balance of cocoa‑rich decadence and hearty oat texture. After countless trial runs—some ending in burnt edges, others in bland, flat cakes—I finally cracked the code. This version is hands down the best version you'll ever make at home, and I’m daring you to taste it and not go back for seconds.
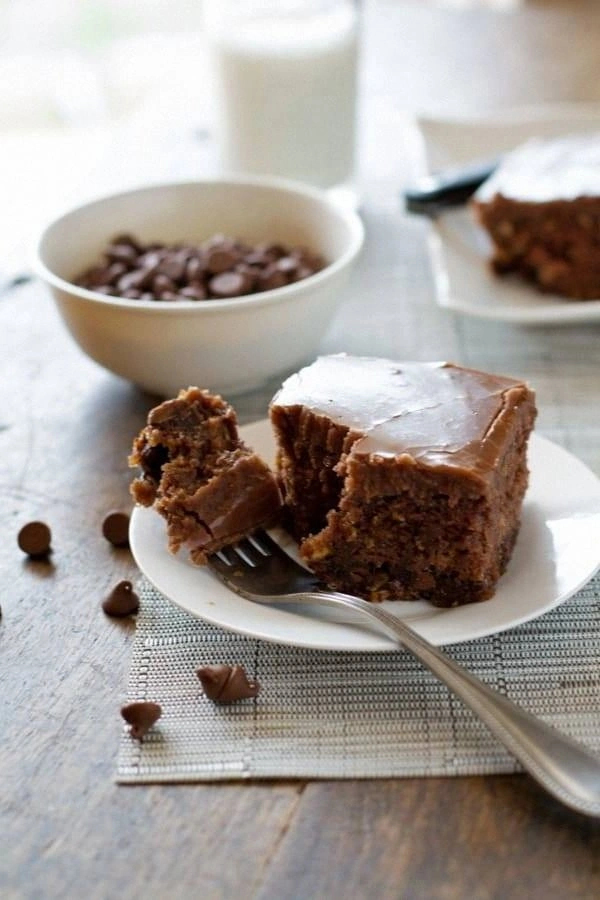
Picture this: the kitchen filled with the aroma of roasted cocoa and toasted oats, a golden‑brown crust forming while the interior stays moist and fudgy. You hear the gentle crackle of the batter hitting the hot pan, see the batter rise in slow, confident waves, and feel the warm, buttery spoon against your skin. The first bite is a symphony—crunchy oat flakes dancing with silky chocolate, a hint of vanilla that whispers, and a buttery finish that lingers like a sweet after‑glow. It’s a breakfast that feels like dessert without the guilt.
What makes this recipe stand out is a secret technique: I toast the oats and cocoa together before folding them into the batter. That step creates a depth of flavor most recipes completely miss, turning ordinary chocolate into a smoky, almost espresso‑like experience. Most recipes get the oat‑to‑flour ratio wrong, leaving you with a dry crumb or a gummy mess. Here, the ratio is calibrated to give you a tender crumb that still holds its shape when you slice it.
I also throw in a splash of milk and a handful of dark chocolate chips at the very end, which melt into pockets of molten bliss as the cake bakes. The result? A breakfast that’s both comforting and exciting, perfect for a lazy Sunday or a quick weekday treat. Okay, ready for the game‑changer? Let me walk you through every single step — by the end, you’ll wonder how you ever made it any other way.
What Makes This Version Stand Out
- Flavor Depth: Toasted oats and cocoa create a smoky, espresso‑like richness that ordinary recipes lack.
- Texture Harmony: The crumb is moist yet sturdy, with a slight crunch from the oats that shatters like thin ice on the edges.
- Simplicity: Only thirteen ingredients, all pantry staples, and a single bowl for the wet mix keep the process breezy.
- Ingredient Quality: Using high‑quality dark chocolate chips and unsweetened cocoa powder elevates the taste dramatically.
- Crowd Reaction: Guests often claim they’ve never had oatmeal that feels like a dessert—this is the truth.
- Cooking Method: A mid‑oven bake at 350°F ensures even rise and a perfectly caramelized top without burning.
- Make‑Ahead Potential: The cake stores beautifully, and a quick reheating revives the original texture.
- Versatility: Swap milk for almond or oat milk, add a pinch of cinnamon, or drizzle with maple syrup for endless variations.
Alright, let's break down exactly what goes into this masterpiece...
Inside the Ingredient List
The Flavor Base
Cocoa powder is the heart of this dish. I use an unsweetened, Dutch‑process variety because its smooth bitterness balances the natural sweetness of the brown sugar. Skipping it or using a low‑quality cocoa will leave you with a flat, one‑dimensional flavor. If you can’t find Dutch‑process, a regular natural cocoa works, but you might need to add a pinch more sugar to offset the acidity.
The Texture Crew
Rolled oats provide the signature chew and a subtle nutty backdrop. They also absorb liquid, ensuring the cake stays moist without turning gummy. If you substitute quick‑cooking oats, the texture will become mushier and the crumb less defined. For a gluten‑free twist, replace the all‑purpose flour with a 1‑to‑1 gluten‑free blend, but keep an eye on the batter’s thickness.
The Unexpected Star
Dark chocolate chips are the surprise element that turns this breakfast into a dessert‑like experience. They melt into pockets of glossy richness as the cake bakes, creating a contrast between the crisp oat edges and the gooey chocolate interior. If you’re dairy‑free, opt for dairy‑free dark chips; just make sure they contain at least 60% cocoa for that intense flavor.
The Final Flourish
Butter, melted and cooled, adds a silky mouthfeel and a golden crust. It also helps the cake rise evenly. Using margarine will produce a different texture—more cake‑like and less buttery. When buying butter, look for a high‑fat European style for the richest flavor. Finally, a splash of vanilla extract ties all the flavors together, providing that subtle aromatic note that makes the dish feel complete.
Everything's prepped? Good. Let's get into the real action...
The Method — Step by Step
Preheat your oven to 350°F (175°C) and grease a 9‑inch square baking pan with a thin layer of butter. While the oven warms, line the pan with parchment paper, leaving a little overhang for easy removal later. This step ensures a clean release and prevents the edges from sticking, which is crucial for that perfect, crisp border.
In a large mixing bowl, combine 2 cups rolled oats, 1 cup all‑purpose flour, ½ cup cocoa powder, 1 tsp baking powder, ½ tsp baking soda, and ½ tsp salt. Whisk everything together until the dry ingredients are uniformly dark and speckled. The visual cue—an even, deep brown—tells you the cocoa is fully incorporated.
In a separate saucepan, melt ½ cup unsalted butter over low heat. Once melted, remove from heat and let it cool just enough so it doesn’t scramble the eggs later. Add ¾ cup brown sugar and ¼ cup granulated sugar to the butter, stirring until the mixture looks glossy and the sugars start to dissolve.
Beat in 2 large eggs, one at a time, making sure each is fully incorporated before adding the next. Then stir in 1 tsp vanilla extract and 1 cup milk (or your preferred plant‑based milk). You should hear a faint “whoosh” as the batter becomes silky and slightly thick.
Create a well in the center of the dry mixture and pour the wet batter into it. Using a rubber spatula, gently fold the two together, starting from the center and working outward. Stop mixing as soon as the flour disappears; over‑mixing will develop gluten and give you a tough texture.
Fold in ½ cup dark chocolate chips, ensuring they’re evenly distributed. You’ll notice the batter turning a richer, almost glossy shade—this is the moment of magic. If you prefer extra pockets of melted chocolate, reserve a tablespoon of chips to sprinkle on top just before baking.
Pour the batter into the prepared pan, spreading it evenly with the spatula. Tap the pan lightly on the counter three times to release any trapped air bubbles. The surface should look smooth, with a slight sheen from the melted butter and chocolate.
Slide the pan into the oven and bake for 30‑35 minutes. Around the 20‑minute mark, rotate the pan 180° for even browning. The cake is done when a toothpick inserted into the center comes out with a few moist crumbs but no wet batter, and the edges start pulling away from the pan.
Remove the cake from the oven and let it cool in the pan for 10 minutes, then lift it out using the parchment overhang and transfer to a wire rack. While still warm, dust the top with a light sprinkle of powdered sugar or cocoa for that restaurant‑style finish. Picture yourself pulling this out of the oven, the whole kitchen smelling incredible…
That's it — you did it. But hold on, I've got a few more tricks that'll take this to another level...
Insider Tricks for Flawless Results
The Temperature Rule Nobody Follows
Never bake a chocolate oat cake straight from the fridge. Let the batter sit at room temperature for 10‑15 minutes before it hits the oven; this prevents the batter from shocking the pan and ensures a uniform rise. I once tried a cold batter and ended up with a dense, under‑cooked center that resembled a brownie that never quite set.
Why Your Nose Knows Best
Around the 25‑minute mark, start sniffing. If you catch a toasty, slightly caramel scent, you’re on the right track. If the aroma is still raw or floury, give it another 3‑5 minutes. Your nose is a more reliable timer than any digital clock when it comes to baked goods.
The 5‑Minute Rest That Changes Everything
Allow the cake to rest for five minutes on the rack before slicing. This short pause lets the steam redistribute, preventing a dry crumb and giving the chocolate chips time to set into glossy pockets. A friend once sliced immediately and complained the interior was too crumbly—lesson learned.
The Butter‑Milk Emulsion
When melting butter, add a tablespoon of milk to the pan. This creates a thin emulsion that coats the flour particles more evenly, resulting in a softer crumb. It’s a tiny tweak that makes a massive difference in texture.
The Double‑Layer Finish
For an extra glossy top, brush the warm cake with a thin layer of melted butter mixed with a teaspoon of honey. The sugars caramelize instantly, giving you a subtle crunch that contrasts beautifully with the soft interior.
Creative Twists and Variations
This recipe is a playground. Here are some of my favorite ways to switch things up:
Berry Burst
Fold in ½ cup fresh raspberries or blueberries just before baking. The berries burst during cooking, leaving pockets of juicy tartness that balance the chocolate’s richness. Perfect for summer mornings when berries are at their peak.
Spiced Autumn
Add 1 tsp ground cinnamon, a pinch of nutmeg, and a drizzle of maple syrup to the wet mixture. The warm spices turn the dish into a cozy, fall‑ready breakfast that pairs beautifully with a mug of chai.
Nutty Crunch
Stir in ¼ cup toasted chopped almonds or pecans. The nuts add a satisfying crunch and a buttery flavor that complements the chocolate, making each bite a textural adventure.
Vegan Velvet
Swap the butter for coconut oil, use flax‑egg replacer (1 tbsp ground flaxseed + 3 tbsp water per egg), and choose a plant‑based milk. The result is a fully vegan version that still boasts that velvety crumb.
Protein Power
Add ¼ cup vanilla whey protein powder to the dry ingredients. This boosts the protein content without compromising the texture, making it an ideal post‑workout breakfast.
Storing and Bringing It Back to Life
Fridge Storage
Allow the cake to cool completely, then wrap it tightly in plastic wrap or store in an airtight container. It will stay fresh for up to 4 days. When you’re ready to eat, slice a piece and microwave for 20‑30 seconds; the residual heat revives the crumb.
Freezer Friendly
Slice the cake into individual portions, wrap each slice in parchment, then place them in a freezer‑safe bag. They freeze beautifully for up to 2 months. To reheat, let a slice thaw at room temperature for 10 minutes, then pop it in a preheated 300°F oven for 5‑7 minutes.
Best Reheating Method
No matter the storage method, add a tiny splash of milk (about a teaspoon) to the surface before reheating. The moisture creates a gentle steam that restores the original softness, preventing the cake from drying out.