Ever find yourself stuck in a midnight snack rut, scrolling through endless recipes that promise “the perfect sweet‑salty combo” only to end up with something that feels like a soggy disappointment? I was there last week, half‑asleep, staring at a bowl of plain pretzels and a lonely bar of chocolate, daring myself to create something that would actually make my taste buds do a happy dance. I tossed the pretzels into a pan, melted the chocolate, and—well—let's just say the result was a mess of clumpy chocolate that stuck to the bottom of the pan like a stubborn scar. That disaster sparked a mission: to craft a snack that balances the crunch of pretzel saltiness with the silky richness of chocolate, without any of the kitchen chaos.
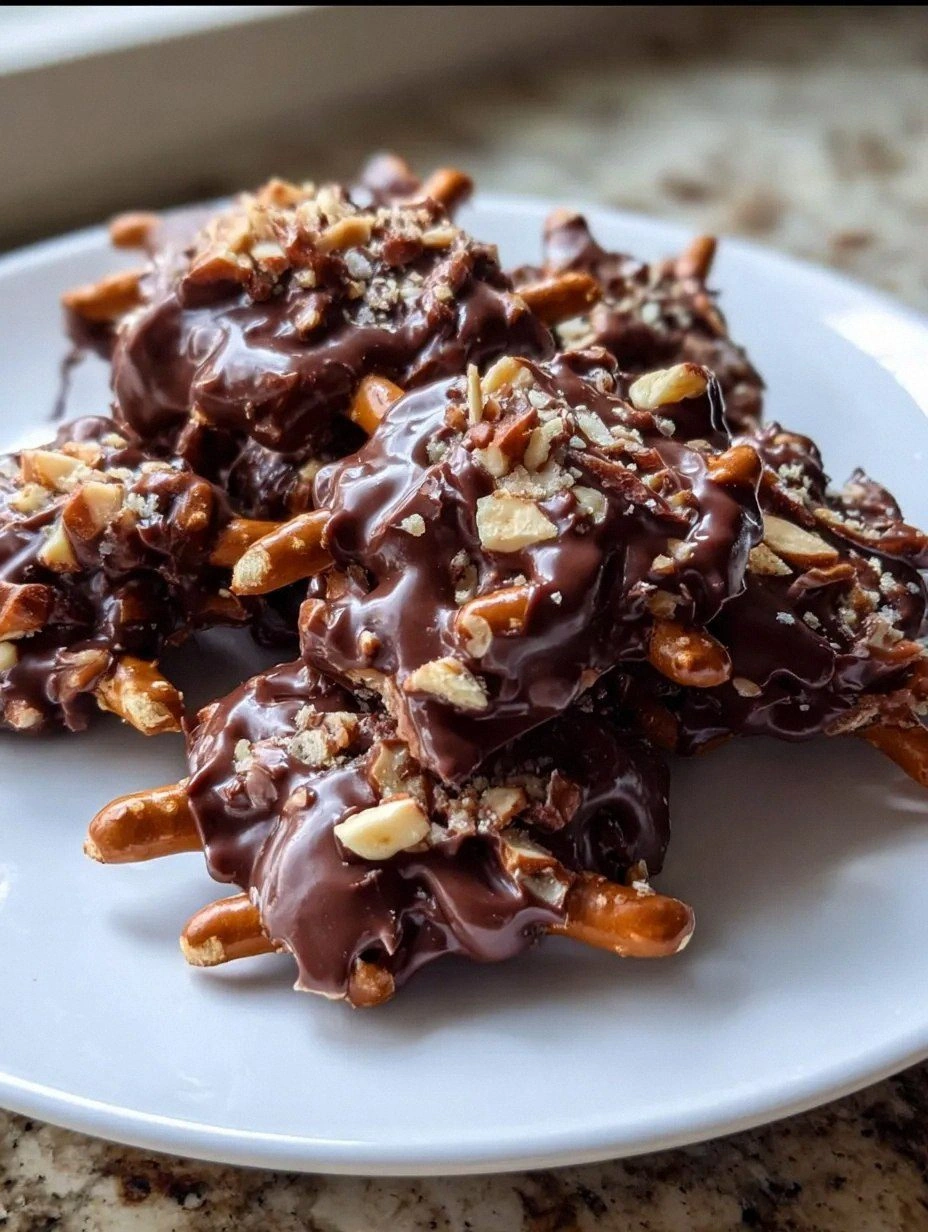
Picture this: you pull a tray of glossy, dark‑glazed clusters out of the oven, the air instantly filling with the intoxicating scent of toasted pretzel and melted cocoa, a faint hint of butter swirling in the background. The clusters sit there, glossy and inviting, each one a miniature work of art—golden pretzel shards embedded in a river of chocolate, speckled with flaky sea salt that catches the light like tiny diamonds. When you bite into one, the pretzel shatters with a crisp snap, the chocolate melts luxuriously across your tongue, and the salt delivers that perfect punch that makes your brain shout, “Yes! This is it!” This isn’t just a snack; it’s a sensory experience that feels like a celebration in every bite.
Most recipes out there either drown the pretzel in chocolate, turning the whole thing into a cloying, soggy mess, or they skimp on the chocolate, leaving you with a salty bite that never satisfies your sweet tooth. I’ve tried them all, and I’ll be honest—I ate half the batch before anyone else got a chance to try it because it was that good. The secret? A precise balance of butter, brown sugar, and a brief bake that sets the chocolate without overcooking it, plus a finishing sprinkle of flaky sea salt that elevates the flavor profile from “good” to “mind‑blowing.” Most recipes get this completely wrong. Here’s what actually works.
Now, I’m about to walk you through every single step—by the end, you’ll wonder how you ever made this snack any other way. Okay, ready for the game‑changer? This next part? Pure magic. I dare you to taste this and not go back for seconds.
What Makes This Version Stand Out
- Flavor Harmony: The combination of semi‑sweet and milk chocolate creates a layered sweetness that complements the pretzel’s salt without overwhelming it. The butter and brown sugar add a buttery caramel note that deepens the overall taste.
- Texture Contrast: You get the satisfying crunch of pretzel shards against the smooth, glossy chocolate coating, plus a delicate snap from the flaky sea salt that shatters like thin ice on your palate.
- Simplicity: Only eight core ingredients, most of which you already have in your pantry. No fancy equipment—just a baking sheet, a saucepan, and a spatula.
- Unique Finish: A final dusting of flaky sea salt creates that irresistible sweet‑salty sparkle, turning a simple snack into a gourmet treat.
- Crowd Reaction: Serve these at a party and watch the crowd scramble for the second round. I’ve seen grown‑ups and kids alike line up for seconds, and that’s a testament to the addictive nature of this snack.
- Ingredient Quality: Using high‑quality chocolate and real pretzel sticks (not the mini twists) makes a world of difference in flavor and texture.
- Cooking Method: A quick bake at a low temperature sets the chocolate perfectly, preventing the dreaded “oil‑separation” many recipes suffer from.
- Make‑Ahead Potential: These clusters keep beautifully for up to a week, and they even freeze well, making them a perfect make‑ahead snack for busy weeks.
Inside the Ingredient List
The Flavor Base
First up, the chocolate duo: 1 cup semi‑sweet chocolate chips and 1/2 cup milk chocolate chips. The semi‑sweet chocolate provides depth and a slight bitterness that balances the sweetness, while the milk chocolate adds a creamy, mellow note that makes the coating melt in your mouth. Skipping either will leave the flavor flat—don’t compromise on this duo. If you’re allergic to dairy, you can swap the milk chocolate for a dairy‑free dark chocolate, but keep the semi‑sweet for that essential backbone.
The Texture Crew
The star of the show is 2 cups of pretzel sticks, broken into bite‑size pieces. Choose pretzel sticks that are sturdy enough to hold up to the chocolate coating; flimsy pretzels will dissolve into mush. The pretzel’s saltiness is the perfect counterpoint, and the crunch is what makes each bite exciting. If you can’t find pretzel sticks, you can crush pretzel twists, but be sure to keep the pieces large enough to provide that satisfying snap.
The Unexpected Star
Half a cup of unsalted butter and 2 tablespoons of brown sugar create a glossy, caramel‑infused chocolate coating that feels luxurious on the tongue. The butter adds richness, while the brown sugar contributes a subtle molasses undertone that deepens the flavor. Don’t skip the butter; it’s the secret to a glossy finish that doesn’t crack. For a dairy‑free version, use coconut oil, but expect a slightly different mouthfeel.
The Final Flourish
Finish with 1/2 teaspoon of flaky sea salt, plus an extra pinch for sprinkling on top. The flaky texture dissolves slowly, delivering bursts of salty goodness that make the chocolate taste even sweeter. If you love extra crunch, add 1/4 cup of chopped toasted almonds or peanuts; they’ll add a nutty dimension without stealing the spotlight.
Everything's prepped? Good. Let’s get into the real action...
The Method — Step by Step
Preheat your oven to 300°F (150°C). While the oven warms up, line a large baking sheet with parchment paper; this prevents the clusters from sticking and makes cleanup a breeze. The low temperature is crucial—it gently sets the chocolate without scorching it, preserving that glossy finish we all love. As the oven heats, you’ll start to smell the faint buttery aroma from the butter you’ll melt later, a subtle promise of what’s to come.
In a medium saucepan over low heat, melt 1/4 cup unsalted butter together with 2 tablespoons brown sugar, stirring constantly until the mixture becomes a smooth, amber‑colored syrup. This is the moment where the sugar dissolves and the butter emulsifies, creating a glossy base that will later coat the pretzels. Watch closely—if the mixture starts to bubble too aggressively, lower the heat; you want a gentle simmer, not a boil. That sizzle when it hits the pan? Absolute perfection.
Kitchen Hack: Use a silicone spatula to scrape every last bit of butter‑sugar mixture from the pan; those caramelized bits add extra depth to the chocolate coating.Remove the saucepan from heat and stir in 1 teaspoon vanilla extract. The vanilla rounds out the flavor, giving the chocolate a subtle aromatic lift that makes the snack feel more sophisticated. Let the mixture sit for a minute; this brief rest allows the butter to cool just enough so it won’t seize the chocolate later.
In a separate heat‑proof bowl, combine 1 cup semi‑sweet chocolate chips and 1/2 cup milk chocolate chips. Place the bowl over a pot of simmering water (double boiler) and melt the chocolate, stirring gently. Once fully melted, add a splash (about 1 teaspoon) of vegetable oil—this is the secret to a glossy, snap‑ready coating that won’t develop a dull film.
Now, fold the melted butter‑sugar‑vanilla mixture into the chocolate, stirring until the blend is uniform and glossy. You’ll notice the chocolate becoming slightly thinner; that’s exactly what we want—it should be fluid enough to coat the pretzel pieces evenly without clumping.
Quickly toss the 2 cups of broken pretzel sticks into the chocolate mixture, ensuring each piece is fully coated. Work fast—chocolate begins to set as it cools, and you don’t want any pretzel left naked. The pretzels should glisten with a thin layer of chocolate, looking like tiny, salty jewels.
Using a spoon or a small ice‑cream scoop, drop dollops of the coated pretzel mixture onto the prepared parchment sheet, spacing them about 2 inches apart. Each cluster should be roughly the size of a walnut. Sprinkle a pinch of flaky sea salt on top of each cluster while the chocolate is still warm; the salt will adhere and create those tiny sparkling specks.
Watch Out: If the chocolate starts to harden before you finish scooping, gently re‑warm the bowl over low heat for a few seconds. Over‑heating will cause the chocolate to separate.Slide the baking sheet into the preheated oven and bake for 12‑15 minutes, just until the chocolate sets and a faint crust forms on the surface. You’ll know it’s ready when the edges pull away slightly from the parchment and the clusters have a matte shine. Keep a close eye—over‑baking will make the chocolate brittle and the pretzels lose their crunch.
Remove the sheet from the oven and let the clusters cool completely on the parchment. As they cool, the chocolate contracts slightly, creating a satisfying snap when you bite into them. This cooling period also allows the sea salt to settle into the chocolate, delivering that perfect salty burst.
Once fully cooled, transfer the clusters to an airtight container. Store at room temperature for up to a week, or freeze for longer storage. That moment when you pop a cluster out of the container and hear the faint crack of chocolate? Pure joy. That’s it — you did it. But hold on, I’ve got a few more tricks that’ll take this to another level...
Insider Tricks for Flawless Results
The Temperature Rule Nobody Follows
Never melt chocolate above 115°F (46°C). Higher temps cause the cocoa butter to separate, leading to a grainy texture. Keep your double boiler water barely simmering, and stir constantly. A friend once tried melting chocolate in the microwave at full power and ended up with a clumpy mess—let’s just say the party was saved by ordering pizza.
Why Your Nose Knows Best
When the chocolate is perfectly melted, you’ll smell a faint roasted cocoa aroma. If you detect a burnt or oily scent, you’ve crossed the line. Trust your nose more than the clock—sensory cues are the ultimate guide. The moment the butter‑sugar mixture starts to caramelize, you’ll notice a deeper, buttery scent that signals it’s ready to combine with the chocolate.
The 5‑Minute Rest That Changes Everything
After mixing the butter‑sugar blend into the chocolate, let the mixture sit for five minutes before coating the pretzels. This short rest allows the fats to fully integrate, creating a smoother coating that adheres better. Skipping this step can lead to uneven coverage and a less glossy finish.
Sea Salt Timing is Everything
Sprinkle the flaky sea salt while the chocolate is still warm but not hot. If you add it too early, the salt can melt into the chocolate, losing its crunch. Too late, and it won’t stick. The perfect window is right after you’ve placed the clusters on the sheet, before they enter the oven.
Cooling on the Parchment, Not the Rack
Let the clusters cool on the parchment they baked on. Transferring them to a wire rack while still warm can cause the chocolate to crack due to rapid temperature change. The parchment acts as an insulator, allowing the chocolate to set gradually and retain its glossy sheen.
Creative Twists and Variations
This recipe is a playground. Here are some of my favorite ways to switch things up:
Spicy Chili Chocolate
Add a pinch of cayenne pepper to the melted chocolate before coating the pretzels. The heat pairs unexpectedly well with the sweet chocolate and salty pretzel, giving you a subtle kick that lingers after the bite.
White Chocolate Coconut
Swap the semi‑sweet and milk chocolate for 1 1/2 cups white chocolate chips and sprinkle toasted coconut flakes on top before baking. The result is a tropical, creamy version that feels like a beach vacation in your mouth.
Peanut Butter Swirl
Stir in 2 tablespoons of smooth peanut butter into the chocolate mixture for a nutty undertone. Top with crushed peanuts for extra crunch. This variation turns the snack into a mini “peanut butter cup” experience.
Dark Espresso Crunch
Replace half of the milk chocolate chips with dark chocolate chips and dissolve 1 teaspoon of instant espresso powder into the butter‑sugar mixture. The coffee notes deepen the chocolate flavor, making it perfect for an after‑dinner treat.
Caramel Drizzle Finish
After the clusters have cooled, drizzle a thin line of caramel sauce over each one and let it set. The caramel adds an additional layer of sweetness that complements the salty pretzel and rich chocolate.
Storing and Bringing It Back to Life
Fridge Storage
Place the clusters in an airtight container and store them in the refrigerator for up to 7 days. The cool environment keeps the chocolate firm, preserving the snap. When you’re ready to eat, let them sit at room temperature for 10‑15 minutes so the chocolate softens slightly for optimal bite.
Freezer Friendly
These clusters freeze beautifully. Lay them in a single layer on a parchment‑lined tray, freeze for 1 hour, then transfer to a zip‑top freezer bag. They’ll keep for up to 3 months. To enjoy, pop a few out and let them thaw at room temperature for 20 minutes.
Best Reheating Method
If the clusters have hardened too much, place them on a microwave‑safe plate and heat for 5‑10 seconds, just until the chocolate becomes pliable. Add a tiny splash of water (about 1/2 tsp) before microwaving; the steam revives the chocolate’s sheen without making it oily.