I was halfway through a Sunday dinner that had gone from “quick fix” to “burnt disappointment” when I remembered the old family recipe I’d found tucked away in a yellowed cookbook. The chicken had been soggy, the sauce a dull gray, and my kitchen smelled like regret. That moment sparked a mission: to create a version that would make even the most skeptical foodie swoon. I’m not just talking about a crispy skin; I’m talking about a crackling that sings like a drumline, a flavor that lingers on the palate like a favorite song, and a dish that feels like a hug from the inside out.
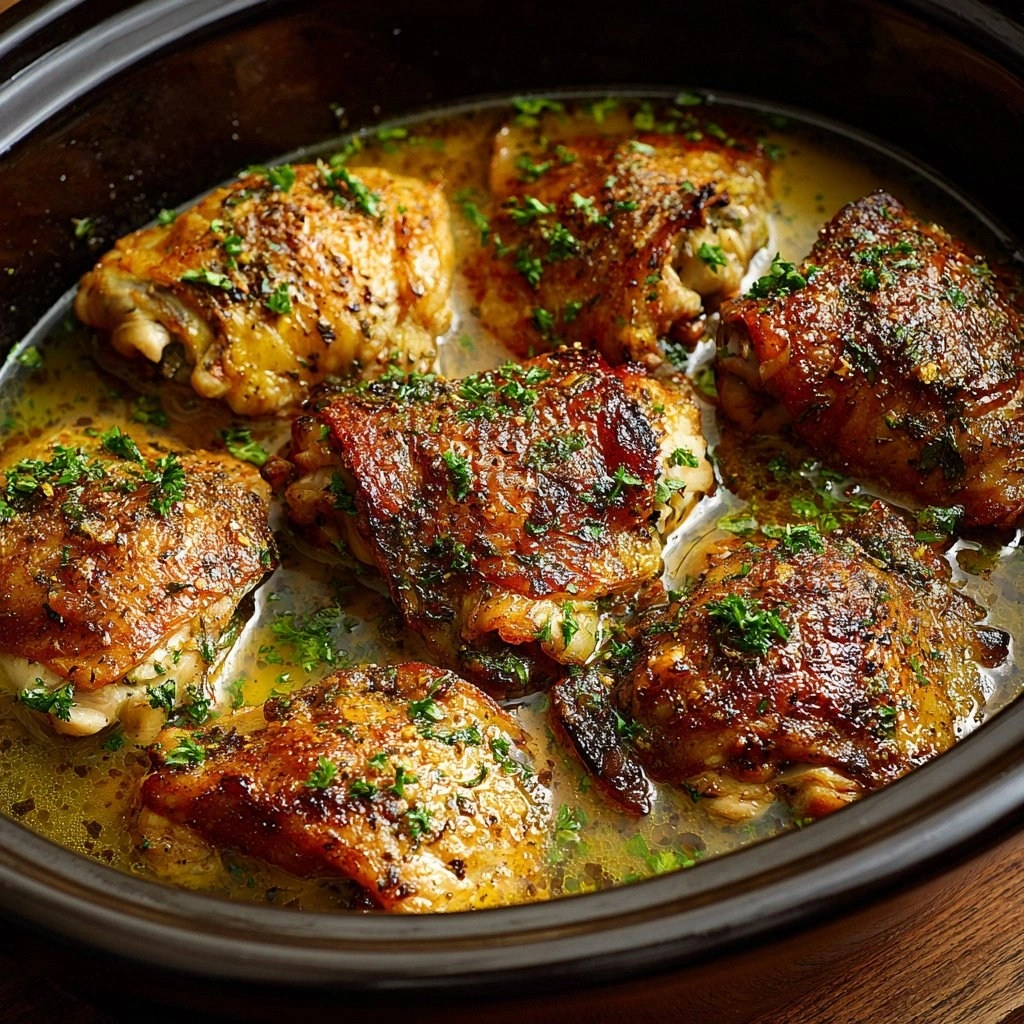
Picture this: a rack of bone‑in, skin‑on chicken thighs resting on a rack in a preheated oven, the air thick with the promise of caramelization. The first few minutes release a faint, sweet aroma of butter and herbs, and as the heat builds, the skin starts to puff and separate from the meat. A quick flick of a fork reveals a crisp edge that snaps like thin ice, while the meat inside remains juicy, tender, and packed with umami. The sound of the sizzling is almost a soundtrack, a subtle reminder that everything is working in perfect harmony. If you’ve ever stared at a piece of chicken and wondered why it never turns out as golden as the picture on the internet, this is the answer.
What sets this version apart isn’t just the technique—it’s the marriage of simple pantry staples with a few clever twists. Baking powder, a quiet hero, lifts the skin, creating a dry surface that crisps without the need for extra oil. A dash of lemon zest injects brightness, cutting through the richness of the skin. The blend of paprika, garlic, and onion powder gives depth without overpowering, while a pinch of cayenne adds a subtle kick that wakes the taste buds. The result? A dish that is hands down the best version you’ll ever make at home, and I dare you to taste this and not go back for seconds.
I’ll be honest—when I first cooked this batch, I ate half the plate before anyone else even had a chance. The moment the first bite hit my tongue, I was transported to a place where every texture and flavor had a story to tell. Picture yourself pulling this out of the oven, the whole kitchen smelling incredible, and the anticipation building as you lift the lid. The sizzling, the crackling, the golden sheen—this is pure magic. Let me walk you through every single step—by the end, you’ll wonder how you ever made it any other way.
What Makes This Version Stand Out
- Texture: The skin reaches a crispy, almost crunchy threshold while the meat stays moist, thanks to a strategic use of baking powder and a dry coating.
- Flavor: A balanced blend of paprika, garlic, and onion powders creates a savory backbone, while lemon zest adds a zesty lift.
- Simplicity: Only nine pantry staples plus the chicken, no need for exotic sauces or complicated marinades.
- Speed: From prep to plate, the entire process takes under an hour, making it ideal for week‑night dinners.
- Versatility: Works with bone‑in or boneless thighs, and can be paired with roasted veggies or a quick grain.
- Make‑ahead: The coated thighs can be refrigerated for up to 24 hours before baking, saving you time on busy days.
- Nutrition: Low‑fat, high‑protein profile keeps you satisfied without the heaviness of deep‑fried chicken.
- Crowd‑pleaser: The universal appeal of crispy chicken makes it a hit at family gatherings and casual get‑togethers alike.
Inside the Ingredient List
The Flavor Base
The foundation of this dish is a simple yet powerful blend of smoked paprika, garlic powder, onion powder, and a touch of cayenne. Each spice is measured precisely to create a harmonious balance—too much paprika can dominate, while too little leaves the flavor flat. If you’re a fan of smoky undertones, you can double the paprika, but keep the other spices in check. Skipping any of these will change the character of the dish, turning it into something unrecognizable.
A pinch of cayenne is optional, but it introduces a subtle heat that keeps the palate engaged. Think of it as a whisper of spice that lingers long after the first bite. If you’re sensitive to heat, you can omit it entirely, and the dish will still shine. For a more complex profile, consider adding a dash of dried thyme; it pairs wonderfully with the lemon zest to bring a fresh herbal note.
The Texture Crew
Baking powder is the unsung hero that turns ordinary skin into a crunchy masterpiece. It reacts with the moisture on the skin’s surface, creating tiny bubbles that expand and separate the skin from the meat. Without it, you’ll end up with a soggy crust that feels like a sad disappointment. The amount is small—just a teaspoon per batch—but its impact is monumental.
Flour, on the other hand, serves as a dry coating that locks in the seasoning and provides a textural contrast. The ½ cup of all‑purpose flour is enough to coat each thigh evenly, but you can swap it for a gluten‑free blend if dietary restrictions demand. The flour also helps the butter to spread evenly, ensuring that every bite receives a buttery sheen.
The Unexpected Star
Lemon zest is the secret that lifts the entire dish. It adds brightness that cuts through the richness of the skin, giving the flavor a fresh, almost citrusy finish. Think of it as the final flourish that ties the spices together. If you’re craving a sweeter note, a small squeeze of fresh lemon juice right before serving can amplify this effect.
The fresh parsley garnish is more than a decorative touch; it introduces a herbaceous note that balances the savory depth. A handful of chopped parsley adds color, aroma, and a subtle crunch that contrasts with the crisp skin. If you’re looking for a different herb, cilantro or basil can be interesting alternatives.
Everything's prepped? Good. Let’s get into the real action.

The Method — Step by Step
- Preheat your oven to 425°F (220°C). Line a rimmed baking sheet with parchment and place a wire rack on top. This setup ensures even heat distribution and lets the excess fat drip away. The result is a uniformly crisp skin with no greasy patches.
- Pat the chicken thighs dry with paper towels—moisture is the enemy of crispiness. A dry surface allows the flour and spices to cling better, and it also helps the skin blister. If you’re feeling fancy, sprinkle a light dusting of salt over the thighs to enhance flavor.
- In a small bowl, whisk together the flour, baking powder, paprika, garlic powder, onion powder, cayenne (if using), and thyme. This dry mix is the backbone of the flavor. Stir until the ingredients are evenly distributed, then set aside.
- Coat each thigh in the flour mixture, shaking off any excess. The coating should look like a fine dusting; too thick and it will become heavy, too thin and it won’t crisp. The flour also traps the butter, creating a glossy finish.
- Brush each coated thigh with melted butter, making sure to cover the skin entirely. The butter not only adds flavor but also helps the spices adhere. For an extra kick, sprinkle a little lemon zest over the buttered surface.
- Place the thighs skin‑side up on the wire rack. The gap between the thighs allows hot air to circulate, ensuring even cooking. If you’re baking a large batch, leave space between each piece to avoid steaming.
- Bake for 30 minutes, then flip each thigh and continue baking for another 10-12 minutes. The internal temperature should reach 165°F (74°C). The skin should be a deep golden brown, and the edges should start pulling away from the meat.
- Remove from the oven and let the thighs rest for 5 minutes. Resting allows the juices to redistribute, keeping the meat juicy. While the thighs rest, sprinkle chopped parsley and a final squeeze of lemon juice for brightness.
- Serve immediately, plating the thighs with a side of roasted vegetables or a simple salad. The contrast of crisp skin, tender meat, and fresh greens creates a balanced plate. If you’re in a hurry, the leftovers reheat beautifully in the oven at 350°F for 10 minutes.
- Enjoy the symphony of textures and flavors. The first bite should crackle, the second should melt, and the third will leave you craving more. Remember to share with friends—they’ll be impressed by the depth of flavor and the impeccable crispness.
Insider Tricks for Flawless Results
The Temperature Rule Nobody Follows
Many people think baking at 375°F is enough, but the higher temperature is key to achieving that coveted crackle. The 425°F setting creates a rapid Maillard reaction, turning the skin into a golden, crisp shell. If you’re baking at a lower temperature, you’ll end up with a soggy surface that can’t hold up to the butter coating. The trick is to preheat the oven for at least 15 minutes before placing the thighs inside.
Why Your Nose Knows Best
Your nose is a reliable indicator of doneness. As the chicken cooks, the aroma shifts from buttery to caramelized. When the smell becomes nutty and slightly sweet, the skin is ready to crackle. Trusting your senses can save you from overcooking and ensures a perfect finish every time.
The 5-Minute Rest That Changes Everything
Resting after baking might seem like a small detail, but it’s essential for juicy meat. The juices redistribute, preventing them from spilling out onto the plate. A five-minute rest also allows the skin to firm up a bit, making it easier to cut and ensuring that every bite has that satisfying crunch.
The Secret of the Flour Coating
Coating the thighs with flour before seasoning creates a dry surface that crisps better. The flour also helps the butter spread evenly, giving each piece a buttery sheen. If you’re gluten‑free, use a rice flour blend; the texture will be similar, but the flavor will be slightly different.
The Lemon Zest Surprise
Adding lemon zest to the coating not only brightens the flavor but also helps the skin to crisp up faster. The zest releases essential oils that act as a natural drying agent, pulling moisture away from the surface. If you’re in a pinch, a teaspoon of lemon juice can substitute, but the zest gives a more vibrant flavor.
The Butter Trick
Brushing the thighs with melted butter before baking ensures a glossy finish and helps the spices adhere. The butter also adds a subtle richness that balances the dry coating. If you’re watching calories, use a light butter or a small amount of olive oil instead; the result will still be delicious.
Creative Twists and Variations
This recipe is a playground. Here are some of my favorite ways to switch things up:
Asian Fusion
Swap the paprika for a blend of five‑spice powder and add a splash of soy sauce to the butter coating. Finish with chopped scallions and a drizzle of sesame oil. This version pairs wonderfully with steamed rice and stir‑fried greens.
Herb‑Infused
Replace thyme with a mixture of rosemary, sage, and oregano. Add a handful of fresh basil leaves to the final garnish. The herbaceous aroma elevates the dish for a rustic, farmhouse vibe.
Spicy Cajun
Introduce a Cajun seasoning blend to the flour mixture and double the cayenne. After baking, top with a dollop of cool yogurt and a sprinkle of chopped cilantro. This spicy kick is perfect for summer picnics.
Smoky Chipotle
Replace smoked paprika with chipotle powder for a smoky, smoky flavor. Add a dash of adobo sauce to the butter coating. Serve with corn tortillas and a squeeze of lime for a Tex‑Mex twist.
Mediterranean Delight
Infuse the coating with oregano and a pinch of dried oregano. Add a handful of chopped sun‑dried tomatoes to the butter mixture. Finish with a drizzle of extra virgin olive oil and a sprinkle of feta cheese.
Citrus‑Herb Explosion
Use a blend of orange zest and lemon zest in the coating. Add fresh thyme and mint to the butter. This bright, herbaceous version is ideal for spring gatherings.
Storing and Bringing It Back to Life
Fridge Storage
Cool the cooked thighs to room temperature, then place them in an airtight container. Store in the refrigerator for up to 3 days. The skin may soften slightly, but the flavor remains intact.
Freezer Friendly
Wrap each thigh individually in parchment paper and place in a freezer bag. Freeze for up to 2 months. When ready to use, thaw in the refrigerator overnight before reheating.
Best Reheating Method
Preheat the oven to 350°F (175°C). Place the thighs on a baking sheet and bake for 10 minutes, or until heated through. Add a tiny splash of water before reheating to create steam, which helps restore the skin’s crispness.