Introduction
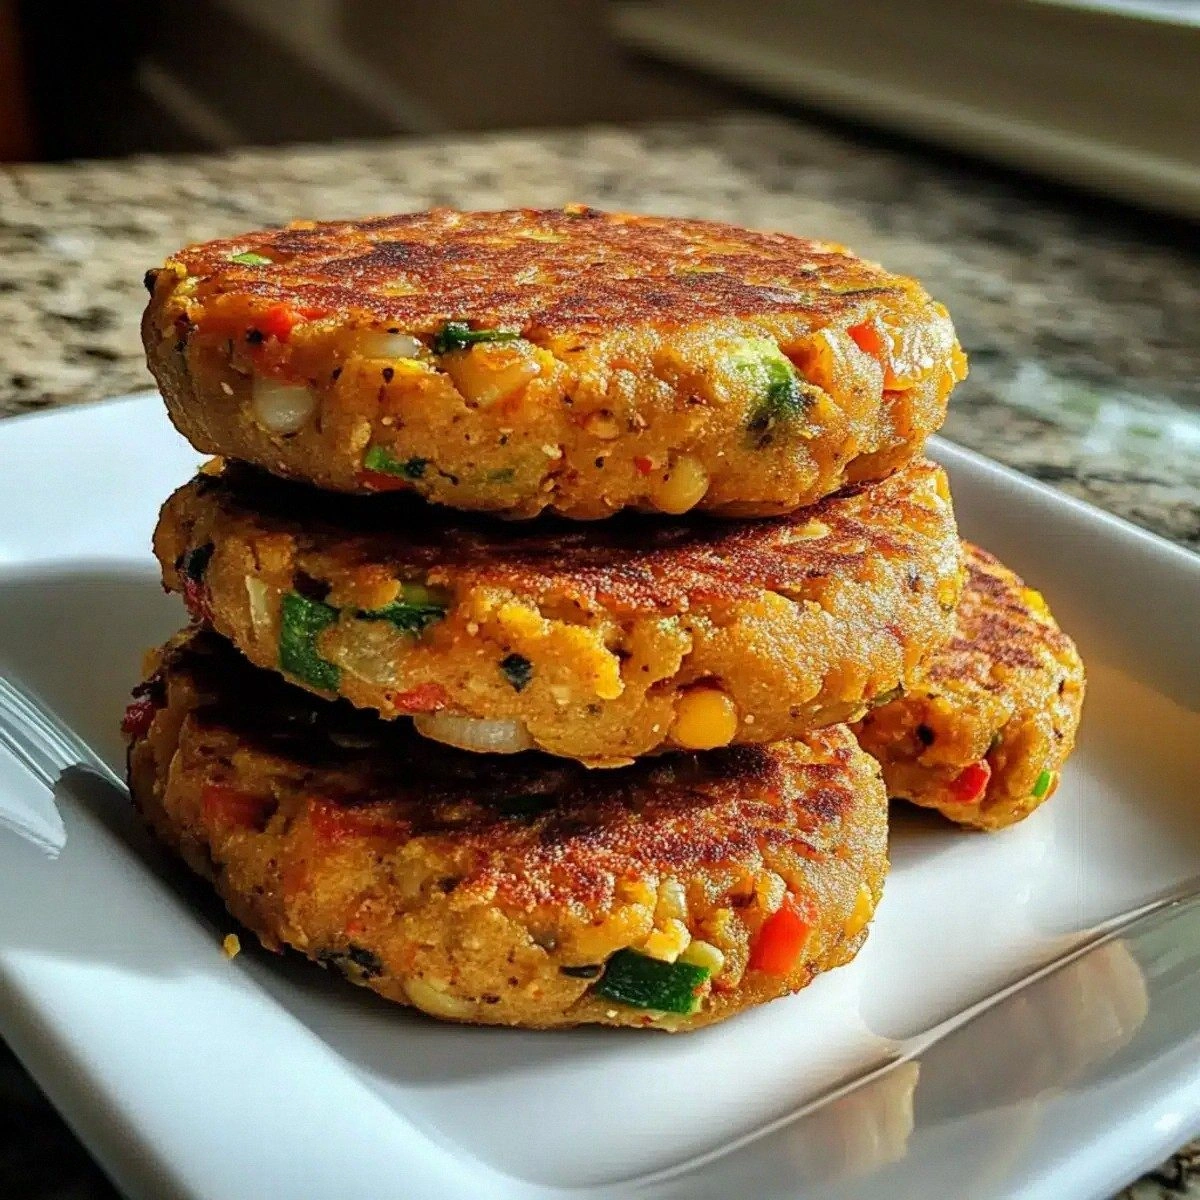
Picture this: a bright Saturday morning, the kitchen humming with the sound of a blender on full blast, and you—halfway through a bowl of chickpeas—realizing you forgot the salt. That moment of panic turns into a delicious revelation when you discover that the missing ingredient was a handful of fresh parsley and a pinch of smoked paprika. I’m talking about the instant flavor lift that makes every bite sing. I dare you to taste this and not go back for seconds, because the first bite will have you reaching for a second handful. The sizzle that follows when the patties hit the pan is not just sound; it’s a promise of crisp edges that shatter like thin ice. That crackle, the aroma of cumin and lemon zest, the bright green of spinach—all combine to create a dish that feels like a summer festival in your mouth.
Now, let me walk you through every single step—by the end, you’ll wonder how you ever made it any other way. This isn’t just a recipe; it’s a culinary experience that marries texture, flavor, and a dash of playful mischief. Most recipes get this completely wrong, treating chickpeas like a bland filler, but here we elevate them with a vibrant mix of veggies and spices. The result? A gluten‑free, protein‑packed patty that’s as satisfying as a hearty burger but without the guilt.
I’ll be honest—I ate half the batch before anyone else got to try it. The moment you bite into the first patty, you’ll notice that the lemon zest brightens everything, while the smoked paprika adds a subtle smokiness that lingers. If you’ve ever struggled with making chickpea patties that hold together, you’re not alone—this is the fix that turns a potential flop into a crowd‑pleaser. Picture yourself pulling this out of the oven, the whole kitchen smelling incredible, and feeling the confidence that comes from mastering a dish that’s both wholesome and utterly delicious.
Okay, ready for the game‑changer? The secret ingredient is a splash of olive oil, but it’s the combination of fresh parsley and a hint of lemon zest that truly sets these patties apart. This next part? Pure magic. And now the fun part—let’s dive into the ingredients that make this recipe shine.
What Makes This Version Stand Out
- Taste: The blend of cumin, smoked paprika, and lemon zest creates a flavor profile that’s bold yet balanced, giving each patty a savory depth that’s hard to resist. The fresh parsley adds a bright, herbal note that cuts through the earthiness of the chickpeas. Together, they produce a taste experience that’s both comforting and adventurous.
- Texture: The grated carrots and finely chopped bell peppers add moisture and crunch, preventing the patties from drying out. The oat flour provides a subtle bind that keeps the patties intact while maintaining a light crumb. This texture contrast is what makes each bite memorable.
- Simplicity: With only 13 ingredients, this recipe is a breeze to assemble, even for novice cooks. No need for exotic spices or complicated techniques—just a few simple steps that yield professional‑grade results.
- Uniqueness: The inclusion of spinach and lemon zest is a twist that most chickpea patty recipes overlook. This gives the dish a fresh, vibrant flavor that stands out from the crowd.
- Crowd Reaction: Friends and family rave about the crispy edges and the juicy center, often asking for the recipe after a single bite. The dish is a hit at gatherings, making it a reliable choice for potlucks and dinner parties.
- Ingredient Quality: Using high‑quality, fresh vegetables and a good olive oil elevates the overall flavor profile. The choice of gluten‑free oat flour ensures the patties remain wholesome while still achieving a satisfying bite.
- Cooking Method: Pan‑frying at the right temperature creates a golden crust that locks in moisture. This method is faster than baking and delivers a superior texture.
- Make‑Ahead Potential: These patties can be assembled and refrigerated for up to 24 hours, making them perfect for meal prep. Reheat in a skillet for a few minutes, and they’re as good as freshly cooked.
Alright, let's break down exactly what goes into this masterpiece…
Inside the Ingredient List
The Flavor Base
At the heart of these patties lies the chickpeas—a protein powerhouse that forms the foundation of the mixture. The can of chickpeas, drained and rinsed, provides a neutral canvas that absorbs the spices beautifully. If you skip this step and use dried chickpeas, the texture will be uneven, and the patties may fall apart during cooking. For an extra layer of flavor, try using a can of chickpeas that’s been seasoned with garlic and herbs; this will reduce the need for additional seasonings later on. The ground cumin brings a warm, earthy undertone that pairs wonderfully with the bright lemon zest, creating a flavor profile that’s both comforting and exciting. A pinch of salt is essential to bring out the natural sweetness of the chickpeas and vegetables.
The Texture Crew
The grated carrots and finely chopped bell peppers are not just decorative; they add moisture and a subtle sweetness that balances the savory elements. Grated carrots release natural sugars, creating a slight caramelization when pan‑fried. Bell peppers contribute a crisp bite and a splash of color that makes the dish visually appealing. The minced garlic, when sautéed with the vegetables, releases a robust aroma that envelops the patties. Olive oil is the secret weapon that keeps the mixture cohesive and prevents sticking; it also adds a silky finish to the crust. Together, these ingredients form a harmonious texture that is neither mushy nor dry.
The Unexpected Star
Fresh parsley is the unsung hero that adds a burst of herbal freshness. It counterbalances the earthiness of the chickpeas and the smokiness of the paprika, giving the patties a lively, green undertone. Lemon zest is another game‑changer; the citrus oils lift the overall flavor, making each bite feel bright and vibrant. Without the zest, the patties would taste flat and lack that zingy punch that keeps diners coming back for more. A sprinkle of smoked paprika adds a subtle depth that mimics the flavor of a slow‑smoked grill, providing a smoky aroma that’s both comforting and indulgent.
The Final Flourish
Gluten‑free oat flour is the binder that holds everything together. It’s light, neutral, and absorbs moisture, ensuring the patties maintain their shape during cooking. If you prefer a nuttier flavor, you can swap oat flour for almond flour; just keep the quantity the same for consistency. The spinach, chopped into small pieces, adds a nutritional boost and a pop of green that brightens the dish. It’s best added after the initial sauté so that it wilts just enough to keep the patties moist without becoming soggy. The black pepper adds a subtle heat that rounds out the spice profile, while the final splash of olive oil during the pan‑fry creates that coveted golden crust.
Everything's prepped? Good. Let's get into the real action…
The Method — Step by Step
- Step 1: Prepare the Chickpea Mixture In a large bowl, mash the drained chickpeas with a fork or potato masher until they’re mostly broken down but still retain some texture. Add the grated carrots, chopped bell peppers, minced garlic, chopped spinach, and fresh parsley. Stir until the vegetables are evenly distributed, ensuring each bite has a burst of color and crunch. This step is crucial for flavor distribution; don’t rush it. If the mixture feels too dry, sprinkle in a tablespoon of water or olive oil to bring it together. The goal is a cohesive yet chunky consistency that will hold when shaped into patties.
- Step 2: Season the Mixture Sprinkle in the ground cumin, smoked paprika, lemon zest, salt, and black pepper. Mix thoroughly so that the spices coat every crumb of the chickpea blend. The cumin provides warmth, while the smoked paprika adds depth. The lemon zest brightens the entire dish, cutting through the earthiness of the chickpeas. Taste the mixture; if it feels flat, add a pinch more salt or pepper. This is the moment to adjust the flavor profile to your liking. The mixture should be aromatic and well‑seasoned before forming patties.
- Step 3: Bind with Oat Flour Sprinkle the gluten‑free oat flour over the mixture, then fold it in gently with a spoon or your hands. The oat flour acts as a binder, preventing the patties from falling apart during cooking. Use enough to hold the mixture together, but avoid adding too much; you want a light, airy texture. Once the flour is incorporated, let the mixture rest for 5 minutes to allow the oats to absorb moisture. This brief rest period ensures the patties will stay firm. After resting, you can shape the mixture into 8 equal patties, about 3/4 inch thick. The uniform size will help them cook evenly.
- Step 4: Preheat the Skillet Heat a large non‑stick skillet over medium‑high heat and drizzle in 2 tablespoons of olive oil. Let the oil heat until it shimmers but does not smoke. This temperature is critical; if the pan is too hot, the patties will burn on the outside before cooking through. If it’s too cool, they’ll absorb too much oil and become greasy. The olive oil not only prevents sticking but also contributes to the crisp, golden crust.
- Step 5: Cook the Patties Place the patties gently into the hot skillet, leaving a little space between each one. Do not overcrowd; you want each patty to have room to develop a beautiful crust. Cook for 3–4 minutes on the first side, until the edges start to look golden and the bottom feels firm. Flip carefully with a spatula, then cook for another 3–4 minutes on the second side. The goal is a crispy exterior with a moist, flavorful interior. Watch the sizzle; that sound is the hallmark of a well‑cooked patty. If you want extra crispness, press down lightly with the spatula for the last minute of cooking.
- Step 6: Check for Doneness The patties should be golden brown on both sides and firm to the touch. If you’re uncertain, press the center; it should feel slightly springy but not rubbery. The internal temperature should reach 165°F (74°C) for optimal safety and texture. If you’re using a meat thermometer, insert it into the center of one patty. This step ensures that the chickpeas are fully cooked and the patties are safe to eat. A quick visual cue—if the edges are crisp and the center looks moist, you’re done.
- Step 7: Let Them Rest Once cooked, transfer the patties to a plate lined with paper towels to drain any excess oil. Let them rest for 2 minutes; this allows the juices to redistribute, ensuring every bite is juicy. Resting also helps the crust set, giving you that satisfying crunch with each bite. This short pause is often overlooked but makes a noticeable difference in texture. Keep the patties warm by covering them loosely with foil if you’re serving them immediately. A quick rest also prevents the patties from becoming soggy when served.
- Step 8: Serve and Enjoy Plate the patties with your favorite sides—perhaps a fresh green salad, a side of roasted sweet potatoes, or a light yogurt dip. Garnish with a few extra parsley leaves or a squeeze of lemon for an extra pop of freshness. Serve immediately while the patties are still warm and crisp. The aroma of the fresh herbs will enhance the dining experience. If you’re planning a potluck, these patties hold up well and can be reheated in a skillet or oven to maintain their texture.
- Step 9: Store the Leftovers If you have leftovers, let the patties cool completely before placing them in an airtight container. Store in the refrigerator for up to 3 days or freeze for up to 2 months. Reheat in a skillet over medium heat for a few minutes until warmed through. This step preserves the crispness and flavor, making the patties a convenient meal prep option. When reheating, a splash of water or a drizzle of olive oil can help revive the moisture.
- Step 10: Clean Up Clean the skillet immediately after use to prevent oil from hardening and sticking to the pan. Wash the bowl and utensils with warm soapy water. This simple step ensures your kitchen stays tidy and ready for the next culinary adventure. A clean workspace encourages creativity and keeps your cooking environment enjoyable.
That’s it — you did it. But hold on, I've got a few more tricks that'll take this to another level…
Insider Tricks for Flawless Results
The Temperature Rule Nobody Follows
Many cooks think that high heat is the key to a crispy patty, but the secret lies in maintaining a steady medium‑high temperature. If the skillet is too hot, the outer layer burns before the interior cooks, leading to uneven texture. Keep the heat at medium‑high and let the oil shimmer—this ensures a golden crust without a char. A quick test is to drop a small piece of the mixture into the pan; if it sizzles and starts browning in about 30 seconds, the temperature is spot on. Adjust the flame as needed; a slight dip in heat can prevent scorching.
Why Your Nose Knows Best
Before you flip the patties, pause and inhale. The aroma of cumin and smoked paprika should fill the air, signaling that the crust is forming. A strong, nutty scent means the pan has reached the right temperature. If the smell is faint or you notice a burnt odor, lower the heat. Your nose is a reliable gauge—trust it, and you’ll avoid over‑cooking.
The 5-Minute Rest That Changes Everything
After cooking, letting the patties rest for five minutes is more than a courtesy; it allows the juices to redistribute. This small window turns a dry center into a moist, flavorful core. If you skip this step, the patties may feel rubbery or soggy. A friend tried cooking them without a rest, and the result was a flat, unappetizing texture that made the entire dish feel like a flop. Resting also solidifies the crust, making each bite crisp.
Use a Non-Stick Skillet for Effortless Release
A good non‑stick skillet eliminates the need for excessive oil and reduces sticking. If you’re using a stainless steel pan, preheat it properly and use enough oil to coat the bottom. A well‑heated pan will release the patties naturally once the crust is formed. This trick saves time and keeps the patties clean and free from excess oil.
Keep the Oil Warm, Not Hot
Adding olive oil to the pan before the patties can cause a sudden splash if the oil is too hot. Warm the oil until it just begins to shimmer, then add the patties. This gentle approach prevents splattering and ensures a consistent cooking environment. A quick test is to flick a small amount of water onto the pan; if it sizzles instantly, the oil is ready.
Serve with a Tangy Dip for Extra Flavor
A simple yogurt or tahini sauce complements the smoky, earthy flavors of the patties. Whisk yogurt with lemon juice, garlic, and a pinch of salt for a creamy, refreshing contrast. The acidity of the dip cuts through the richness, making each bite feel balanced. This dip is also a crowd‑pleaser, especially at parties or family dinners.
Creative Twists and Variations
This recipe is a playground. Here are some of my favorite ways to switch things up:
Spicy Mexican Twist
Swap the smoked paprika for chipotle powder and add a dash of cayenne pepper. Toss in corn kernels and diced jalapeños for an extra kick. Serve over a bed of cilantro‑lime rice for a full Mexican-inspired meal that will have everyone shouting, “¡Mmm!”
Middle Eastern Medley
Replace the parsley with fresh mint and add a tablespoon of sumac for a tangy, lemony flavor. Mix in chopped tomatoes and a splash of pomegranate molasses for a sweet‑sour contrast. Serve with a dollop of labneh and a drizzle of olive oil for an authentic, Mediterranean vibe.
Asian Fusion Flair
Infuse the mixture with a tablespoon of soy sauce, a pinch of sesame oil, and a handful of chopped green onions. Add finely shredded cabbage for crunch and a splash of rice vinegar for brightness. Plate over steamed rice and garnish with toasted sesame seeds for a dish that feels like a quick stir‑fry.
Breakfast Boost
Fold in a beaten egg to the mixture for a protein‑rich breakfast patty. Serve with a side of sautéed spinach and a sprinkle of grated cheese. Pair with a glass of fresh orange juice for a wholesome, energizing start to your day.
Low-Carb Delight
Replace the oat flour with almond flour or coconut flour to reduce carbs. Add a handful of chopped kale for extra nutrients. These patties pair wonderfully with a side of roasted cauliflower for a satisfying low‑carb meal.
Sweet & Savory Surprise
Incorporate diced apples and a touch of cinnamon into the mixture for a sweet, aromatic twist. The apples add moisture and a subtle sweetness that balances the savory spices. Serve with a dollop of Greek yogurt for a creamy finish.
Storing and Bringing It Back to Life
Fridge Storage
Cool the patties completely before placing them in an airtight container. Store in the refrigerator for up to three days. When ready to eat, reheat in a skillet over medium heat for about five minutes, flipping halfway through. The quick heat will revive the crispness without drying out the interior. If you’re short on time, microwaving for 30 seconds on high will warm them through, but the skillet method preserves texture.
Freezer Friendly
Wrap each patty individually in parchment paper and place them in a freezer bag. This prevents clumping and makes it easy to grab just the number of patties you need. Freeze for up to two months. When you’re ready to enjoy them, thaw in the refrigerator overnight or use the defrost setting on your microwave. Reheat in a skillet for a few minutes to bring back that golden crust.
Best Reheating Method
The skillet is the champion for reheating these patties. Add a splash of water or a drizzle of olive oil to the pan to keep the patties moist. Heat over medium until the surface is crisp and the interior is heated through. A quick 1–2 minute burst in the oven at 350°F (175°C) can also work, but the skillet maintains the desired crunch. Remember to let them rest for a minute after reheating to allow juices to settle.