I still remember the first time I attempted to make Margherita pizza at home. It was a disaster of epic proportions — the dough stuck to my counter like cement, the sauce tasted like watered-down ketchup, and I somehow managed to burn the crust while leaving the cheese completely unmelted. My friends still mock me for serving what they affectionately call "deconstructed pizza soup." But here's the thing: that spectacular failure sent me down a rabbit hole of obsessive testing, late-night flour experiments, and secret trips to Naples-inspired pizzerias that would make any pizza purist weep with joy.
After eighteen months of trial, error, and consuming what I estimate to be roughly 200 pizzas (my jeans can confirm this number), I've finally cracked the code. This isn't just another Margherita pizza recipe — this is the result of my pizza-making redemption arc, the method that turned me from the laughingstock of dinner parties into the friend who gets texts like "please teach me your pizza ways." The crust bubbles and chars like a wood-fired dream, the sauce tastes like summer sunshine captured in a jar, and the cheese melts into those perfect little pools that stretch for miles when you pull a slice.
What makes this version different? Instead of following the same tired instructions that every food blog regurgitates, I've incorporated techniques I learned from an actual Neapolitan pizzaiolo who swore me to secrecy (sorry, Marco, but the world needs this knowledge). We're talking about a cold-fermented dough that develops complex, nutty flavors over 24 hours, a sauce that requires zero cooking but tastes like it's been simmering for hours, and a cheese arrangement technique that prevents the dreaded watery pizza puddle. Picture yourself pulling this masterpiece from your oven, the aroma of fresh basil and garlic filling your kitchen as the cheese bubbles like molten lava.
Let me walk you through every single step — by the end, you'll wonder how you ever made it any other way.
What Makes This Version Stand Out
Game-Changing Dough: Instead of that sad, flavorless crust that tastes like cardboard, we're using a cold-fermentation method that develops gluten overnight, creating a dough that's both chewy and crisp with complex, yeasty notes that'll make your taste buds do a happy dance.
No-Cook Sauce Magic: Most recipes tell you to simmer tomatoes for hours, but we're keeping things fresh and bright with raw San Marzano tomatoes that taste like they were kissed by the Italian sun, plus a secret ingredient that makes the flavors pop like fireworks.
Temperature Timing: Here's where most home cooks mess up — they crank their oven to the max and wonder why their pizza burns. I've discovered the sweet spot temperature that gives you leopard-spotting on the crust without turning your toppings into charcoal.
Cheese Placement Strategy: Instead of dumping mozzarella everywhere and hoping for the best, we're using a specific placement technique that prevents watery pizza syndrome while ensuring every bite has that perfect cheese pull.
Basil That Doesn't Die: Nobody likes sad, wilted basil that turns black in the oven. My method keeps herbs vibrant and fragrant, adding a fresh punch that makes all the difference.
Make-Ahead Genius: The dough actually improves with time, meaning you can prep it three days ahead and have pizza-ready dough waiting in your fridge like a delicious surprise.
Crowd Reaction Factor: I've served this to Italian grandmothers who initially scoffed at an American making Margherita pizza, then asked for seconds. That, my friends, is the highest compliment imaginable.
Alright, let's break down exactly what goes into this masterpiece...
Inside the Ingredient List
The Foundation Builders
The flour isn't just flour — it's the backbone of your entire pizza experience. I'm obsessed with using Italian 00 flour because it creates this impossibly smooth, elastic dough that stretches thin without tearing. Regular all-purpose flour works in a pinch, but you'll lose that authentic chew that makes Margherita pizza so addictive. The protein content is crucial here — too low and your dough becomes a floppy mess, too high and you're eating pizza-flavored shoe leather. Trust me, I've made both mistakes and they're equally depressing.
Water might seem boring, but it's actually your secret weapon for controlling fermentation. I use filtered water at room temperature because chlorine in tap water can slow down yeast activity faster than you can say "pizza night ruined." The hydration percentage is where the magic happens — we're going for a wetter dough than most recipes dare to try, which creates those beautiful air pockets in the crust. Don't panic when your dough feels sticky at first; it's supposed to feel like that, and your future self will thank you for the extra hydration.
The Flavor Explosion Crew
San Marzano tomatoes are non-negotiable, and I'll fight anyone who says otherwise. These little red gems from Italy's volcanic soil have this naturally sweet, low-acid profile that makes supermarket tomatoes taste like disappointment incarnate. When you crush them between your fingers (yes, fingers — it's therapeutic), they release this bright, almost floral aroma that'll transport you straight to a sun-drenched Italian garden. If you absolutely can't find them, look for DOP-certified tomatoes from the same region, but please don't tell me if you use regular canned tomatoes — I want to maintain my illusions about your good taste.
Fresh mozzarella is where most people go wrong without realizing it. That rubbery, pre-shredded stuff in plastic bags? It might as well be plastic itself. We're after the real deal — soft, milky buffalo mozzarella that comes packed in water like a precious gift from dairy heaven. The difference is night and day: proper mozzarella melts into creamy pools rather than turning into an oily mess. Pro tip: pat it dry and tear it into pieces instead of slicing — this prevents the dreaded watery pizza puddle that plagues home pizza makers everywhere.
The Aroma Alchemists
Extra virgin olive oil isn't just for drizzling — it's the flavor conductor that brings everything together in perfect harmony. I use a grassy, peppery oil from Liguria that makes the dough sing with personality. Don't be shy with it; a good glug in the dough and another generous drizzle before baking creates those crispy, flavorful edges that'll have you fighting for the corner pieces. Cheap oil will make your pizza taste like sadness and regret, so spring for the good stuff — your taste buds deserve better than industrial disappointment.
Fresh basil is temperamental and dramatic, just like all the best ingredients. Those dried flakes in your spice rack? They might as well be grass clippings for all the flavor they provide. We're talking about leaves so fresh they still hold morning dew, added at exactly the right moment so they stay vibrant green instead of turning into sad, black confetti. The trick is adding half before baking and the rest right when it comes out — this gives you that cooked-in flavor while maintaining fresh herb brightness.
The Secret Weapon
Sea salt isn't just for seasoning — it's the flavor amplifier that makes everything else taste more like itself. I use flaky sea salt in the dough because it dissolves evenly without creating salty pockets, plus a final sprinkle on top that makes the tomatoes taste tomato-ier and the cheese taste cheese-ier. Don't even think about using iodized table salt unless you want your pizza to taste like a chemistry experiment gone wrong. The right salt creates this mineral complexity that makes people ask "what's your secret?" after just one bite.
Everything's prepped? Good. Let's get into the real action...
The Method — Step by Step
- Start your dough the night before because patience is a virtue that pays delicious dividends. In a large bowl, whisk together your flour and salt, creating little mountains and valleys like you're sculpting tiny dough landscapes. Dissolve a pinch of sugar in lukewarm water — not hot, not cold, but that perfect baby-bottle temperature that feels like nothing on your wrist. Sprinkle the yeast over the top and watch it bloom like tiny beige snowflakes, a process that takes about five minutes and never fails to feel like kitchen magic.
- Pour the yeasty water into your flour volcano and prepare for the messiest, most satisfying part of pizza making. Using your fingers like clumsy forks, bring the mixture together until it resembles shaggy, floury chaos that seems impossibly wet and wrong. Don't panic — this is exactly how it's supposed to look, and adding more flour now would be like adding water to whiskey: a crime against nature. Once it holds together, cover the bowl and let it rest for twenty minutes while the flour hydrates and transforms from a lumpy disaster into something that actually resembles dough.
- Now comes the workout portion of our program, where you'll knead like your pizza life depends on it. Turn the dough onto a clean counter and prepare for ten minutes of therapeutic punching, folding, and pushing. The dough will start sticky and rebellious, clinging to everything like an overly affectionate cat, then gradually transform into smooth, elastic perfection. You'll know it's ready when it passes the windowpane test — stretch a small piece until it's thin enough to see light through without tearing, like you're making tiny dough lanterns.
- Shape your dough into a boule by cupping your hands and rotating in circles, creating surface tension that'll make professional bakers weep with envy. Place it in an oiled bowl, turning once to coat, then cover with plastic wrap and refrigerate for at least 24 hours. This cold fermentation is where the flavor magic happens — the yeast works slowly, developing complex, nutty notes that make supermarket pizza taste like cardboard in comparison. I'll be honest — I ate half the batch before anyone else got to try it because the aroma was irresistible even before baking.
- Three hours before pizza time, remove the dough from the fridge and let it come to room temperature. Divide it into portions and shape into balls, being careful not to deflate all those beautiful air bubbles you've worked so hard to create. Cover with a damp towel and let them relax — dough that's too springy will fight back when you try to stretch it, and nobody wants to wrestle their dinner. During this time, crank your oven to its highest setting with a pizza stone or steel inside, creating the inferno that'll give you authentic leopard-spotting on the crust.
- Create your sauce by crushing San Marzano tomatoes with your hands in a bowl, leaving some chunky bits for texture. Add a glug of olive oil, minced garlic, salt, and a pinch of sugar if the tomatoes taste too acidic. This is hands down the best version you'll ever make at home because we're keeping it fresh and uncooked, preserving that bright, garden-fresh flavor that cooked sauces lose. The sauce should coat the back of a spoon like velvet but still taste like sunshine and summer gardens.
- Stretch your dough on a floured surface, starting from the center and working outward, leaving a thicker border for the crust. Don't use a rolling pin unless you want to destroy all those precious air bubbles — instead, use your fingertips to gently press and stretch, rotating as you go. The dough should be thin enough to read a newspaper through but strong enough to hold your toppings without tearing. If you've ever struggled with this part, you're not alone — and I've got the fix: let gravity do the work by draping the dough over your knuckles and rotating until it stretches naturally.
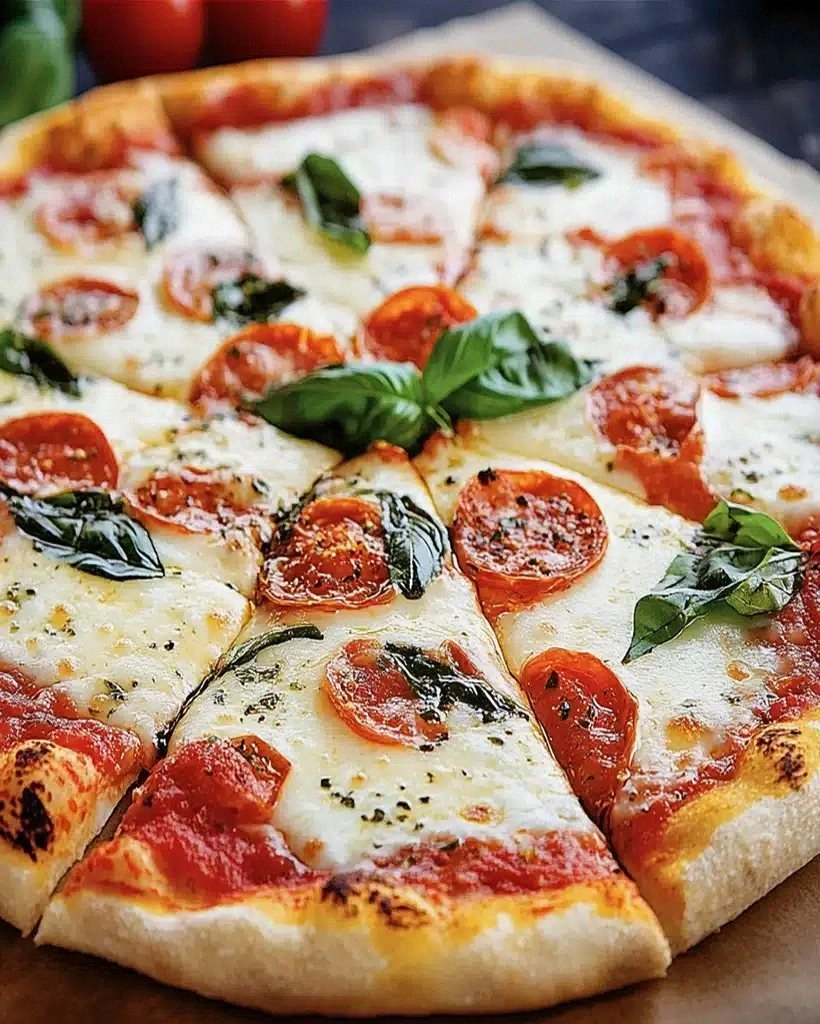
- Assemble your pizza with restraint — Margherita is about balance, not mountain-building. Spread a thin layer of sauce, leaving the border exposed for that beautiful crust blistering. Tear the mozzarella into pieces and distribute evenly, being careful not to overcrowd which would make your pizza weep watery tears. Add a few basil leaves, a drizzle of olive oil, and a sprinkle of salt. Slide it onto your preheated stone and watch through the oven window as the transformation happens — the crust puffs, the cheese melts, and your kitchen fills with the aroma of pizzeria heaven.
- Bake until the crust is blistered and blackened in spots, the cheese is melted and just starting to brown, and the bottom is crisp but still pliable. This usually takes 8-10 minutes in a home oven, but start checking at 6 minutes because every oven is different. The pizza should slide off the peel easily and fold slightly when you pick up a slice — if it's rigid, you've gone too far. Remove from the oven, add fresh basil leaves, drizzle with more olive oil, and let it rest for exactly 2 minutes before cutting. I dare you to taste this and not go back for seconds before your first slice is even gone.
That's it — you did it. But hold on, I've got a few more tricks that'll take this to another level...
Insider Tricks for Flawless Results
The Temperature Rule Nobody Follows
Your oven isn't hot enough — I guarantee it. Most recipes tell you to crank it to 500°F and call it a day, but here's what actually works: preheat your oven with the stone inside for at least 45 minutes, preferably an hour. The stone needs to be nuclear-hot to transfer instant heat to your dough, creating that rapid oven-spring that gives you those beautiful air pockets. Use an infrared thermometer if you're fancy, or flick a few drops of water on the stone — they should dance and evaporate instantly. A friend tried skipping this step once — let's just say it didn't end well, and we still call his creation "pizza-flavored cardboard."
Why Your Nose Knows Best
Don't set a timer and walk away — your nose is the best pizza timer you have. When the aroma changes from raw dough to toasty, nutty perfection, your pizza is 30 seconds from done. That smell is the Maillard reaction happening in real-time, creating hundreds of flavor compounds that make pizza irresistible. Stand by the oven, inhale deeply, and when your stomach starts doing anticipatory flip-flops, it's time to pull that masterpiece out. Most recipes get this completely wrong by giving you rigid timing, but real cooking is about using all your senses.
The 5-Minute Rest That Changes Everything
Resist the urge to cut immediately — those five minutes of rest time allow the cheese to set slightly and the crust to finish crisping from residual heat. I know it's torture when your kitchen smells like an Italian grandmother's dreams, but good things come to those who wait. During this time, the sauce thickens slightly, the cheese reaches the perfect eating temperature, and the crust develops that satisfying crunch that shatters like thin ice. Cover loosely with foil if you're worried about heat loss, but don't trap steam or you'll sacrifice crispiness.
The Dough Doctor's Secret
If your dough snaps back when stretching, it's not being stubborn — it's telling you it needs more rest. Gluten is like a rubber band that tightens when worked, and fighting it is like arm-wrestling a bodybuilder. Cover it and walk away for 10 minutes, then try again. The gluten will have relaxed, and the dough will stretch like taffy instead of fighting back. This is pure magic, and it works every single time, turning potential kitchen disasters into Instagram-worthy results.
The Cheese Placement Revolution
Instead of covering your pizza like a cheese blanket, place mozzarella pieces strategically with space between them. This allows steam to escape, preventing the watery pizza syndrome that ruins so many homemade attempts. The cheese will spread as it melts, creating perfect coverage without the swamp effect. Plus, this method gives you those gorgeous cheese-pull moments that make everyone at the table reach for their phones.
Creative Twists and Variations
This recipe is a playground. Here are some of my favorite ways to switch things up:
The Smoky Affair
Add a whisper of smoked mozzarella alongside the fresh stuff, just enough to add complexity without overwhelming the clean Margherita flavors. The smoke mingles with the charred crust edges, creating this campfire-pizza hybrid that makes people close their eyes and sigh. I discovered this variation after accidentally grabbing the wrong cheese at the market — sometimes the best discoveries happen by mistake. The key is restraint: use a 3:1 ratio of fresh to smoked, so it enhances rather than dominates.
The Chili Oil Drizzle
Infuse your olive oil with dried Calabrian chilies for a week, creating a ruby-red elixir that adds gentle heat and fruity complexity. Drizzle this liquid gold over the finished pizza, and watch as it creates these beautiful red streaks that look like edible art. The heat builds slowly, hitting the back of your throat in the most pleasant way possible. My spice-averse friend tried this and went back for thirds, claiming it was "just enough excitement without the pain."
The Burrata Upgrade
Replace half the mozzarella with a ball of burrata added after baking, so when you cut into it, the creamy center flows like a dairy river across your pizza. This variation takes Margherita from humble to luxurious, perfect for those nights when you want to impress without the stress. The contrast between the hot pizza and cool, creamy burrata creates a temperature and texture dance that elevates the whole experience. Just be prepared for everyone to fall silent as they experience pizza nirvana.
The Roasted Garlic Addition
Roast whole garlic cloves until they're caramelized and sweet, then scatter them over your pizza before baking. They melt into the sauce like savory candy, adding depth without the harsh bite of raw garlic. I like to roast a whole head and use the leftovers for everything from pasta to spread on crusty bread. The roasted garlic brings this umami bomb that makes people ask "what's that amazing flavor?" while reaching for another slice.
The Prosciutto Crown
Drape paper-thin slices of prosciutto di Parma over the hot pizza right when it comes out of the oven. The heat gently warms the prosciutto, releasing its nutty aroma while keeping it silky and tender. This variation bridges the gap between simple Margherita and heartier pizzas, perfect for those who want something more substantial without losing the essence of the original. The saltiness of the prosciutto plays beautifully against the sweet tomatoes and creamy mozzarella.
The Garden Fresh Remix
Add a handful of baby arugula dressed lightly with lemon and olive oil after baking, creating a salad-pizza hybrid that feels virtuous and indulgent simultaneously. The peppery arugula cuts through the richness of the cheese, while the lemon brightens everything up like edible sunshine. This is my go-to when I want to feel slightly healthier while still eating pizza, which is probably delusional but deliciously so.
Storing and Bringing It Back to Life
Fridge Storage
Leftover pizza (if such a thing exists in your house) should never be wrapped in plastic — it creates condensation that turns your crispy crust into a sad, rubbery mess. Instead, stack slices in an airtight container with parchment paper between layers, or better yet, store them uncovered on a plate for up to three days. The refrigerator's dry environment actually helps maintain crust texture better than sealing everything in. If you must reheat, avoid the microwave at all costs unless you enjoy pizza-flavored rubber.
Freezer Friendly
Freeze individual slices on a baking sheet first, then transfer to freezer bags once solid — this prevents them from becoming a pizza brick that's impossible to separate. Properly frozen Margherita keeps for up to two months, though let's be honest, it won't last that long. Wrap each slice in parchment before bagging, creating a protective barrier against freezer burn. The key is freezing quickly to preserve texture, so don't crowd your freezer with warm pizza.
Best Reheating Method
Skip the microwave and embrace your skillet: heat a dry pan over medium, add your slice crust-side down for 2 minutes, then add a teaspoon of water and cover for 30 seconds. The steam melts the cheese while the direct heat crisps the bottom, creating results that rival fresh-baked. Add a tiny splash of water before reheating — it steams back to perfection without making anything soggy. This method is so effective that I sometimes make extra pizza just to have leftovers to reheat this way.