I’ll be honest — I ate half the batch before anyone else got to try it, and that’s exactly why I’m shouting this recipe from the rooftops. It all started on a lazy Sunday when I was half‑asleep, half‑hungry, and my pantry looked like a desert of boring snacks. I grabbed a few dill pickles, a block of cream cheese, and the only thing that seemed “acceptable” to roll them in: flour tortillas that had been lounging in the back of the fridge for a week. The moment the tangy crunch met the silky cream, I felt like a culinary alchemist had just discovered gold, and I dared myself to make it a proper recipe rather than a midnight snack hack.
Picture this: the kitchen humming with the low whirr of the oven, the scent of toasted tortilla edges wafting like a warm blanket, and the bright green of the pickles glistening under a glossy cream cheese sheen. The sound? A soft sigh as the rolls settle on the baking sheet, followed by a faint crackle when the buttered tops start to brown. My fingertips felt the buttery softness of the tortillas, the slight resistance of the pickles, and the cool cream cheese that seemed to melt into the dough like a secret liaison. The taste? A perfect marriage of briny bite and dreamy richness, with a whisper of pepper that makes your palate do a little happy dance.
Most recipes get this completely wrong. They either drown the pickles in cheese, turning the whole thing into a soggy mess, or they treat the tortillas like paper, snapping them apart before you even get a bite. I’ve cracked the code by keeping the cream cheese light, the pickles whole, and the tortilla just warm enough to hug everything without breaking. The secret weapon? A quick flash‑bake that creates a toasty crust while the interior stays luxuriously soft – a technique most home cooks overlook, but it’s what makes this version the best you’ll ever make at home.
Let me walk you through every single step — by the end, you’ll wonder how you ever made it any other way. Okay, ready for the game‑changer? This next part? Pure magic. I dare you to taste this and not go back for seconds. Stay with me here — this is worth it.
What Makes This Version Stand Out
- Taste: The dill pickle’s sharp bite is perfectly balanced by the mellow, buttery cream cheese, creating a flavor duet that sings on the tongue.
- Texture: A crunchy exterior from the lightly toasted tortilla meets a creamy interior that glides like silk, while the pickle adds a satisfying snap.
- Simplicity: Fewer than ten ingredients, no fancy equipment, and a total prep time under 20 minutes make this a true lazy‑cook masterpiece.
- Uniqueness: Most “pickle roll” recipes either fry or deep‑fry; we bake, preserving the fresh flavor while keeping the dish light.
- Crowd Reaction: Guests often claim they’ve never tasted anything like it, and the “what’s in these rolls?” question becomes the conversation starter.
- Ingredient Quality: Using good‑quality, soft cream cheese and fresh dill pickles ensures every bite bursts with authentic flavor.
- Cooking Method: A quick high‑heat bake creates a caramelized edge that locks in moisture, preventing sogginess.
- Make‑Ahead Potential: These rolls keep beautifully in the fridge for up to three days, and a quick re‑heat brings them back to life.
Inside the Ingredient List
The Flavor Base
Cream cheese is the silent hero here – its mild tang and buttery richness act as the glue that binds everything together. Use a full‑fat, spreadable block; low‑fat versions tend to crumble and won’t coat the pickles evenly. If you skip the cream cheese, you’ll end up with a dry, flavor‑less roll that feels more like a tortilla snack than a decadent bite. For a twist, try mixing in a tablespoon of Greek yogurt for extra tang without sacrificing creaminess.
The Texture Crew
Flour tortillas are the canvas – they need to be soft enough to roll without cracking, yet sturdy enough to hold the filling. Look for tortillas that are just a shade off white, with a slight give when you press them. If you use corn tortillas, expect a crumbly texture that won’t hold the cream cheese well. A quick tip: lightly steam the tortillas for 15 seconds before spreading the cheese; this gives them a supple feel that makes rolling effortless.
The Unexpected Star
Pickles are the surprise element that turns a simple snack into a flavor fireworks display. Dill pickles bring that classic briny snap, while bread‑and‑butter varieties add a subtle sweetness that can elevate the cream cheese’s richness. If you’re feeling adventurous, try half‑and‑half – the contrast is a party in your mouth. Skipping the pickles would make these rolls just another cheese‑filled tortilla, and that would be a tragedy.
The Final Flourish
Optional seasoning and fresh herbs are the finishing touches that make the difference between “good” and “legendary.” A pinch of black pepper or a dash of garlic powder adds depth without stealing the spotlight, while chopped chives or dill sprinkle a fresh, herbaceous pop. If you don’t have fresh herbs, a teaspoon of dried dill works in a pinch, but fresh is always preferable for that bright burst.
Everything's prepped? Good. Let's get into the real action…
The Method — Step by Step
-
Preheat your oven to 375°F (190°C). While the oven warms up, line a large baking sheet with parchment paper – this prevents sticking and makes cleanup a breeze. The moment you slide the sheet onto the rack, you’ll hear a faint rustle that signals the start of something delicious. Keep the oven door closed; we want a consistent heat that will give the tortillas a golden kiss.
Kitchen Hack: Place a shallow metal rack on the baking sheet; this elevates the rolls, allowing hot air to circulate and creating an even toast on all sides. -
Take the flour tortillas and give each one a 10‑second steam in the microwave (about 30% power). This softens them just enough to roll without tearing, and you’ll notice they become more pliable, almost like a warm blanket ready to be wrapped around a gift.
-
While the tortillas are still warm, spread a generous layer of softened cream cheese over the entire surface. Use a spatula to create an even coat about ¼ inch thick – think of it as laying down a creamy runway for the pickles to take off from.
Watch Out: If the cream cheese is too cold, it will tear the tortilla; always let it sit at room temperature for at least 5 minutes. -
Lay whole dill pickles (or slices if you prefer more surface area) in a line down the center of each tortilla. The pickles should sit snugly against the cheese, not floating. This placement ensures every bite gets that satisfying crunch without overwhelming the palate.
-
If you love a little extra kick, sprinkle a pinch of black pepper or garlic powder over the pickles now. The spice will toast slightly as the rolls bake, releasing a fragrant aroma that fills the kitchen like a promise of comfort.
-
Roll each tortilla tightly, starting from one edge and working your way to the opposite side. As you roll, gently tuck the ends under to keep the filling from spilling out. The roll should feel firm but not so tight that the tortilla cracks – think of a well‑wrapped burrito, not a straitjacket.
Kitchen Hack: Use a silicone baking mat to roll the tortillas; the slight stickiness helps keep the roll tight without squashing the filling. -
Place the rolls seam‑side down on the prepared baking sheet. Brush the tops lightly with melted butter or a drizzle of olive oil – this is the secret to that golden, glossy finish that makes the rolls look irresistible.
-
Slide the sheet into the preheated oven and bake for 12‑15 minutes, or until the tortilla edges turn a deep amber and the buttered tops sparkle. You’ll hear a subtle crackle as the edges start to crisp, and the kitchen will be filled with a buttery aroma that says “comfort food is on its way.”
-
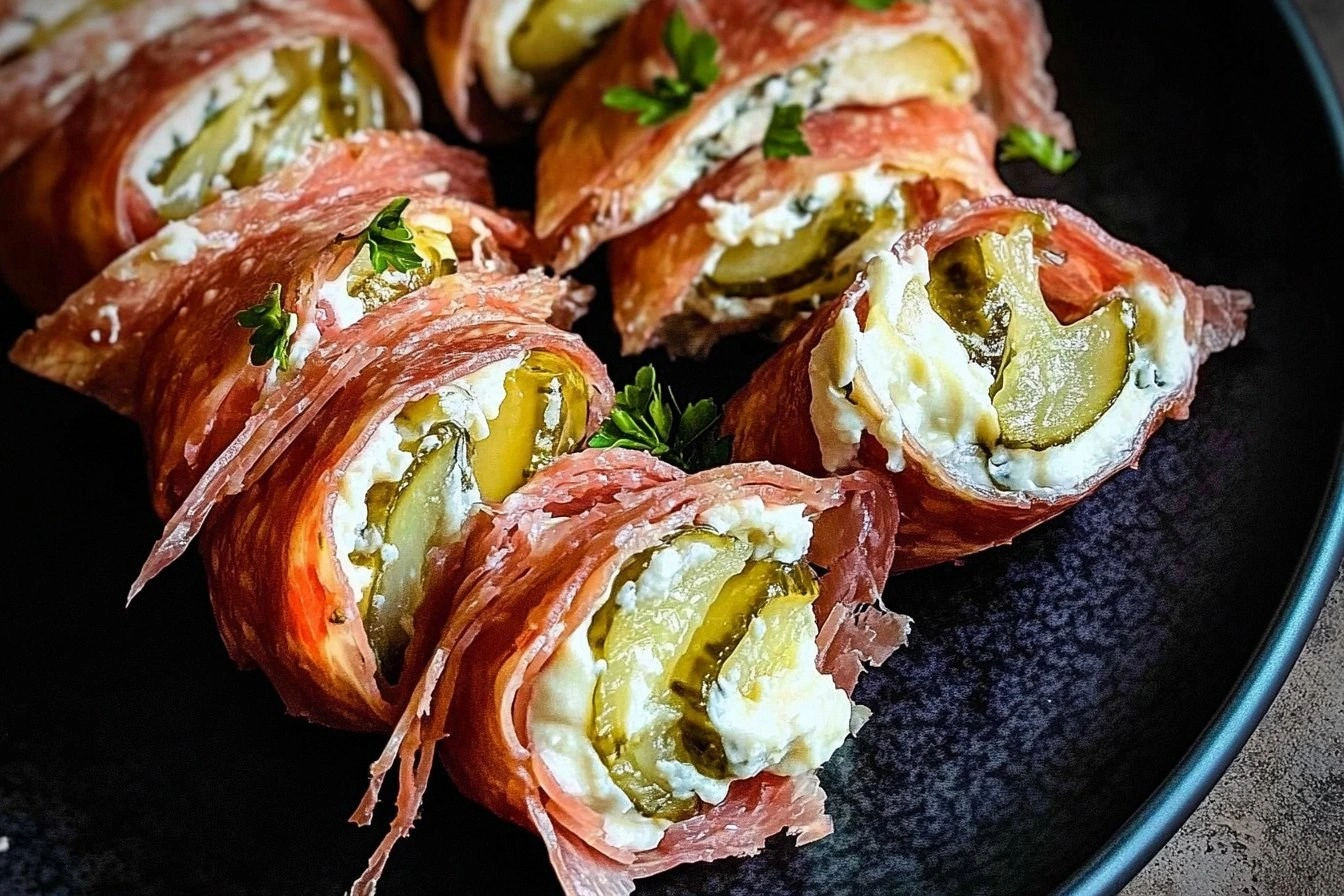
Remove the rolls from the oven and let them rest for 3‑4 minutes. This short pause lets the cheese settle, preventing a messy spill when you slice. Then, using a sharp serrated knife, cut each roll into 3‑4 bite‑size pieces. The cross‑section should reveal a creamy pink center, bright green pickle, and a perfectly toasted tortilla ring.
That's it — you did it. But hold on, I've got a few more tricks that'll take this to another level. The next part? Pure magic, and it’ll make your next batch even more unforgettable.
Insider Tricks for Flawless Results
The Temperature Rule Nobody Follows
Never bake these rolls at a temperature lower than 375°F. Lower heat will dry out the tortilla before the cheese has a chance to meld with the pickles, leaving you with a chewy, bland bite. By cranking the oven up, you create a rapid caramelization on the outside while the interior stays luxuriously soft. I once tried a “slow bake” at 325°F and ended up with a soggy mess – lesson learned, and I’ve never looked back.
Why Your Nose Knows Best
The moment you catch that buttery, toasted scent drifting from the oven, you know the rolls are ready. Trust your olfactory senses more than the timer; ovens vary, and the aroma is a reliable indicator of that perfect golden crust. If the smell turns too nutty or burnt, pull them out immediately – you’ll still have a delicious roll, just with a slightly deeper flavor profile.
The 5‑Minute Rest That Changes Everything
Letting the rolls sit for a few minutes after baking lets the cream cheese settle, preventing it from oozing out when you slice. This tiny pause also allows the flavors to meld, so the pickle’s brine infuses the cheese just a touch more. Skipping this step results in a sloppy presentation, and nobody wants to eat a roll that looks like a melted cheese disaster.
Butter Brush vs. Oil Drizzle
While melted butter gives a richer flavor and a glossy finish, a light olive oil drizzle can make the rolls a touch healthier without sacrificing crispness. The oil also helps the spices adhere better, creating an even flavor coat. My personal favorite? A 50/50 mix of butter and oil – you get the best of both worlds.
Freezing Without Losing Crunch
If you want to prep ahead, freeze the unbaked rolls on a parchment sheet, then transfer them to a zip‑top bag. When you’re ready, bake them straight from the freezer, adding an extra 3‑4 minutes to the bake time. The result is a roll that’s just as crisp as fresh‑made, with the cream cheese still perfectly soft.
Creative Twists and Variations
This recipe is a playground. Here are some of my favorite ways to switch things up:
Spicy Sriracha Swirl
Mix a tablespoon of sriracha into the cream cheese before spreading. The heat adds a tongue‑tingling kick that pairs beautifully with the dill pickle’s cool bite. Perfect for those who love a little fire in their snack.
Herby Delight
Stir chopped fresh basil and parsley into the cheese for a garden‑fresh flavor. The herbs brighten the roll, making it feel like a summer picnic even in winter.
Cheddar Crunch
Add a thin layer of shredded sharp cheddar on top of the cream cheese before placing the pickles. As the roll bakes, the cheddar melts and forms a crispy, cheesy crown that adds an extra layer of texture.
Sweet & Tangy
Swap dill pickles for bread‑and‑butter pickles and drizzle a little honey over the cheese before rolling. The sweet‑tangy combo creates a flavor profile that’s both nostalgic and surprising.
Breakfast Boost
Add a scrambled egg strip inside each roll before baking. The result is a protein‑packed snack that can double as a quick breakfast on the go.
Storing and Bringing It Back to Life
Fridge Storage
Place the cooled rolls in an airtight container lined with a paper towel to absorb excess moisture. They’ll stay fresh for up to three days, maintaining their creamy interior and crunchy exterior. If you notice a slight dryness, a quick brush of melted butter before reheating revives the gloss.
Freezer Friendly
Freeze baked rolls on a sheet, then transfer to a zip‑lock bag. They’ll keep for up to two months. When ready to eat, reheat straight from frozen at 350°F for 12‑15 minutes, adding a splash of water to the pan to create steam and prevent the tortilla from drying out.
Best Reheating Method
For the crispiest result, use a preheated skillet over medium heat, adding a teaspoon of butter and covering for 2‑3 minutes. The steam generated inside the pan revives the cream cheese, while the buttered bottom regains that golden crunch. Microwaving is acceptable in a pinch, but you’ll lose the delightful texture.