Picture this: it's 11:47 p.m. on a Tuesday, your fridge is practically empty except for some ground beef, a few sad tortillas, and that half-onion that's been giving you side-eye all week. You're standing there in your pajamas, stomach growling like an angry raccoon, when suddenly you remember the life-changing beef burrito that your neighbor brought over last month. The memory hits like a freight train of flavor — that perfectly seasoned meat, those tender beans, the way the cheese melted into every crevice like it was meant to be there all along. That craving? It's not going anywhere until you make it happen.
Now, before you reach for those sad packets of mystery seasoning from 2019, let me stop you right there. Most home cooks approach burritos like they're just throwing stuff in a tortilla and hoping for the best. They end up with dry meat, watery salsa, and that disappointing moment when everything falls apart in your hands like a culinary Jenga tower. But here's the thing — the difference between a mediocre burrito and one that makes you close your eyes and sigh with happiness isn't about fancy ingredients or spending hours in the kitchen. It's about understanding the harmony of textures, the layering of flavors, and a few game-changing techniques that restaurant chefs don't want you to know.
This recipe came from my absolute obsession with recreating the burritos from that tiny food truck that used to park behind the laundromat on 5th Street. You know the type — run by someone's abuela who doesn't speak much English but somehow communicates pure love through food. I spent months reverse-engineering their secret, and let me tell you, when I finally nailed it, I may have done a little victory dance in my kitchen at 2 a.m. The smell alone transported me back to that cracked vinyl booth, plastic fork in hand, wondering if it would be weird to order a second one "for the road."
What you're about to make isn't just another dinner — it's the kind of burrito that ruins all other burritos for you forever. We're talking about meat so flavorful it tastes like it's been slow-cooking for hours (spoiler: it hasn't), beans that are creamy instead of mushy, and that perfect balance of melty cheese and fresh toppings that makes each bite better than the last. Stay with me here — this is worth it. Let me walk you through every single step — by the end, you'll wonder how you ever made it any other way.
What Makes This Version Stand Out
This isn't your average throw-everything-in-a-pan burrito situation. I've tested this recipe on my most brutally honest friends (including my sister who once told me my chocolate chip cookies tasted "like disappointment"), and they all agree: this version is something special.
- Flavor Explosion: Instead of just dumping taco seasoning on plain beef, we're building layers of flavor with a special spice blend that includes a touch of cocoa powder for depth and a hint of cinnamon for warmth. Your taste buds won't know what hit them, but they'll definitely be asking for more.
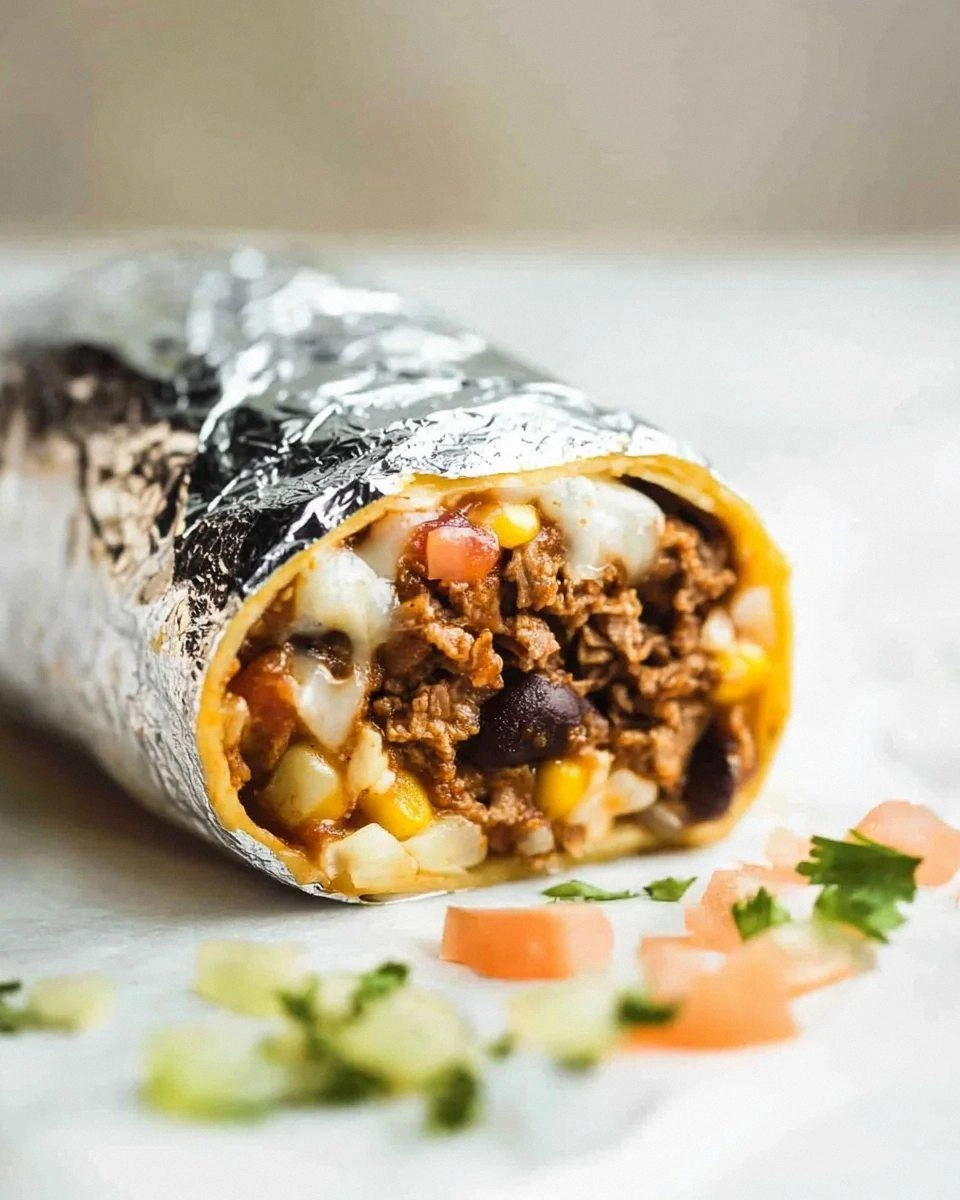
- Texture Perfection: Most burritos suffer from textural monotony — everything's either mushy or crunchy. Not here. We're creating a symphony of textures: tender beef, creamy beans, melty cheese, crisp lettuce, and juicy tomatoes all playing together beautifully.
- Restaurant-Quality Without the Price Tag: Those $15 burritos from your favorite spot? We're making something better for under $4 per serving. Your wallet will thank you, and honestly, your taste buds will too.
- Make-Ahead Magic: The beef mixture actually gets better after a day in the fridge. Make a double batch on Sunday, and you've got the base for three different meals throughout the week. Monday burritos, Tuesday taco salads, Wednesday nachos — boom.
- Customizable Without Compromise: Whether you're feeding picky kids, spice-loving adults, or that one friend who claims to be "allergic to flavor," this recipe adapts without losing its soul. Each component stands strong on its own but plays even better with others.
- Technique That Actually Works: I'm sharing the real-deal restaurant trick for keeping your tortillas pliable (hint: it involves steam and timing), plus the assembly method that prevents the dreaded burrito blowout. No more burrito casualties or filling avalanches.
Alright, let's break down exactly what goes into this masterpiece...
Inside the Ingredient List
Great burritos start with understanding your ingredients. Each component here has a job to do, and when they all work together, it's like a well-orchestrated flash mob in your mouth. Let's break down the cast of characters that'll make this dish unforgettable.
The Flavor Foundation
The ground beef is obviously the star, but not all ground beef is created equal. Skip the super lean stuff — you need a bit of fat for flavor and moisture. I'm talking about 80/20 beef here. Yes, you could go leaner, but then you'd need to add oil, and honestly, what's the point? The fat carries all those beautiful spices we're about to add, and it keeps everything juicy instead of turning into beef-flavored sawdust. When you're browning it, don't just mindlessly stir — let it sit for a minute or two so it develops those gorgeous caramelized bits. That's where the magic lives.
Our spice blend is where we separate the amateurs from the pros. Chili powder provides the backbone, but we're also adding ground cumin for earthiness, smoked paprika for depth, and here's the kicker — a pinch of unsweetened cocoa powder. I know, I know, it sounds weird, but trust me on this one. That tiny bit of cocoa adds this incredible complexity that makes people ask "what's in this?" in the best possible way. It's like adding a bass note to a song you didn't know was missing the bottom end.
The onion and garlic aren't just there for show — they're building the aromatic base that'll make your neighbors knock on your door asking what smells so incredible. Dice that onion small enough that it melts into the beef but not so tiny that it disappears completely. And please, please don't use garlic powder when fresh garlic is calling your name. The difference is like comparing a photograph to actually being there.
The Texture Crew
Let's talk beans. Canned beans are perfectly fine here — we're not trying to win a cooking competition, we're trying to get dinner on the table before you eat your own arm. But here's what matters: rinse them first. That goopy can liquid is your enemy, turning your beautiful burrito into a soggy mess. Black beans hold their shape better than pinto, but honestly, use what you love. I won't tell.
The rice isn't just filler — it's the secret weapon that makes these burritos satisfying without being gut bombs. Day-old rice is actually better than fresh because it's drier and won't make everything soggy. No leftover rice? Spread fresh rice on a baking sheet and pop it in the freezer for 10 minutes. Boom, instant day-old rice texture.
Cheese selection matters more than you think. Pre-shredded cheese is coated with cellulose to prevent clumping, which also prevents it from melting smoothly. Take the extra two minutes to shred your own, and you'll be rewarded with cheese that actually melts into creamy perfection instead of sitting there like yellow plastic. I'm partial to a Monterey Jack and cheddar blend, but hey, this is your burrito journey.
The Fresh Factor
Fresh tomatoes, crisp lettuce, and cool sour cream aren't just there to make your burrito look Instagram-worthy (though they definitely do that). They provide temperature contrast and fresh flavors that wake up your palate between bites of rich, warm filling. Dice your tomatoes small so they distribute evenly, and chop your lettuce just before serving so it stays crisp. Nobody wants wilted lettuce in their burrito — that's how disappointment tastes.
Cilantro haters, I see you. You can leave it out, but you're missing out on that bright, citrusy note that makes everything else pop. If you're genetically predisposed to tasting soap when you eat cilantro (thanks, DNA), substitute with fresh parsley and a squeeze of lime. It won't be the same, but it'll still be delicious.
The Unexpected Stars
Here's where we get a little wild. A splash of Worcestershire sauce in your beef adds incredible umami depth. A squeeze of fresh lime juice right at the end brightens everything up like flipping on a light switch. And if you're feeling really adventurous, a spoonful of chipotle peppers in adobo sauce will give you that smoky heat that makes your lips tingle in the most delightful way.
Everything's prepped? Good. Let's get into the real action...
The Method — Step by Step
Okay, ready for the game-changer? We're not just cooking here — we're orchestrating a flavor symphony, and you're the conductor. Follow these steps exactly and you'll understand why restaurant burritos taste different than the ones you've been making at home. This is where the magic happens, so pay attention.
- Start with the beef foundation: Heat a large skillet over medium-high heat. You want it hot enough that a drop of water sizzles immediately, but not so hot that your oil smokes like a chimney. Add your ground beef and here's the key — don't touch it for a full two minutes. Let it develop that gorgeous brown crust that holds all the flavor. Break it up with a wooden spoon, but leave some nice big chunks for texture. Season with salt and pepper right now, not later. This helps draw out moisture and concentrates the beefy flavor. Cook until it's no longer pink, about 6-8 minutes total, stirring occasionally but not constantly. You want those caramelized bits sticking to the pan — that's liquid gold right there.
- Build the flavor base: Push the beef to one side of the pan and add your diced onions to the cleared space. Let them hang out in the beef fat for a minute before stirring everything together. Add your minced garlic and cook for just 30 seconds — garlic burns faster than your ex's new relationship, so keep it moving. Now it's time for our spice blend. Sprinkle over the chili powder, cumin, paprika, oregano, cocoa powder, and that tiny pinch of cinnamon. Stir it all together and let the spices toast for about a minute. Your kitchen should smell like a Mexican street market at this point. If it doesn't, you did something wrong (kidding... mostly).
- Deglaze and deepen: Here's where most home cooks miss the boat. Pour in about a quarter cup of beef broth (or water if that's all you've got) and scrape up all those beautiful brown bits stuck to the pan. That's concentrated flavor that you worked hard to create — don't leave it behind like yesterday's news. Add your tomato paste and Worcestershire sauce, stirring until everything turns into a rich, thick sauce that coats the beef like velvet. Let it simmer for about 3 minutes, until most of the liquid has evaporated but it's still moist. Taste it. Add salt if needed, but remember we're about to add beans and other components.
- Bring in the beans: Add your drained and rinsed black beans to the party. Stir them in gently — you want them to stay mostly intact rather than turning into bean paste. Let everything simmer together for about 2 minutes, just long enough for the beans to heat through and absorb some of that incredible sauce. Squeeze in the juice of half a lime and give it a final stir. Remove from heat and let it rest for 5 minutes. I know you're hungry, but this resting time lets the flavors marry and prevents your tortillas from getting soggy when you assemble.
- Prepare your assembly station: While the beef is resting, this is your moment to get organized like a pro. Warm your tortillas (see the hack above), set out all your fillings in little bowls like you're on a cooking show, and clear some counter space. There's nothing worse than trying to roll a burrito while hunting for the cheese you swear you just shredded. Lay out your warmed tortillas on a clean surface. They should be pliable and slightly steamy — if they're cracking when you fold them, they're too cold.
- The art of assembly: Here's where technique matters. Place about half a cup of your beef mixture slightly below the center of each tortilla. Don't get greedy and overfill — I know you want to, but a burrito explosion is nobody's friend. Add a spoonful of rice, a sprinkle of cheese, and your fresh toppings. The key is layering: beef first (it's the heaviest), then rice, then cheese (so it melts from the heat of the beef), then fresh stuff on top. Leave about two inches clear on all sides for folding.
- The restaurant roll technique: Fold in the sides first, then bring up the bottom edge and tuck it tightly over the filling. Roll away from you, keeping everything snug but not so tight that the tortilla tears. The seam should end up on the bottom. If you're meal-prepping, wrap each burrito in foil at this point. If you're eating immediately, heat a dry skillet over medium heat and place the burrito seam-side down for 2-3 minutes per side. This creates that golden, slightly crispy exterior that makes all the difference.
- Final touches and serving: Once your burritos are golden and warmed through, let them rest for 2 minutes before cutting. This prevents the filling from oozing out like a culinary lava flow. Serve with extra lime wedges, sour cream, and maybe some of that salsa you made while the beef was cooking (you did make salsa, right?). Cut them in half on the diagonal if you're feeling fancy, or just hand them over whole if you're feeding people who don't care about presentation because they're too busy inhaling their food.
That's it — you did it. But hold on, I've got a few more tricks that'll take this to another level...
Insider Tricks for Flawless Results
Now that you've got the basics down, let me share the secrets that separate the burrito masters from the mere mortals. These are the little details that seem insignificant but add up to burrito perfection. I learned some of these the hard way, through trial and error (and one memorable incident involving a very angry cat and a flying tortilla). Learn from my mistakes, friends.
The Temperature Rule Nobody Follows
Here's the thing about temperature — it matters way more than you think. Your beef should be warm when you assemble, but not piping hot. Too hot and it'll steam your tortilla from the inside, creating that dreaded soggy bottom that nobody wants. Let it cool for about 5 minutes after cooking. The cheese should be room temperature so it starts melting immediately from the beef's warmth but doesn't turn into a greasy mess. Your rice should be slightly warm too — cold rice creates temperature shock that makes everything taste flat. And here's the kicker: your fresh toppings should be cold. That temperature contrast between warm filling and cool lettuce, tomatoes, and sour cream? That's what makes restaurant burritos taste so much better than the ones you make at home.
Why Your Nose Knows Best
Your sense of smell is your built-in doneness detector. When you're cooking the beef and onions together, wait for that moment when your kitchen starts to smell like the best Mexican restaurant you've ever been to. That's when you know it's time to add the spices. When the spices hit the pan and bloom in the fat, you should smell warmth and depth, not raw powder. If you're not getting that "I want to bottle this scent and wear it as perfume" reaction, your heat is too low or your spices are too old. Yes, spices go bad, and yes, that jar of chili powder from Obama's first term needs to go. Trust your nose — it's been evolving for thousands of years specifically to help you cook better food.
The 5-Minute Rest That Changes Everything
I know you're hungry. I know the smell is driving you crazy. But here's what separates the burrito champions from the also-rans: that five-minute rest after rolling. When you wrap a hot burrito in foil and let it sit, something magical happens. The steam redistributes throughout, warming the tortilla evenly and melting the cheese perfectly. The flavors settle down and get cozy with each other. The tortilla softens just enough to be pliable without getting soggy. It's like a little burrito spa treatment that transforms good into unforgettable. Use this time to set the table, pour yourself a drink, or just stare longingly at your creation while drooling slightly. I won't judge.
The Cheese Blend Secret
Want to know why restaurant burritos have that perfect cheese pull while yours just sort of sits there? It's all about the blend. Use a combination of cheeses for maximum effect: Monterey Jack for meltability, sharp cheddar for flavor, and a little bit of queso fresco or feta for tang. The different melting points create layers of cheesy goodness rather than one homogenous mass. Plus, mixing cheeses means you get that Instagram-worthy cheese pull without having to use processed cheese product. A friend tried skipping this step once — let's just say it didn't end well for anyone involved, especially the burrito.
The Acid Balance Trick
Acid is the unsung hero of great burritos. Without enough acid, everything tastes flat and heavy. Too much and it tastes like you're eating a lime. The trick is layering different acids throughout: lime juice in the beef at the end, maybe a splash of vinegar in your salsa, and another squeeze of lime right before serving. Each hits your palate differently, creating brightness without overwhelming the other flavors. If your burrito tastes like it's missing something but you can't put your finger on what, it's probably acid. Add a squeeze of lime and watch the whole thing come alive like someone turned on the lights.
Creative Twists and Variations
This recipe is a playground. Here are some of my favorite ways to switch things up:
The Breakfast Burrito Remix
Take the same beef mixture but fold in some scrambled eggs and crispy hash browns. Add a slice of American cheese instead of the Mexican blend — it melts into pure nostalgia. Throw in some breakfast sausage if you're feeling particularly indulgent. Serve with hot sauce and coffee, and you've got a breakfast that'll make you excited to wake up early on weekends. I dare you to taste this and not go back for seconds.
The California Fresh Take
Swap the beef for ground turkey seasoned the same way, add sliced avocado, sprouts instead of lettuce, and use Greek yogurt instead of sour cream. Add a handful of cherry tomatoes and some cucumber for crunch. It's like your burrito went to yoga and came back all zen and healthy. Still delicious, just wearing different clothes. Picture yourself pulling this out of your lunch bag at work — the whole office smelling incredible while you pretend not to notice everyone's jealous stares.
The Heat Seeker's Dream
Add a diced chipotle pepper to the beef while cooking, throw in some pickled jalapeños with your fresh toppings, and use habanero jack cheese. Serve with a side of fiery salsa and make sure you have plenty of cold beer on hand. This version isn't playing around — it'll make your nose run and your brow sweat in the most satisfying way. Most recipes get the heat level completely wrong. They either blow your head off or barely register. This one hits that perfect sweet spot where it hurts so good.
The Veggie-Loaded Version
Keep the beef but add roasted bell peppers, zucchini, and corn to the mix. Use a blend of Mexican cheeses and add a spoonful of roasted tomato salsa. The vegetables add sweetness that plays beautifully against the savory beef, and you can pretend it's healthy because, you know, vegetables. Kids who normally turn their noses up at veggies will inhale this without complaint. Future pacing: imagine your kid asking for seconds of something with zucchini in it. That's the power of a well-built burrito.
The Low-Carb Life Saver
Replace the tortilla with a low-carb wrap or go full bowl-style with cauliflower rice. Load up on extra lettuce, add more cheese (because you're saving carbs, right?), and don't skimp on the sour cream. The beef mixture is naturally low-carb, so you can eat like a king while staying on track. If you've ever struggled with low-carb meals that taste like punishment, I've got the fix right here. This doesn't taste like diet food — it tastes like you're getting away with something.
The Leftover Transformation
Got leftover steak or roast? Chop it up and warm it with the spices. Add some leftover roasted vegetables, that bit of rice from Chinese takeout, maybe some black beans from taco Tuesday. It's like the United Nations of leftovers, but somehow it all works together. This is how you prevent food waste while creating something that tastes intentional. Stay with me here — this is worth it. Some of my best burritos came from cleaning out the fridge on a Friday night.
Storing and Bringing It Back to Life
Here's the thing about burritos — they're meal prep champions when you treat them right. But there's an art to storing and reheating that most people completely mess up, resulting in soggy, sad burritos that taste like regret. Let me save you from that fate.
Fridge Storage
For assembled burritos, wrap each one tightly in plastic wrap, then in foil. They'll keep for up to 4 days in the fridge, but honestly, they're best within 2 days. The key is letting them cool completely before wrapping — warm burritos create condensation, and condensation is the enemy of crisp tortillas. Store components separately if you're a perfectionist: beef mixture in one container, fresh toppings in another, tortillas wrapped in a damp paper towel inside a plastic bag. This is hands down the best version for make-ahead meals, because you can reheat the beef and assemble fresh when you're ready to eat.
Freezer Friendly
Wrap completely cooled burritos individually in plastic wrap, then in foil, then pop them into a freezer bag. They'll keep for up to 3 months, though I doubt they'll last that long. The trick is to freeze them flat initially, then you can stack them like delicious frozen bricks. Label them with the date and contents — future you will appreciate this when you're staring into the freezer at 6 a.m. trying to figure out what to grab for lunch. Thaw overnight in the fridge for best results, though you can microwave from frozen in a pinch.
Best Reheating Method
Forget everything you think you know about reheating burritos. The microwave is your enemy here — it'll turn your tortilla into rubber and your lettuce into sadness. Instead, unwrap the foil and place the burrito in a dry skillet over medium-low heat. Cover with a lid and heat for about 5 minutes per side. This creates a crispy exterior while warming everything through evenly. If it's frozen solid, microwave for 30 seconds just to take the chill off, then finish in the skillet. Add a tiny splash of water to the pan before covering — it creates steam that warms the inside without drying out the tortilla. It's like giving your burrito a second chance at life, and it tastes almost as good as fresh.