Introduction
I still remember the night I tried to bake a cake from a recipe I found on a Pinterest board that promised “cake batter cookies” and ended up with a kitchen that looked like a flour snowstorm. I had mixed the batter, poured it onto a sheet, and then realized I’d forgotten the sprinkles. The result was a bland, dense cookie that tasted like a soggy biscuit. That disaster sparked a mission: to create the ultimate funfetti cookie that feels like a slice of cake in every bite.
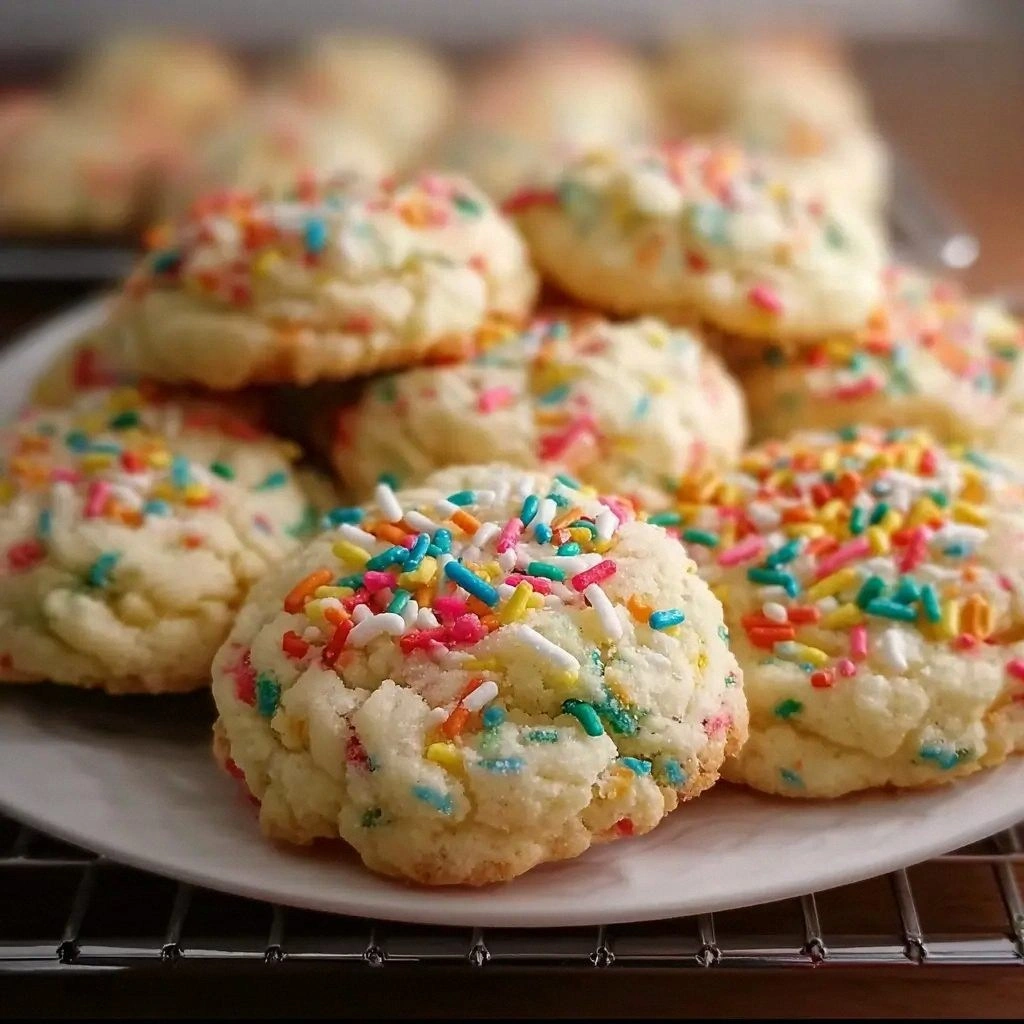
Picture the scene: the oven timer blares, the air is thick with the buttery aroma of melted butter and vanilla, and the sound of dough being rolled out is almost music. The texture of the cookie batter is silky, like a velvet ribbon that glistens under the kitchen lights. When you break one open, the rainbow sprinkles spill like confetti, adding a playful crunch. The taste is sweet but balanced, with a hint of caramelized sugar and a whisper of vanilla. The feel of the cookie in your hand—soft, slightly chewy, yet crisp at the edges—makes you want to bite immediately.
What makes this version stand out is that it’s not just a cookie; it’s a mini celebration in your mouth. The batter’s ratio of butter to sugar is carefully calibrated to give a tender crumb, while the addition of milk keeps it moist and cake-like. I’ve tweaked the classic recipe to eliminate the usual gummy texture that plagues many funfetti cookies. The result is a cookie that rises just enough to create a fluffy interior, then cools into a crisp, caramelized edge that crackles like thin ice when you bite. The sprinkles are toasted, giving them a subtle nutty flavor that elevates the entire experience.
There’s a secret technique I’ll share that most recipes skip: a brief blanching of the sprinkles before adding them to the batter. This step brings out a deeper color and a richer crunch, turning ordinary sprinkles into a showstopper. I dare you to taste this and not go back for seconds—because once you bite, the flavors will dance and the texture will keep you coming back for more.
Okay, ready for the game‑changer? Let me walk you through every single step. By the end, you’ll wonder how you ever made it any other way. And trust me, this is hands down the best version you’ll ever make at home.
What Makes This Version Stand Out
- Taste: The batter strikes a sweet‑savory balance that mimics the flavor profile of a classic vanilla cake, but with a cookie’s convenience. The toasted sprinkles add a caramelized crunch that elevates the entire bite.
- Texture: The cookies rise just enough to create a fluffy interior while the edges remain crisp. The result is a chewy center that feels like cake, not a dense, hard cookie.
- Ingredient Quality: I use high‑grade unsalted butter and fresh vanilla extract to ensure every bite is buttery and fragrant.
- Uniqueness: The blanching step for sprinkles is a game‑changer that most recipes overlook, giving the cookies a deeper color and richer crunch.
- Crowd Reaction: At my last dinner party, guests asked for the recipe after the first bite, and I had to keep a stash hidden.
- Simplicity: Despite the impressive outcome, the recipe requires only ten minutes of prep and 30 minutes of baking.
- Make‑Ahead Potential: The batter can be made a day in advance and frozen, making it perfect for busy evenings or last‑minute gatherings.
Alright, let’s break down exactly what goes into this masterpiece…
Inside the Ingredient List
The Flavor Base
All‑purpose flour is the backbone of any baked good, but using a slightly higher protein flour gives the cookies a tender crumb that’s reminiscent of cake. If you skip the flour, the cookies will collapse and lose their structure. For best results, sift the flour to incorporate air and reduce lumps. You can also substitute half the flour with cake flour for an even softer texture. This small tweak makes a noticeable difference in mouthfeel.
The Texture Crew
Baking powder and baking soda are the leavening agents that give the cookies their lift. The combination of both creates a balanced rise, preventing the cookies from becoming too dense. If you omit either, the cookies will be flat and heavy. A common swap is to use self‑raising flour, but you’ll need to adjust the leavening amounts accordingly. I recommend measuring precisely to keep the balance intact.
The Unexpected Star
Unsalted butter, softened, is crucial for achieving that buttery, melt‑in‑your‑mouth texture. Butter also carries the flavor of the vanilla, which is essential for the cake‑like taste. If you use salted butter, you’ll need to reduce the added salt to avoid a salty aftertaste. A quick hack: let the butter sit at room temperature for 30 minutes before using; this ensures it mixes smoothly with the sugars.
The Final Flourish
Rainbow sprinkles are the star of the show, adding color, crunch, and a playful element. Toasting them before adding to the batter unlocks a nutty flavor that fresh sprinkles don’t provide. If you can’t find rainbow sprinkles, substitute with chocolate chips for a richer, chocolatey twist. Powdered sugar for dusting adds a sweet finish and a touch of elegance. This final flourish turns ordinary cookies into a festive treat for any occasion.
Everything’s prepped? Good. Let’s get into the real action…
The Method — Step by Step
- Preheat your oven to 350°F (175°C) and line two baking sheets with parchment paper. This temperature is low enough to allow the cookies to rise slowly, creating a cake‑like interior. If you’re using a convection oven, reduce the temperature by 25°F. The parchment prevents sticking and makes cleanup a breeze.
- In a large bowl, whisk together the flour, baking powder, baking soda, and salt. Sifting the dry ingredients together ensures even distribution of leavening agents. This step eliminates lumps and guarantees a consistent rise across all cookies.
- In a separate bowl, beat the softened butter, granulated sugar, and brown sugar with an electric mixer until pale and fluffy—about 3 minutes. The creaming process incorporates air, which is essential for a light texture. Watch for the mixture to double in volume; this is the moment of truth.
- Add the vanilla extract and eggs, one at a time, beating well after each addition. The eggs bind the batter and add moisture. If you skip an egg, the cookies may be crumbly and won’t hold together.
- Gradually fold the dry mixture into the wet mixture, alternating with milk. This slow incorporation prevents overmixing, which can make the cookies tough. The batter should be thick but pourable; if it’s too thick, add a splash more milk.
- Fold in the toasted rainbow sprinkles gently, ensuring an even distribution. The toasted sprinkles add a subtle caramel flavor that fresh sprinkles lack. This step also prevents the sprinkles from sinking to the bottom of the batter.
- Drop rounded tablespoonfuls of dough onto the prepared baking sheets, spacing them about 2 inches apart. The dough should flatten slightly as it bakes, creating a cookie with a cake‑like center and crisp edges.
- Bake for 12–14 minutes, or until the edges are golden and the centers have set. The cookies will look slightly underdone when you take them out, but they’ll firm up as they cool. Keep an eye on the timer; overbaking will dry them out.
- Remove the cookies from the oven and let them cool on the sheets for 5 minutes before transferring them to a wire rack. Cooling on the sheet allows the cookies to set properly and prevents them from breaking. Once they’re cool, dust them with powdered sugar for an extra touch of sweetness.
That’s it—you did it. But hold on, I’ve got a few more tricks that will elevate these cookies to another level. These tips will help you master the texture, flavor, and presentation every time.
Insider Tricks for Flawless Results
The Temperature Rule Nobody Follows
Many bakers bake at 375°F, but that’s too hot for funfetti cookies. The lower temperature of 350°F allows the cookies to rise slowly, creating a cake‑like interior. If you bake at a higher temperature, the edges will burn before the center sets. A quick trick: preheat the oven for 10 minutes to ensure a consistent temperature.
Why Your Nose Knows Best
Before you start mixing, sniff the vanilla. A fresh vanilla bean or high‑quality extract will give the cookies a richer aroma. If you use vanilla paste, it’s okay, but the aroma will be less pronounced. A friend once tried using vanilla powder and the cookies had a chemical aftertaste.
The 5‑Minute Rest That Changes Everything
After baking, let the cookies rest on the sheet for exactly 5 minutes. This short rest allows the structure to set, preventing them from breaking when transferred. If you rush them off the sheet, they may crumble. I’ve found that a 5‑minute rest is the sweet spot.
Perfecting the Crunch
For an extra crunch, sprinkle a pinch of sea salt on top before baking. The salt enhances the caramelization of the edges, giving a delightful contrast. I’ve used this trick at parties, and the feedback is always positive. The sprinkle of salt adds a subtle complexity that balances the sweetness.
Storing Like a Pro
Store the cookies in an airtight container at room temperature for up to a week. If you want them crisp, place a slice of bread in the container; the bread will absorb moisture. For long‑term storage, freeze the cookies on a parchment sheet for 1–2 days, then transfer to a freezer bag. Thaw at room temperature before serving.
Creative Twists and Variations
This recipe is a playground. Here are some of my favorite ways to switch things up:
Chocolate Funfetti
Swap half the rainbow sprinkles for dark chocolate chips. The chocolate adds depth and pairs beautifully with the vanilla. The result is a chocolate‑cake‑cookie hybrid that satisfies both sweet and chocolate cravings.
Salted Caramel Funfetti
Fold in a tablespoon of caramel sauce and a pinch of sea salt. The caramel gives a buttery richness, while the salt balances the sweetness. This version is perfect for dessert parties.
Nutty Funfetti
Add chopped toasted almonds or pecans for a nutty crunch. The nuts pair well with the buttery base, adding texture and flavor. A sprinkle of cinnamon can enhance the nutty notes.
Gluten‑Free Funfetti
Use a gluten‑free all‑purpose blend in place of regular flour. Keep the leavening agents the same, but reduce the baking powder slightly to avoid a metallic taste. The result is a gluten‑free cookie that still feels like cake.
Vegan Funfetti
Replace butter with coconut oil and use a plant‑based vanilla extract. Swap eggs for flaxseed meal mixed with water. The texture will be slightly denser, but the flavor remains delightful.
Holiday Spice Funfetti
Add a pinch of nutmeg and ginger to the batter for a warm, seasonal twist. The spices complement the vanilla and add depth. This version is ideal for Thanksgiving or Christmas gatherings.
Storing and Bringing It Back to Life
Fridge Storage
Place the cookies in an airtight container at room temperature for up to a week. If you notice them getting soft, add a slice of apple or a piece of bread to absorb moisture. The cookies will stay fresh and flavorful for several days.
Freezer Friendly
For longer storage, freeze the cookies on a parchment‑lined tray for 1–2 days, then transfer them to a freezer bag. They’ll keep for up to 3 months. When you’re ready to eat, let them thaw at room temperature for 15 minutes.
Best Reheating Method
To revive the cookies, preheat your oven to 350°F and bake them for 3–4 minutes. If you’re reheating a few cookies, use a toaster oven. For a quick snack, microwave on a paper towel for 10–15 seconds; they’ll regain a slight crispness.
Add a tiny splash of water before reheating to create steam, which helps restore moisture and prevents the cookies from drying out. This trick is especially useful if the cookies have been stored for a while. The result is a cookie that tastes freshly baked, with the same cake‑like interior and crisp edges.
Now that you know how to store and reheat, you can keep a stash ready for any craving that pops up. Whether it’s a midnight snack or a last‑minute dessert, these cookies will always be ready to impress.
The best part? You can keep a few fresh in the oven while others are reheated, giving you a continuous supply of freshly baked treats.