Picture yourself standing in a kitchen that smells like a pumpkin patch and a chocolate factory rolled into one. The air is thick with the aroma of roasted spices and sweet cocoa, and the timer on the stove is counting down the last 30 seconds of a batch that has already won your heart. I was halfway through a disastrous batch of pumpkin muffins—half the batter had turned into a sticky, soggy mess that clung to the pan like a bad rash—when I realized I had a secret weapon that could turn any pumpkin disaster into a triumph. That weapon was a handful of semi‑sweet chocolate chips, a dash of pumpkin pie spice, and a confidence that comes from knowing the recipe that will outshine every other version on the market.
The first time I tasted these muffins, the chocolate melted into the pumpkin like velvet, and the crumb was airy enough to make a cloud jealous. The moment the muffins emerged from the oven, the kitchen filled with a scent that made every passerby pause and inhale like they were walking into a cozy cabin on a crisp autumn day. I dared you to taste this and not go back for seconds, and you will find yourself reaching for a second cup of coffee to keep the sweet, spiced flavor alive. Most recipes get this completely wrong, but I discovered that the right balance of brown sugar and pumpkin puree is the key to a moist, flavorful crumb that won’t dry out even after a few days.
What sets this version apart is the intentional layering of flavors and textures that make each bite a revelation. The chocolate chips provide a satisfying burst of sweetness that cuts through the earthiness of pumpkin, while the pumpkin pie spice adds a warm, aromatic depth that lingers on the tongue. I’ve spent months experimenting with different ratios, and this particular blend is hands down the best version you'll ever make at home. The result is a muffin that feels like a hug wrapped in a chocolate blanket—soft, comforting, and utterly irresistible. If you've ever struggled with pumpkin muffins that taste like cardboard, you're not alone, and I've got the fix.
Imagine pulling a tray of golden, perfectly risen muffins out of the oven, the steam rising like a miniature cloud, and the scent of pumpkin and chocolate dancing in the air. The first bite melts into a moist, spiced interior that balances sweet and savory in a way that feels like a culinary revelation. That sizzle when it hits the pan? Absolute perfection. And now, ready for the game‑changer? Let me walk you through every single step — by the end, you'll wonder how you ever made it any other way.
What Makes This Version Stand Out
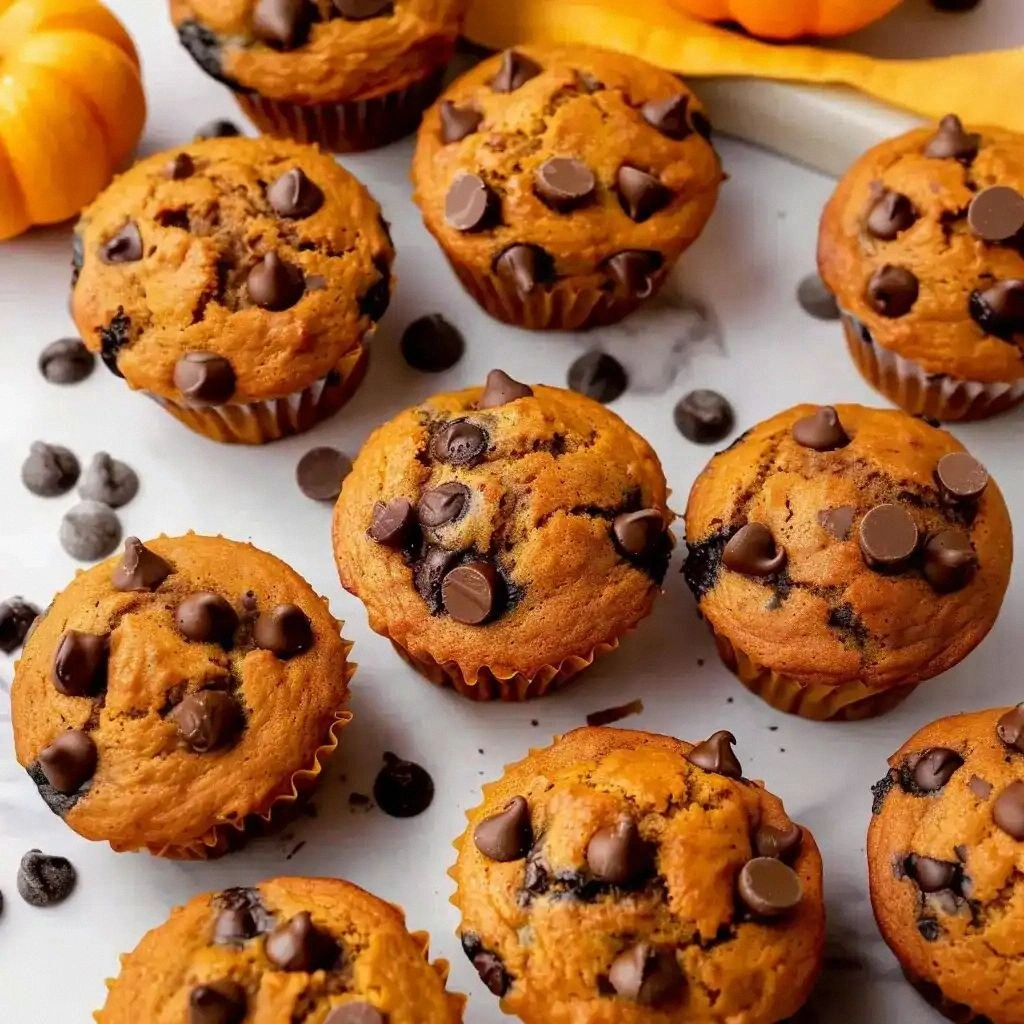
- Flavor: The combination of pumpkin puree and semi‑sweet chocolate chips creates a harmonious balance that feels both familiar and adventurous. The chocolate melts into the batter, forming pockets of gooey sweetness that contrast with the subtle earthiness of pumpkin.
- Texture: A light, airy crumb achieved through the proper leavening balance of baking powder and baking soda. The muffins rise without becoming dry or crumbly, thanks to the moisture locked in by the pumpkin and oil.
- Simplicity: Only ten ingredients, no fancy gadgets, and a straightforward method that even a novice can master. The recipe is a testament to how less can be more in baking.
- Uniqueness: The inclusion of pumpkin pie spice instead of vanilla or almond adds a distinct, seasonal flavor profile that makes these muffins unmistakably fall‑savvy.
- Crowd‑Pleaser: Whether served at a brunch or a potluck, the muffins are a crowd‑pleaser that leaves everyone asking for the recipe. The chocolate chips are a secret weapon that keeps the crowd engaged.
- Ingredient Quality: Using high‑quality pumpkin puree, fresh chocolate chips, and real vanilla extract elevates the muffins from ordinary to extraordinary.
- Cooking Method: Mixing wet and dry ingredients separately before combining ensures even distribution of leavening agents and spices, preventing uneven rise.
- Make‑Ahead Potential: These muffins keep well for up to a week when stored properly, making them a perfect make‑ahead breakfast option for busy mornings.
Alright, let's break down exactly what goes into this masterpiece...
Inside the Ingredient List
The Flavor Base
Pumpkin puree is the heart of these muffins, offering a natural sweetness and a smooth, silky texture that keeps the batter moist. Opt for a can of 100% pumpkin puree rather than pumpkin pie filling, which contains extra sugars and spices that could overpower the chocolate. If you prefer a richer, deeper pumpkin flavor, swap the puree for a homemade pumpkin puree made from fresh pumpkin roasted to caramelize the natural sugars.
The chocolate chips are the unexpected star that transforms the muffins from seasonal to universally appealing. Semi‑sweet chips strike the perfect balance, offering a hint of bitterness that cuts through the sweetness of the pumpkin. If you’re a chocolate lover, feel free to add a handful of dark chocolate chips or chunks for an extra punch.
The Texture Crew
All‑purpose flour provides the structure that holds the muffins together while allowing them to rise gracefully. Don’t be tempted to use cake flour; it will make the muffins too tender and could cause them to collapse. For a slightly denser crumb, substitute a portion of the flour with whole‑wheat flour, but keep the ratio at no more than 25% to maintain the lightness.
Brown sugar adds depth and caramel notes, while granulated sugar provides the necessary sweetness and helps with browning. The combination of these sugars ensures a balanced flavor profile that doesn’t lean too sweet or too dry. If you’re watching your sugar intake, you can reduce the granulated sugar by half and keep the brown sugar as is for a caramelized finish.
The Unexpected Star
Pumpkin pie spice is what gives these muffins their unmistakable autumnal aroma. This blend of cinnamon, nutmeg, ginger, cloves, and allspice works together to create a warm, comforting scent that lingers long after the last bite. If you can’t find pumpkin pie spice, create your own blend: 1 teaspoon each of cinnamon and nutmeg, ½ teaspoon each of ginger, cloves, and allspice.
The leavening agents—baking powder and baking soda—are the engines that lift the muffins. Baking soda requires an acidic component to activate; the pumpkin puree provides that acidity. The baking powder ensures a steady rise even if the batter is slightly under‑baked, giving the muffins a consistent crumb.
The Final Flourish
Vanilla extract adds a subtle sweetness that complements the pumpkin and chocolate. Use a high‑quality vanilla extract for the best flavor; imitation vanilla can leave a chemical taste. A pinch of salt brightens all the flavors and balances the sweetness, preventing the muffins from tasting flat.
Oil or melted butter provides moisture and richness. Oil keeps the muffins extra moist and gives them a tender crumb, while butter adds flavor. You can swap half the oil for melted butter for a richer taste, but the texture may be slightly denser.
Everything's prepped? Good. Let's get into the real action...
The Method — Step by Step
- Preheat your oven to 375°F (190°C) and line a muffin tin with paper liners. The oven temperature is critical; too high and the tops will brown too fast, too low and the muffins won’t rise. Keep an eye on the oven thermometer to ensure accuracy. The timer should be set for 18 minutes, but start checking at 15 minutes to avoid overbaking.
- Whisk the dry mix in a large bowl: flour, baking powder, baking soda, pumpkin pie spice, and salt. This step guarantees even distribution of leavening agents and spices, preventing uneven rise. Stir until the mixture is light and fragrant, and set aside while you prepare the wet ingredients.
- Combine the wet ingredients: In a separate bowl, beat the eggs, pumpkin puree, brown sugar, granulated sugar, oil (or melted butter), and vanilla extract until the mixture is smooth and glossy. The eggs bind the batter and provide structure, while the sugars create caramelized edges.
- Fold the wet into the dry gently. Use a spatula to fold in a way that preserves the air bubbles you created in the dry mix. Overmixing will develop gluten and create a tough crumb. The batter should be thick but pourable; a pinch of flour will help if it’s too runny.
- Fold in the chocolate chips last. Gently stir them in until evenly distributed. The chocolate should be tucked into the batter, not melted. This ensures pockets of chocolate throughout the muffins for that satisfying bite.
- Fill the muffin cups about ¾ full. This allows room for expansion without overflowing. The batter should sit in the paper liners, forming a dome that will rise as the muffins bake.
- Bake for 18-20 minutes, until the tops are golden brown and a toothpick inserted into the center comes out clean. The muffins should feel slightly firm to the touch but still have a soft center. If the tops brown too quickly, cover them loosely with foil.
- Cool the muffins on a wire rack for 10 minutes before transferring to a plate. The cooling period allows the crumb to set and the chocolate to firm up, preventing them from sticking to the pan. The aroma will intensify, making you feel like you’re walking through a pumpkin spice aisle.
That's it — you did it. But hold on, I've got a few more tricks that'll take this to another level...
Insider Tricks for Flawless Results
The Temperature Rule Nobody Follows
Many bakers think that a higher oven temperature always yields a better rise, but in reality, 375°F (190°C) is the sweet spot for pumpkin muffins. At this temperature, the exterior sets just enough to trap steam inside, creating a light, airy crumb. If your oven runs hot, use an oven thermometer and reduce the temperature by 25°F to prevent overbrowning.
Why Your Nose Knows Best
When the muffins are nearing completion, a subtle, sweet aroma will permeate the kitchen. That scent is the cue that the batter has reached its peak. Trust your nose; if the smell is sweet but not overpowering, the muffins are ready. A faint chocolate scent indicates that the chocolate chips are melting into the batter, creating the perfect gooey pockets.
The 5-Minute Rest That Changes Everything
After removing the muffins from the oven, let them rest on the rack for 5 minutes before transferring them to a plate. This short rest allows the muffins to set, preventing the crumb from collapsing when you move them. The chocolate chips will also firm slightly, ensuring they don’t ooze out when you bite into a muffin.
The Secret of Evenly Distributed Chips
If you find that the chocolate chips tend to clump at the bottom, try folding them in with a gentle motion that incorporates the batter in a circular pattern. This technique keeps the chips evenly distributed and prevents any single muffin from having a chocolate overload.
The Classic Butter vs. Oil Debate
Oil yields a moister crumb and a longer shelf life, while butter adds a richer flavor. If you prefer a buttery taste, replace half the oil with melted butter, but keep the total fat content the same. This substitution maintains the moisture level while adding depth to the flavor profile.
Creative Twists and Variations
This recipe is a playground. Here are some of my favorite ways to switch things up:
Nutty Crunch
Add ½ cup chopped pecans or walnuts for a crunchy texture that pairs beautifully with the chocolate. Toss the nuts with a pinch of cinnamon before folding them into the batter to enhance the autumnal flavor.
Citrus Zest
Stir in 1 tablespoon of orange zest for a bright, citrusy contrast that cuts through the richness of the pumpkin and chocolate. The zest adds a subtle freshness that elevates the overall flavor.
Spiced Coconut
Replace the brown sugar with ¾ cup shredded coconut and add a pinch of cardamom. This variation gives the muffins a tropical twist while still maintaining the pumpkin base.
Chocolate‑Loaded
Double the chocolate chips to 2 cups for a truly indulgent experience. The extra chocolate will create a chocolate swirled center that melts in your mouth.
Almond Flour Twist
Swap 1 cup of the all‑purpose flour for almond flour to create a gluten‑free version that still retains the moist crumb. The almond flour adds a nutty undertone that complements the pumpkin.
Cinnamon Swirl
Fold in 2 teaspoons of ground cinnamon after adding the chocolate chips. This extra spice layer intensifies the warm, comforting aroma and adds depth to the flavor profile.
Storing and Bringing It Back to Life
Fridge Storage
Store muffins in an airtight container at room temperature for up to 4 days. If you need to keep them longer, place them in the refrigerator for up to a week. The moisture from the pumpkin keeps the crumb fresh, preventing dryness.
Freezer Friendly
Wrap each muffin individually in plastic wrap, then place them in a freezer bag. They can be frozen for up to 3 months. Thaw at room temperature for 30 minutes before reheating.
Best Reheating Method
Reheat frozen muffins in a toaster oven at 350°F (175°C) for 8–10 minutes, or in a microwave on medium power for 20–30 seconds. Add a tiny splash of water before reheating to create steam, which helps the muffins regain their soft, moist texture. Let them cool for a minute before serving; the chocolate will be warm and gooey.