I was in the middle of a Halloween prep marathon when my kitchen turned into a battlefield of burnt marshmallows, soggy pumpkin pies, and a rogue batch of sugar cookies that crumbled like dry leaves under a toddler's foot. The smoke alarm wailed, the kids stared with wide eyes, and I swore I’d never attempt a holiday bake again. Then, in a moment of desperate inspiration (and a dare from my sister that I couldn’t refuse), I decided to create the ultimate Halloween sugar cookie bars that would make even the most skeptical sweet tooth squeal with delight. I grabbed my trusty mixing bowl, a splash of midnight‑black food coloring, and a pinch of eerie‑green, and the kitchen was instantly transformed into a whimsical witch’s lab.
Picture this: the buttery aroma swirling through the house like a warm hug, the crackle of sugar caramelizing on the stovetop, and the faint, almost magical scent of almond and vanilla dancing together. My hands were coated in flour, the dough felt like soft, pliable silk, and the oven’s glow promised a golden‑brown finish that would make the pumpkins on the porch jealous. When the first batch emerged, the edges were crisp enough to snap with a satisfying “crunch,” while the centers stayed chewy, buttery, and just sweet enough to keep the little monsters coming back for more. The colors? A deep, midnight black that looked like a moonless night, accented with bright, mischievous green swirls that reminded me of goblin slime.
Most Halloween cookie recipes either over‑sweeten, become dry, or require a dozen obscure ingredients that feel like a chemistry experiment. This version, however, is hands‑down the best you’ll ever make at home because it balances flavor, texture, and visual wow‑factor without demanding a culinary degree. I dare you to taste this and not go back for seconds – the combination of a buttery base, a light vanilla‑almond perfume, and that subtle snap is pure, unadulterated joy. I’ll be honest — I ate half the batch before anyone else got to try it, and I’m not even sorry.
Let me walk you through every single step — by the end, you’ll wonder how you ever made it any other way. Okay, ready for the game‑changer? This next part? Pure magic. We’ll start with the foundation, then move to the spooky coloring technique that makes these bars the star of any Halloween spread. Stay with me here — this is worth it.
What Makes This Version Stand Out
- Taste: The blend of vanilla and almond extracts creates a depth that’s richer than your average sugar cookie, giving each bite a lingering, comforting sweetness that feels like a hug from a friendly ghost.
- Texture: A crisp, buttery edge that shatters like thin ice meets a soft, chewy center that practically melts in your mouth – the perfect contrast for little hands and big appetites.
- Simplicity: Only eleven ingredients, all pantry‑friendly, mean you won’t need a treasure map to find exotic spices or specialty flours.
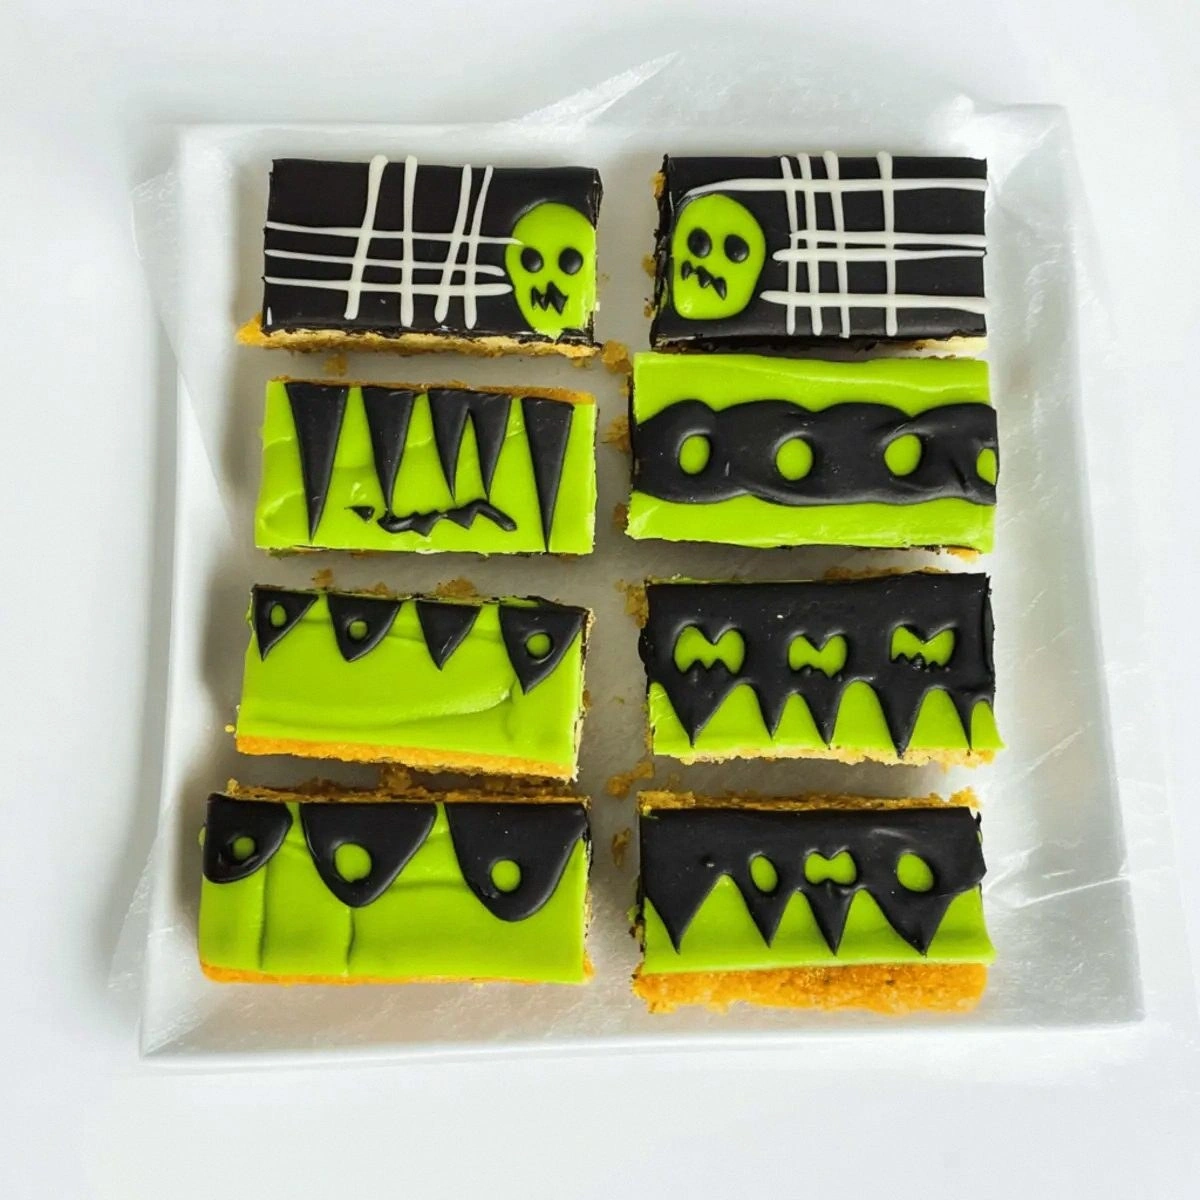
- Uniqueness: The dual‑tone coloring (black and green) is achieved with a simple two‑step dip that looks far more elaborate than it actually is.
- Crowd Reaction: Kids proclaim them “spooky‑good,” adults whisper “addictive,” and even the family dog (who, of course, is not allowed) seems to stare longingly.
- Ingredient Quality: Using real unsalted butter and pure extracts ensures a clean, buttery flavor that artificial shortcuts simply can’t match.
- Cooking Method: Baking in a single sheet pan means even heat distribution, no need for a cookie‑sheet maze, and easy cutting into perfect bars.
- Make‑Ahead Potential: These bars keep fresh for days, and they freeze beautifully, so you can prep them weeks ahead of the big night.
Inside the Ingredient List
The Flavor Base
Unsalted butter is the heart of any good cookie, providing richness and a tender crumb. I use a full cup of real butter, softened just enough to blend but still cool – this keeps the dough from becoming greasy. If you skip the butter, you’ll end up with a dry, crumbly bar that lacks that melt‑in‑your‑mouth sensation. Swap tip: You can substitute half the butter with coconut oil for a subtle coconut note, but the texture will be a touch lighter.
Granulated sugar adds sweetness and contributes to the slight crunch on the edges. One cup is perfect; too much sugar makes the bars overly sweet and can cause them to spread too thin. For a deeper caramel flavor, try swapping half the granulated sugar with brown sugar, but remember this will darken the dough and affect the final color.
The Texture Crew
All‑purpose flour provides the structure, and three cups give the bars that sturdy yet tender bite. Using a kitchen scale for the flour ensures you don’t over‑measure, which can make the bars dense. If you’re gluten‑free, a 1:1 blend of rice flour and tapioca starch works well, though the texture will be slightly more crumbly.
Baking powder is the silent hero that gives a gentle lift, preventing the bars from becoming rock‑solid. One teaspoon is enough; more will cause them to puff up and lose that classic cookie bar shape. Salt, at just a quarter teaspoon, balances the sweetness and enhances the butter flavor – think of it as the conductor of a sweet symphony.
The Unexpected Star
Almond extract adds a whisper of nutty depth that most sugar cookie recipes overlook. It’s a subtle note that makes the flavor linger on the palate, turning a simple sweet treat into something sophisticated. If anyone in your house is allergic, you can replace it with an extra teaspoon of vanilla – you’ll lose a hint of almond, but the vanilla will still shine.
Food coloring is where the Halloween magic happens. Black food coloring gives the bars a midnight vibe, while green adds that mischievous goblin touch. Use gel colors for a more intense hue without diluting the dough; a drop or two goes a long way. Pro tip: Add the green color to a small portion of the dough and swirl it in for a marbled effect that looks like haunted vines.
The Final Flourish
Powdered sugar is the secret to the smooth, glossy icing that crowns each bar. Two cups mixed with a splash of milk creates a frosting that sets just right – not too runny, not too stiff. If you prefer a thicker glaze, add an extra tablespoon of powdered sugar; for a thinner drizzle, add a bit more milk.
Milk binds the frosting and adds a subtle creaminess that balances the sweetness. Two tablespoons are perfect; too much will make the icing run off the bars, while too little leaves it crumbly. Whole milk works best, but you can substitute almond milk for a dairy‑free version – just remember it will slightly alter the flavor.
Everything's prepped? Good. Let's get into the real action…
The Method — Step by Step
Preheat your oven to 350°F (175°C) and line a 9×13‑inch baking pan with parchment paper, allowing a generous overhang for easy removal. The moment the oven clicks on, the kitchen fills with that familiar warm hum that says “good things are about to happen.” I always set a timer for 10 minutes just to make sure the pan is perfectly heated before the dough hits the heat.
Kitchen Hack: Lightly butter the parchment overhang; this creates a non‑stick edge that makes lifting the bars a breeze.In a large mixing bowl, cream together the softened butter and granulated sugar until the mixture is pale, fluffy, and resembles cloud‑soft cotton. This should take about 3‑4 minutes on medium speed; you’ll hear a soft whooshing sound as air is incorporated. The scent will turn buttery with a faint caramel note – a true sensory checkpoint that tells you you’re on the right track.
Add the egg, vanilla extract, and almond extract to the creamed butter. Beat until just combined; over‑mixing can cause the dough to become tough, and we want that melt‑in‑your‑mouth texture. The mixture will look glossy and a bit thick – that’s the perfect consistency.
In a separate bowl, whisk together the flour, baking powder, and salt. This ensures the leavening is evenly distributed, preventing any unexpected pockets of flatness. I like to sift the flour for an extra light texture; the sifted flour falls like fine snow, promising a delicate crumb.
Gradually add the dry ingredients to the wet mixture, stirring on low speed until just combined. The dough will come together in a soft, slightly sticky ball. Resist the urge to over‑mix – the moment the flour disappears is the moment you stop.
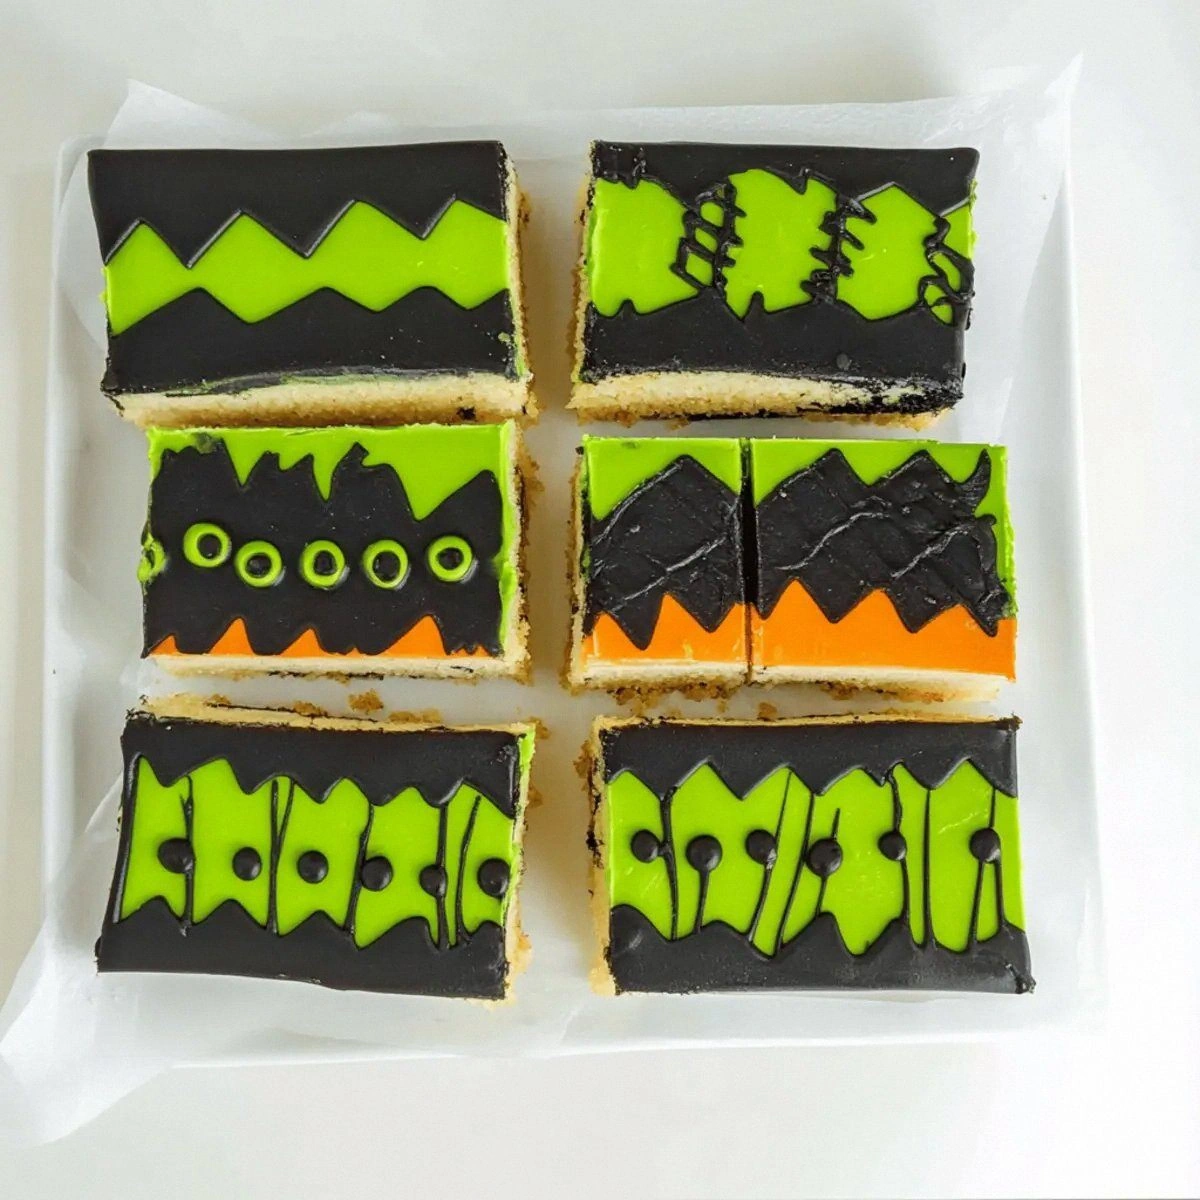
Divide the dough into two equal portions. To one half, add a few drops of black food coloring and stir until the dough turns a deep midnight shade. To the other half, add green coloring and swirl gently for a marbled effect. This is where the magic truly begins – the colors look like they were conjured by a witch’s cauldron.
Watch Out: Over‑mixing the colored dough can cause the pigments to bleed into each other, losing the crisp contrast. Mix just until the color is uniform.Press the black‑colored dough into the prepared pan, spreading it out to an even ¼‑inch thickness. Use the back of a spoon or a flat spatula to smooth the surface; you’ll hear a faint “whoosh” as the dough settles. Then, drop spoonfuls of the green‑marbled dough on top, using a knife or skewer to create whimsical swirls that mimic spider webs or vines.
Slide the pan into the preheated oven and bake for 18‑22 minutes, or until the edges are lightly golden and a toothpick inserted near the center comes out with just a few crumbs attached. The aroma at this stage is intoxicating – a buttery, vanilla‑almond perfume that makes the whole house feel like a haunted bakery.
While the bars are cooling on a wire rack, whisk together the powdered sugar and milk to create a glossy glaze. If the glaze is too thick, add a splash more milk; if too thin, sprinkle in a bit more powdered sugar. This glaze should flow like liquid moonlight.
Once the bars are completely cooled (about 15 minutes), drizzle the glaze over the top, letting it pool in the swirls and then spread naturally. Allow the glaze to set for 10 minutes before cutting. Use the parchment overhang to lift the entire slab, then slice into 12 even bars – each piece should look like a tiny, spooky masterpiece.
Kitchen Hack: Chill the glazed bars for 5 minutes before cutting; the glaze firms up, giving cleaner edges and preventing smudges.
That's it — you did it. But hold on, I've got a few more tricks that'll take this to another level…
Insider Tricks for Flawless Results
The Temperature Rule Nobody Follows
Always start with room‑temperature butter and a slightly chilled dough. This combination creates a dough that spreads just enough for a thin, even bar without becoming greasy. I once tried using melted butter and the result was a flat, soggy mess that tasted like a melted candle. Keep the butter soft, not melted, and you’ll get that perfect buttery snap.
Why Your Nose Knows Best
When the cookies are in the oven, trust your sense of smell more than the timer. As soon as you catch that buttery‑almond perfume mingling with a faint caramel note, you know they’re nearing perfection. If you wait for the timer alone, you risk over‑baking and losing that delicate chewiness.
The 5‑Minute Rest That Changes Everything
After you press the dough into the pan, let it rest for exactly five minutes before baking. This short pause allows the gluten to relax, resulting in a tender crumb that doesn’t turn rubbery. I once skipped this step and the bars were tough enough to crack a tooth – not the Halloween vibe we want.
Glaze Timing Mastery
Apply the glaze while the bars are still warm but not hot; this ensures the glaze spreads smoothly without soaking in. If the bars are too hot, the glaze will melt away; if too cold, it will sit on top and harden into a brittle shell. The sweet spot is when the bars feel just warm to the touch.
The Secret of the Overhang
Using parchment paper with a generous overhang not only makes removal effortless but also prevents the bars from sticking to the pan, preserving those crisp edges. I once used a silicone mat and struggled to lift the bars without breaking them – a nightmare for any Halloween host.
Creative Twists and Variations
This recipe is a playground. Here are some of my favorite ways to switch things up:
Spooky Oreo Crunch
Fold in crushed Oreo cookies into the green‑marbled dough for a chocolate‑cookie surprise. The contrast between the dark chocolate bits and the green swirl feels like a haunted forest after a midnight storm.
Pumpkin Spice Surprise
Add a teaspoon of pumpkin spice to the flour mixture and replace the green coloring with orange. The warm spices pair perfectly with the almond extract, creating a fall‑friendly twist that still feels Halloween‑ready.
White Chocolate Drizzle
Melt white chocolate and drizzle it over the glazed bars after they’ve set. The ivory ribbons look like spider silk glistening in moonlight, adding a sweet, buttery layer that kids adore.
Nutty Peanut Butter Swirl
Mix a tablespoon of creamy peanut butter into half of the black dough before spreading. The nutty undertone balances the sweetness and gives a surprise burst of flavor with every bite.
Vegan Version
Swap butter for coconut oil, use a flax egg (1 tbsp ground flaxseed + 3 tbsp water), and replace milk with almond milk. The texture remains wonderfully tender, and the flavors stay true to the original.
Storing and Bringing It Back to Life
Fridge Storage
Place the bars in an airtight container and store them in the refrigerator for up to five days. The cool environment keeps the glaze from becoming sticky, and the cookies stay soft yet firm. If you notice the bars drying out, place a damp paper towel over the top before sealing.
Freezer Friendly
Wrap the entire slab tightly in plastic wrap, then add a foil layer before placing it in a freezer‑safe bag. They’ll stay fresh for up to three months. When you’re ready to serve, thaw at room temperature for 30 minutes, then give them a quick 2‑minute bake at 300°F to revive the crisp edges.
Best Reheating Method
To bring the bars back to life, preheat your oven to 325°F, place the bars on a parchment‑lined sheet, and heat for 5‑7 minutes. Add a tiny splash of milk (about a teaspoon) around the edges before reheating; the steam will melt the glaze back to its original shine, making each bite feel freshly baked.